What is a synthesizer? How does it make a sound? Synthesis for beginners
Synthesizers have evolved to become power house machines in professional and home music production studios.
While electronic music makes extensive use of synthesizers, they have crept into other genres and even made whole new ones.
But how do synthesizers make a sound? And how can you harness that technology and make your own sounds? In truth, there are a number of types of synthesis which we’ll show later on.
We’re discussing the common components you’ll find on all synthesizers. In this synthesizer tutorial. Once you’ve finished reading, you’ll be clued up on all things synthesis & sound design.
In addition to the rising trend of sampling, synthesizers are a huge component of music production. So, how do synthesizers work?
- What is a synthesizer?
- How do synthesizers work?
- Signal oscillators
- ADSR amplitude envelopes
- What is an LFO?
- Synth filters
- Polyphonic vs monophonic synths
Okay, what is a synthesizer?
A synthesizer is a musical instrument that you can use to design your own sounds. Analog synthesizers utilize electrical current to generate sound while digital and software synthesizers use binary code, algorithms, and Digital Signal Processing (DSP).
Synthesizers are called so because we use them to synthesize (create) sounds. And different methods of synthesis utilize different strategies of sound design, and some like granular synthesis require a specific type of synth.
With that said, all synthesizers share common modules & parameters which you can use to create a new sound from an audio signal.
Aside from the many knobs, ports, and cables, the majority of synthesizers utilize a keyboard that makes it much easier to play your sounds. As a result, you can interact with your sounds across multiple octaves and see where it sounds best.
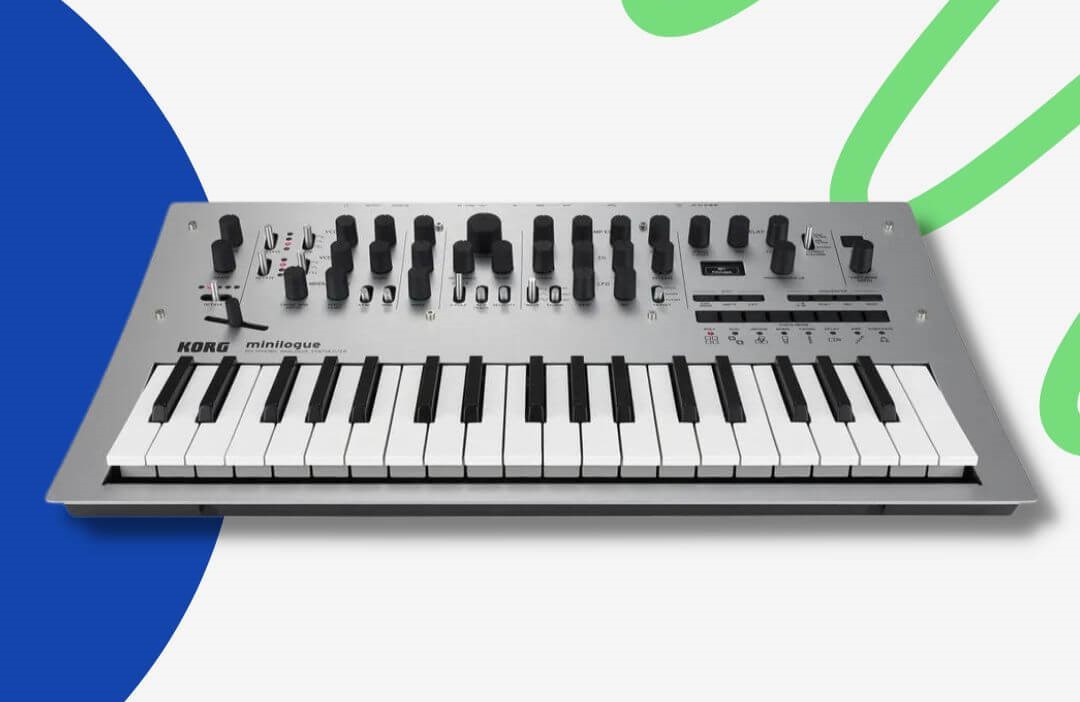
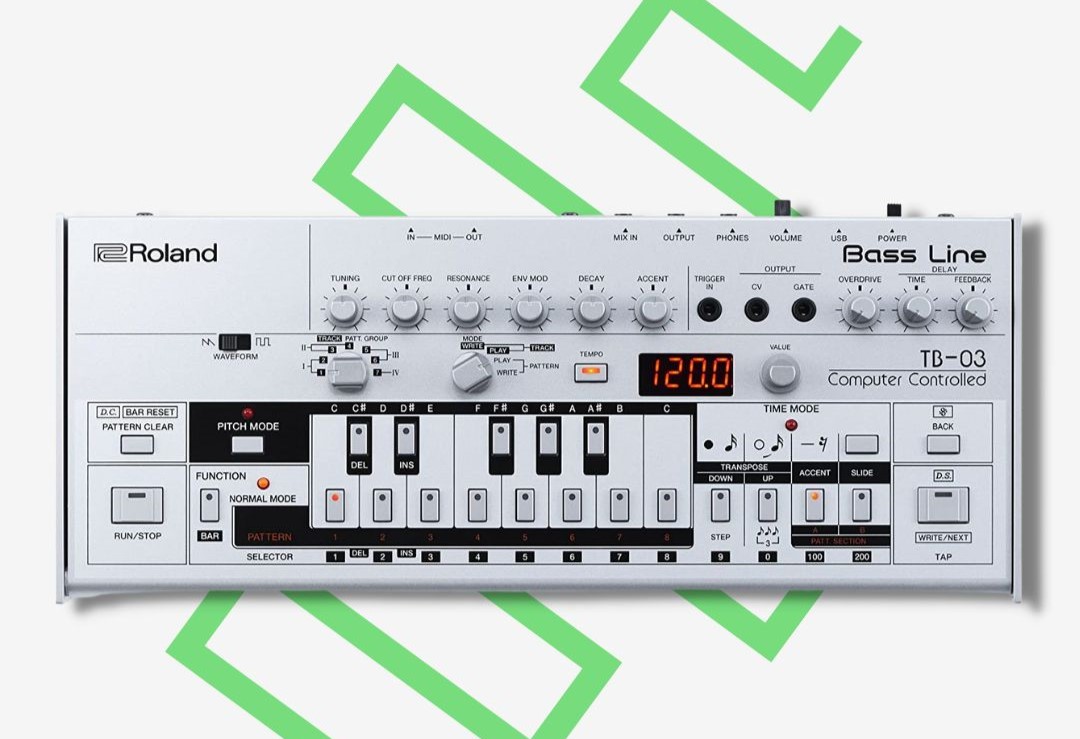
In fact, by Googling “hardware synthesizer” you’ll get a tonne of results with keyboard synthesizers. For instance, you’ll find keyboards on some more basic synthesizers like the Korg Minilogue…
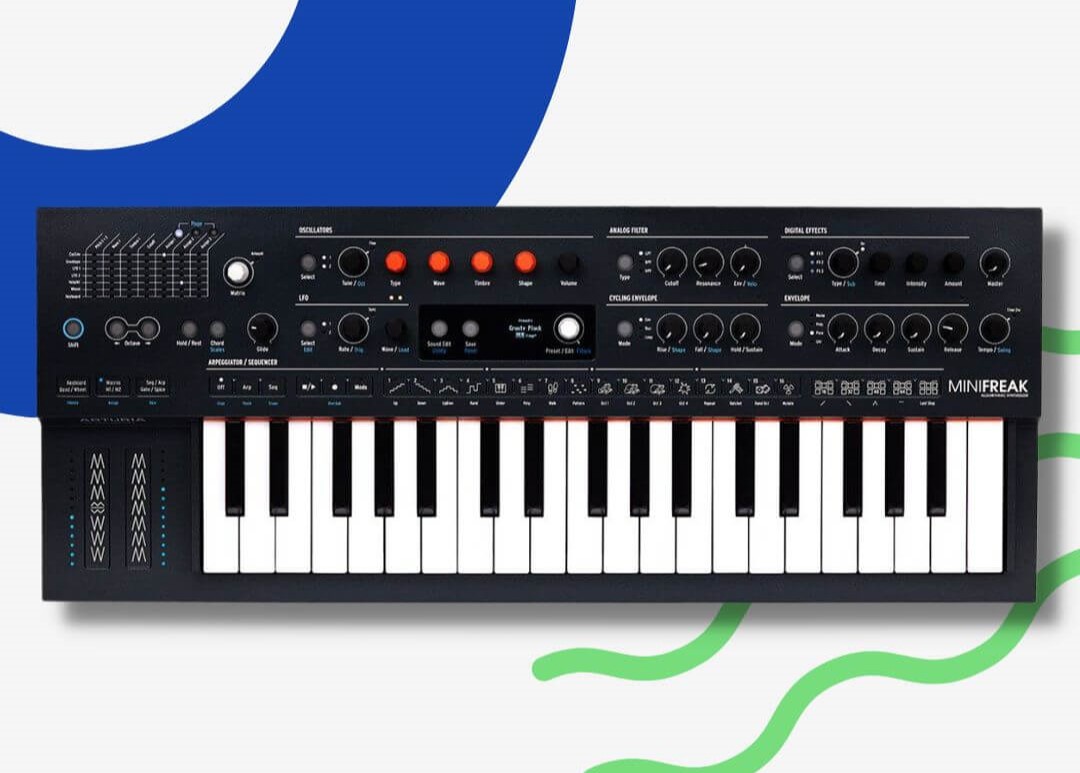
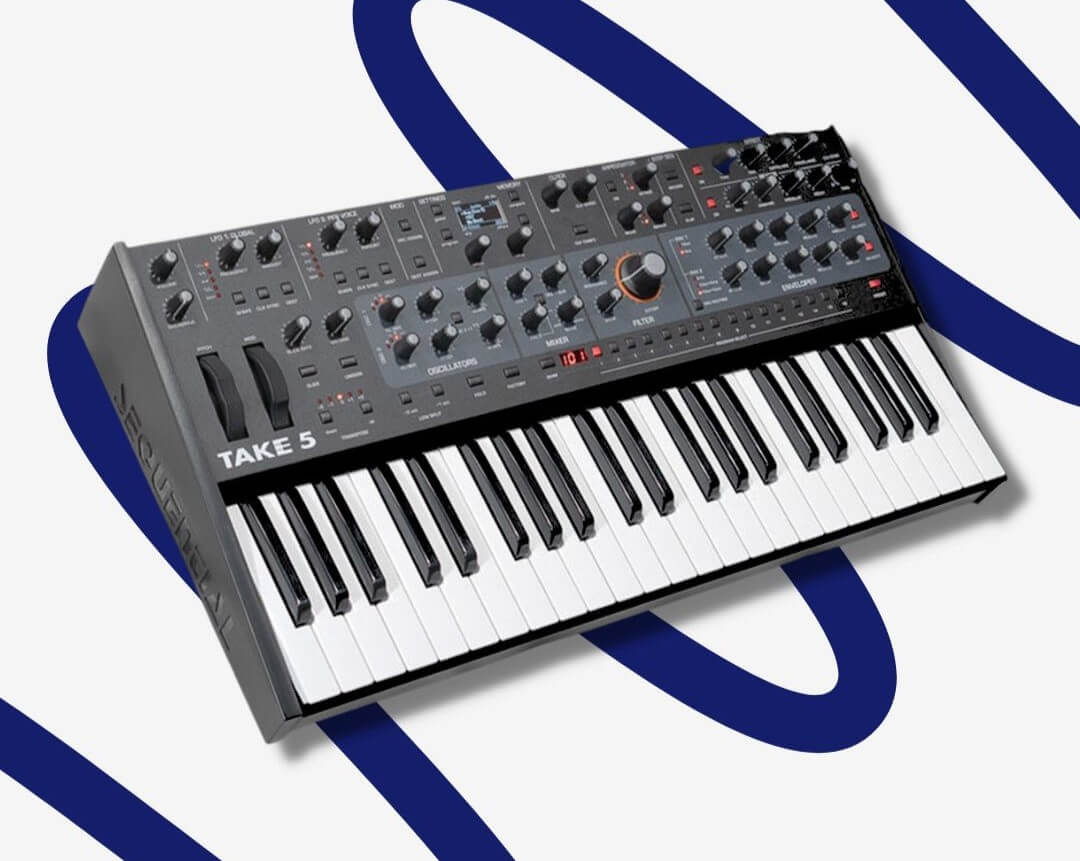
And you’ll find keyboards on more advanced synthesizers like the Novation Summit or the Arturia MiniFreak. As a result, keyboard synthesizers make playing your sounds far easier you don’t need to get too technical to have fun!
But how do you interact with a synthesizer that doesn’t have a keyboard?
Controlling synthesizers with a MIDI keyboard controller
Thankfully, many synthesizers utilize 5-DIN MIDI ports. In short, DIN MIDI ports allow you to connect multiple pieces of electronic music gear into one signal chain!
As a result, you can connect a DIN MIDI-enabled synth to a MIDI keyboard controller and play your sounds that way!
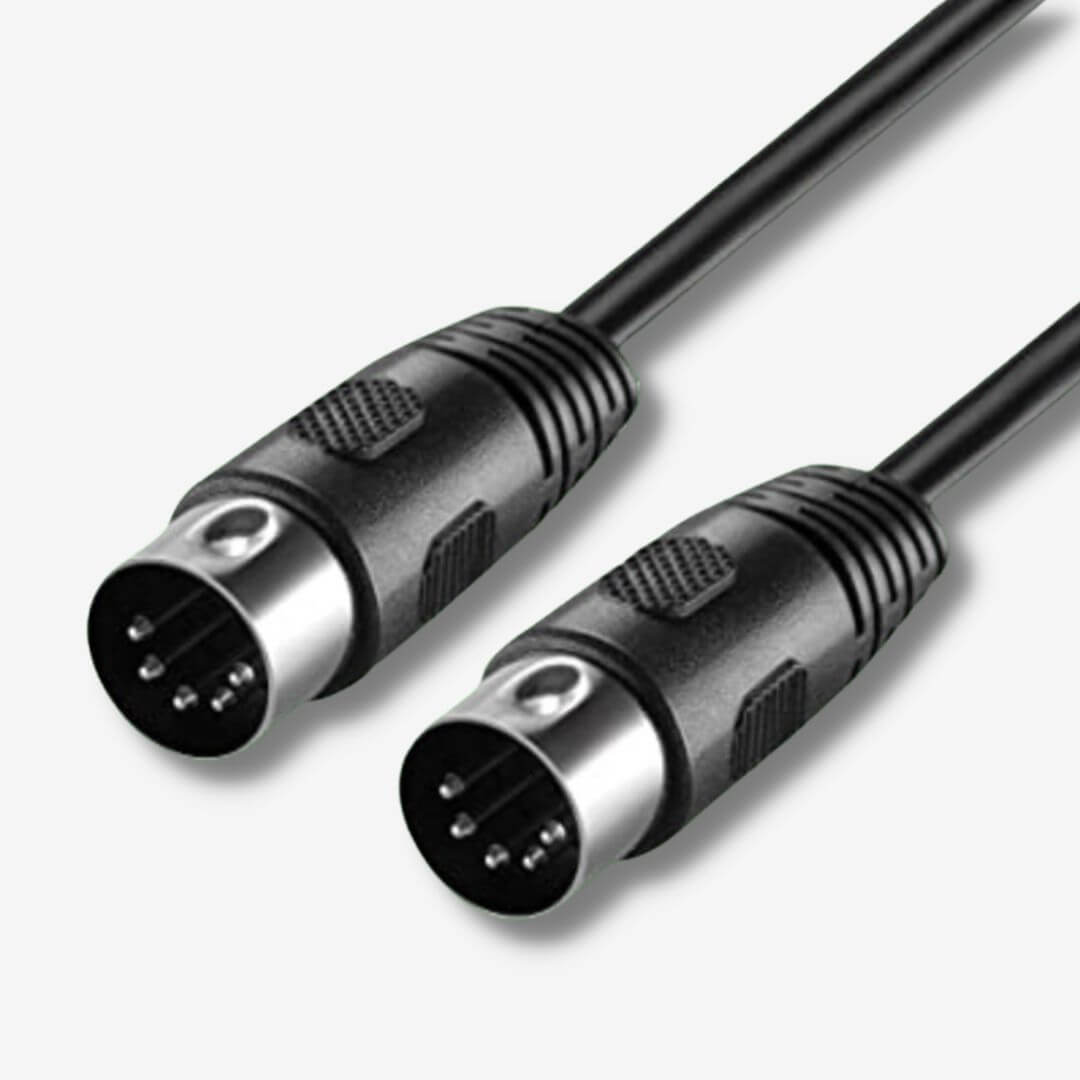
Unfortunately, not all MIDI keyboard controls utilize ports though – especially entry-level keyboards. So if you’re buying a synth with no key bed, make sure you get a MIDI keyboard controller with DIN MIDI ports if you want to play your sounds across a keyboard.
How do software synthesizers work?
Software synthesizers (soft synths) are computer software programs that use binary code and algorithms to generate sound. Soft synths rely on the CPU and RAM of a computer to function, and they’re fantastic options for anyone looking to start making their own sounds.
Thanks to this digital revolution, you can download software emulations of vintage hardware like the Oberheim OB-X in addition to new synth products!
Furthermore, Serum by Xfer Records is probably the most recognizable software synthesizer. This wavetable synthesizer has been the go-to soft synth for many electronic music producers for years.
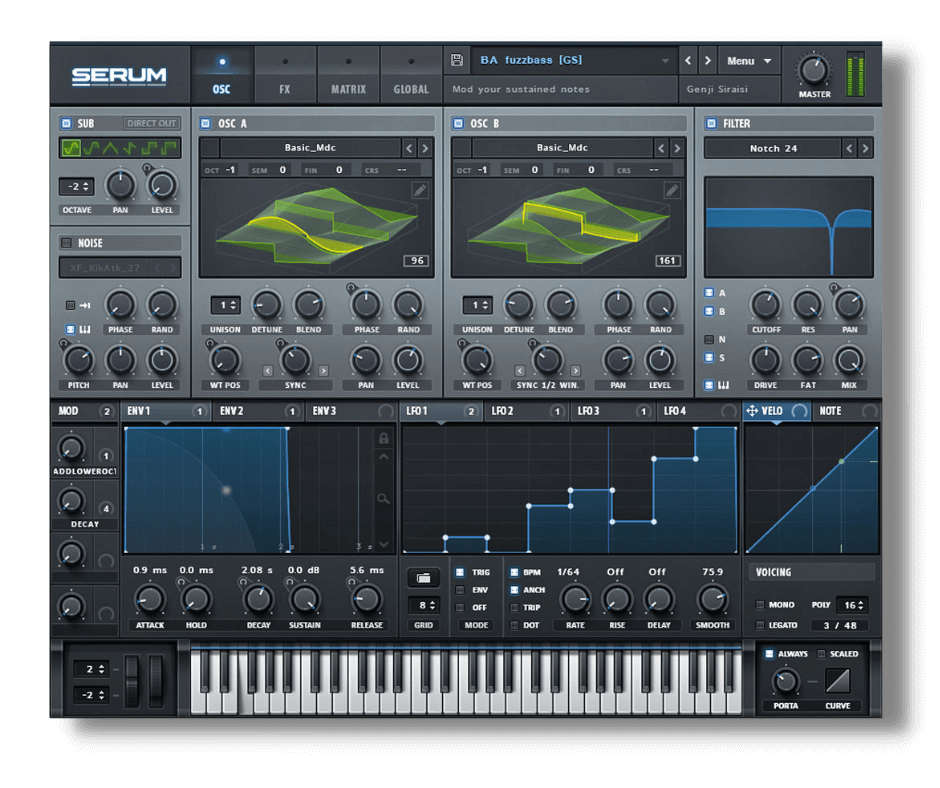
That’s because soft synths like Serum are more accessible than hardware synths. The price tag is so much smaller, and some software synths are free!
In fact, I’m using a free synthesizer for the purpose of demonstrating different synth modules in this article! I’m using Vital – it’s a fantastic software synthesizer that gives Serum a serious run for its money.
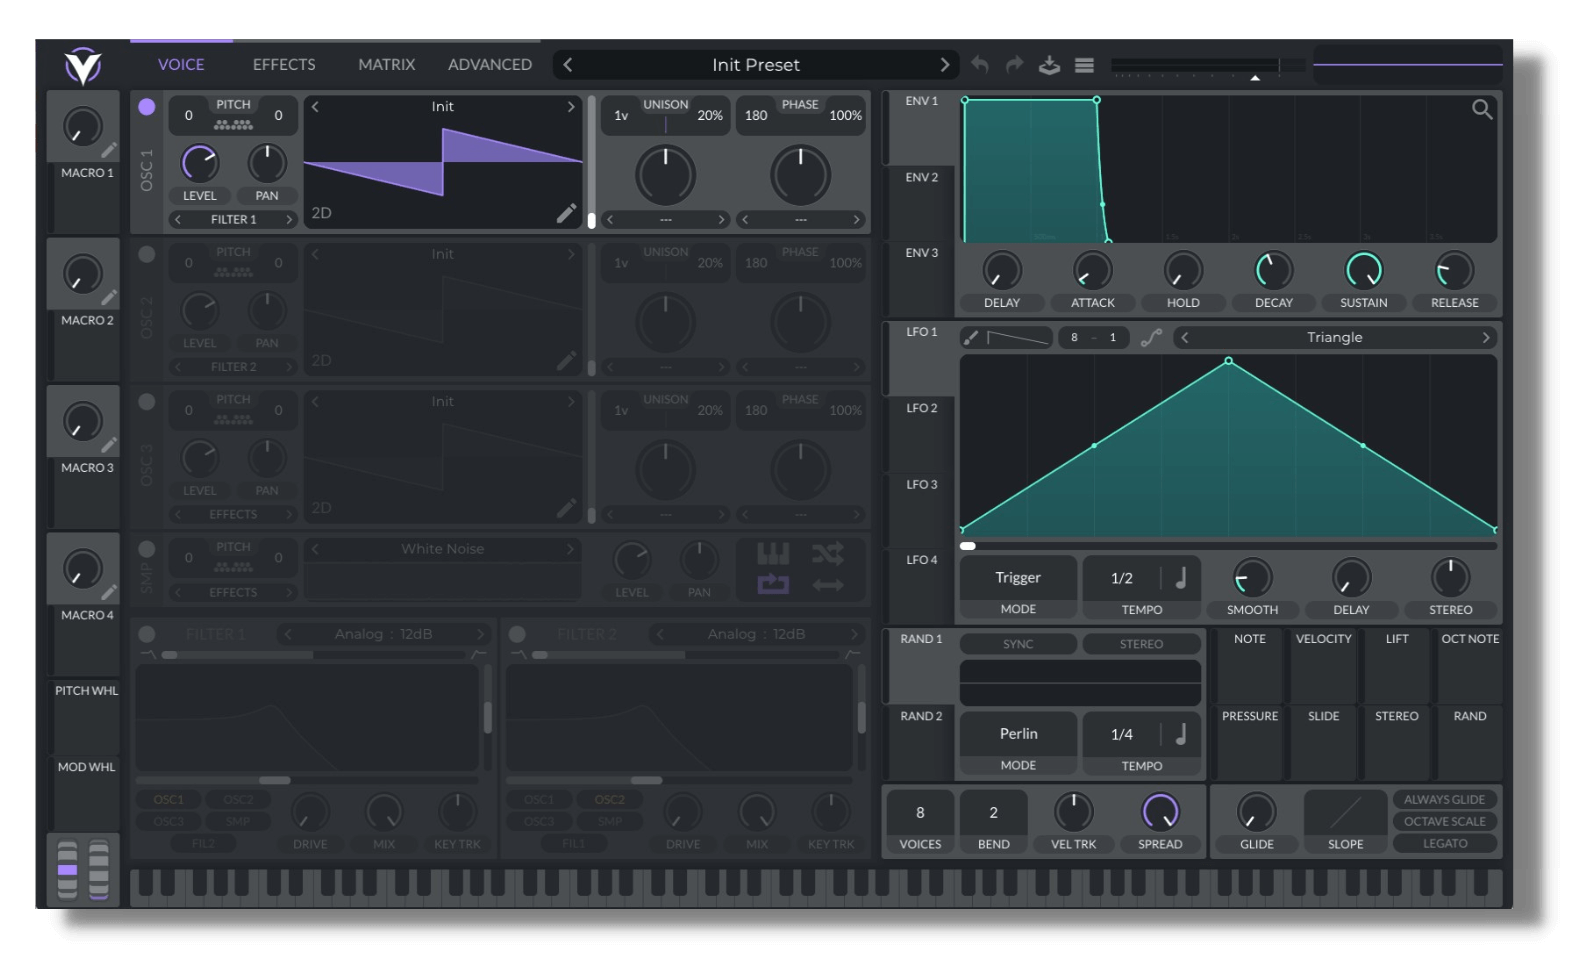
I strongly recommend downloading this synthesizer right now via its free tier below. It’s not essential, of course, but it’s a great soft synth for easily creating simple or complex sounds. It’s available as a VST and AU plugin, so download it now!
What are the different types of synthesis?
There are a total of 6 methods of synthesis commonly used in music production today:
- Subtractive synthesis
Subtractive synthesis is the process of removing frequencies from an original signal via filtering to sculpt a new sound. - Additive synthesis
Additive synthesis is all about stacking multiple sine waves together at different frequencies and amplitudes to build a sound. - FM synthesis
Frequency modulation is a method of synthesis whereby the frequency of one signal is modulated by the frequency of another. - Wavetable synthesis
Wavetable synthesis converts a waveform into a morphable “wavetable”, and the wavetable is made up of many “subtables” which oscillate like a regular waveform signal. Then you can modulate the wavetables in numerous ways.
Both VItal & Serum are wavetable synthesizers! - Granular synthesis
Granular synthesis goes one step further than wavetable synthesis – it cuts a waveform into tiny segments of audio (granules) that you can modulate. - Modular synthesis
Instead of buying an all-in-one standalone synth, you could buy synthesizer modules and design your own modular synth!
While these synthesis techniques differ massively, they all utilize the same synthesizer modules albeit in different ways.
So how do synthesizers work?
Analog, digital, and software synthesizers may differ in shape and size but they always utilize some main modules. These include:
- Oscillators
- ADSR envelopes
- LFOs
- Filters
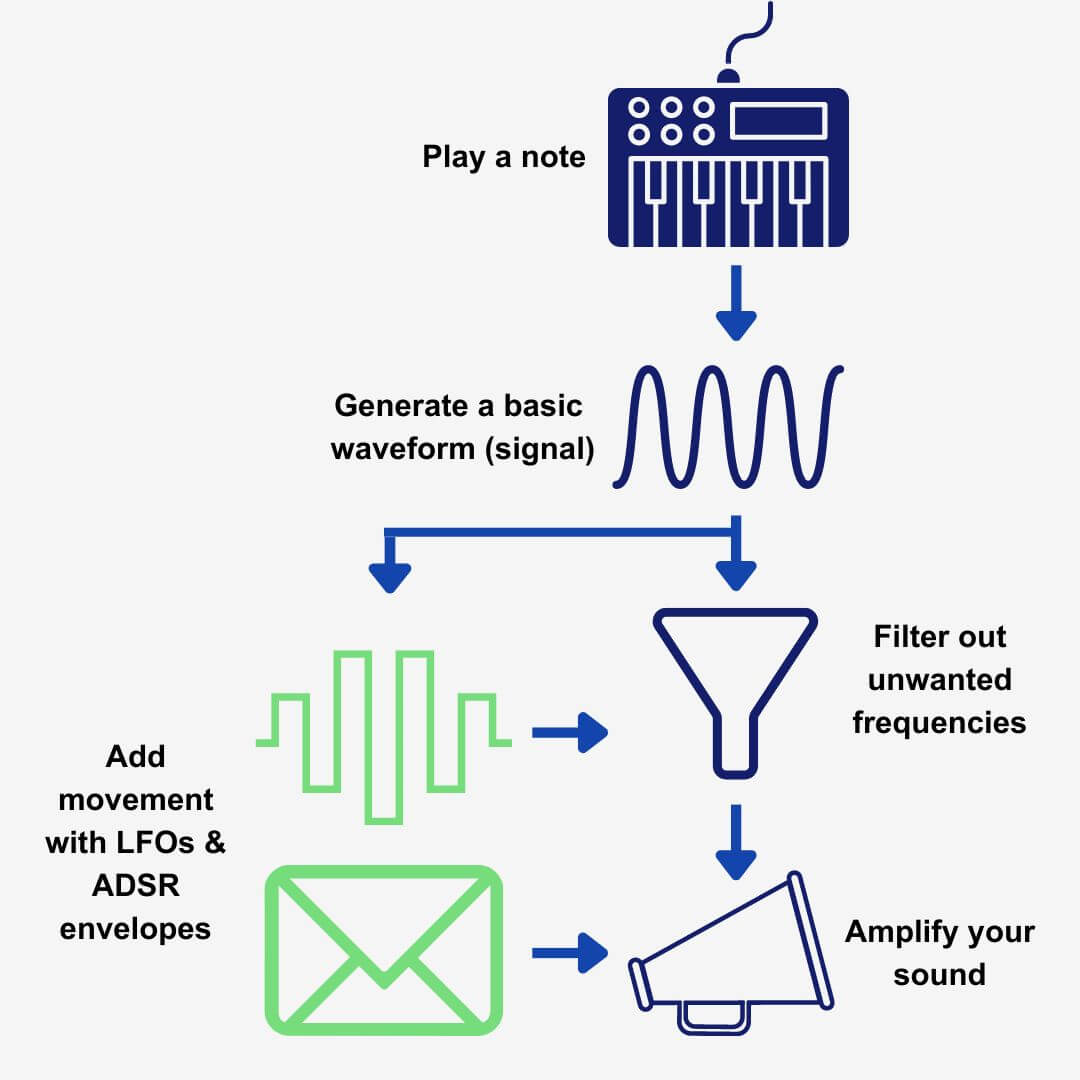
A signal oscillator generates a signal with a consistent tone, and many synths have multiple oscillators that you can stack on top of one another for a bigger sound.
Then, you can use LFOs and envelopes to modulate a plethora of parameters. For example, you can modulate the pitch of the oscillators with an envelope while modulating its phase with an LFO. It would take me a while to list every parameter you can modulate with LFOs and envelopes, but you get the idea.
And synths always offer at least one filter. As a result, you can filter out unwanted frequencies from your sound. And you can apply an envelope or LFO to the filters to create even more movement!
Though different synthesizers function a little differently for different types of synthesis, all use these modules to generate and manipulate sound.
Signal oscillators: how synthesizers make sound
An oscillator generates a waveform that cycles between its positive and negative amplitudes (signal strengths) extremely quickly. And each time the waveform oscillates between its positive and negative amplitudes it completes one cycle.
Think of an oscillator as a guitar string if that’s a little too much jargon. In practice, oscillating signals cycle between positive and negative amplitude values just as guitar strings vibrate back and forth once plucked.
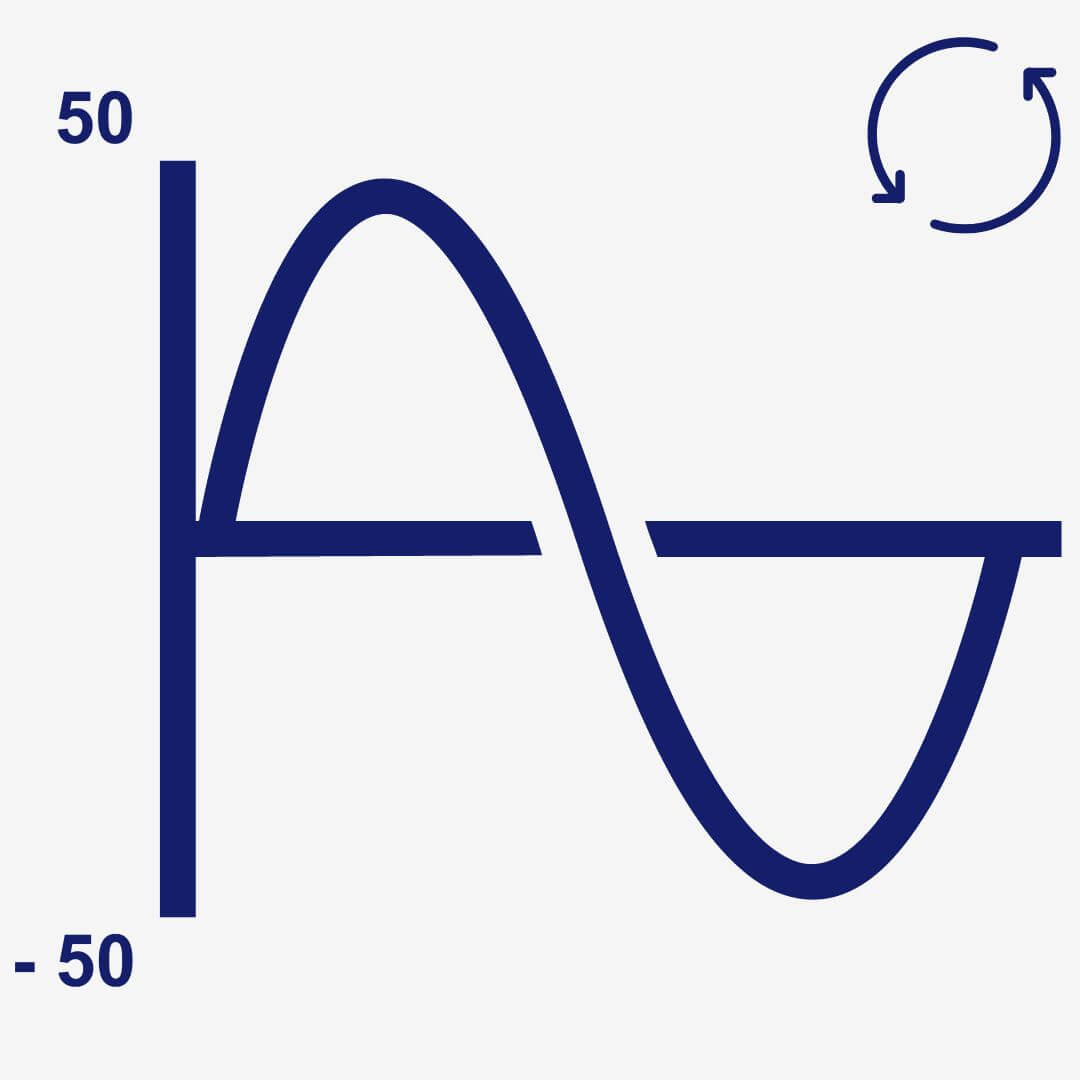
As the signal oscillates you’ll hear the sound of the waveform loaded into the oscillator. One cycle of the waveform would be too quick to be audible, so the waveform oscillates repeatedly so you hear a constant tone.
As a result, the oscillating signal is the full sound of a waveform with all of its natural characteristics like its dynamic range and harmonics.
How a synth oscillator makes different tones
Furthermore, there are four common oscillator waveforms which we’ll cover in detail shortly. Each has a different shape, so each oscillates between its minimum and maximum amplitudes differently.
As a result, the shape of these oscillating waveforms goes a long way in determining the tone of your final sound.

If that wasn’t enough, the minimum and maximum amplitude values change depending on the oscillating waveform too!
However, our ears can only hear oscillation cycles between 20 – 20,000 per second because 20 Hz – 20 kHz is the range of human hearing. In other words, a lower rate of oscillation means the pitch of the waveform will be lower.
So the oscillation rate determines the frequency of the waveform while its shape determines the tone. For instance, pressing the E note in the 4th octave and gradually moving up the E major scale increases the oscillation rate with each successive note.
But doing so with a square wave oscillator just wouldn’t sound as bright as a sawtooth oscillator would…
The common oscillator waveforms
There are four main types of oscillator waveforms that synthesizers use. These are:
- Sine wave
- Sawtooth wave
- Square wave
- Triangle wave
Sine wave
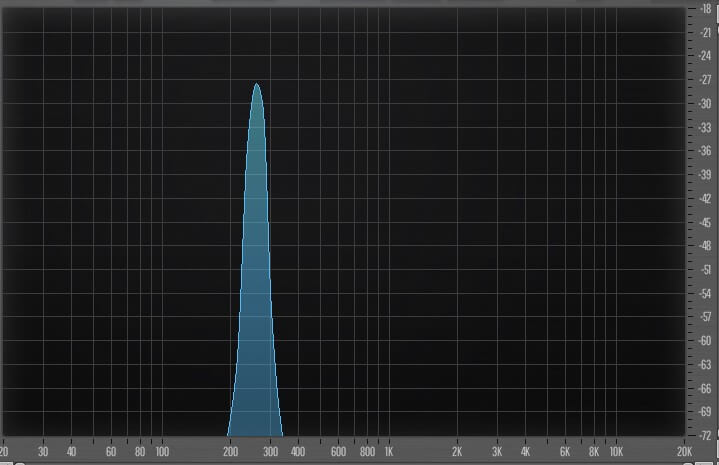
A sine wave is a pure tone, meaning it’s a waveform with no additional harmonics

The edges of a sine wave are smooth with no jagged corners. Consequently, sine waves offer a smooth and pretty mellow tone that you can use to emulate the sound of tube instruments like flutes or create pads and basses too.
Sawtooth wave
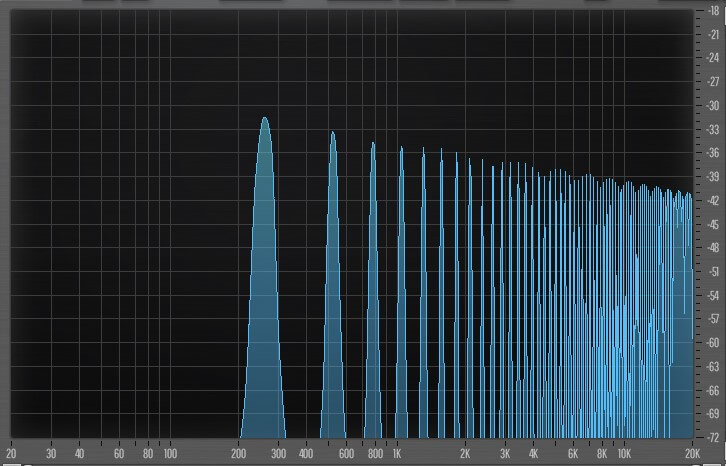
From one extreme to another – the sawtooth waveform is the most harmonic oscillator.

A sawtooth wave is named so because it looks like the teeth on a chainsaw. They have a pleasant buzz sound as a result – the strongest buzz of all the common oscillators, in fact. And this is why they’re great for creating strong leads.
The additional harmonics of sawtooth waveforms sit at even intervals, and they get progressively quieter at each interval. If the fundamental frequency is 200 Hz, the harmonics sit at 400 Hz, 600 Hz, and so on.
Square wave
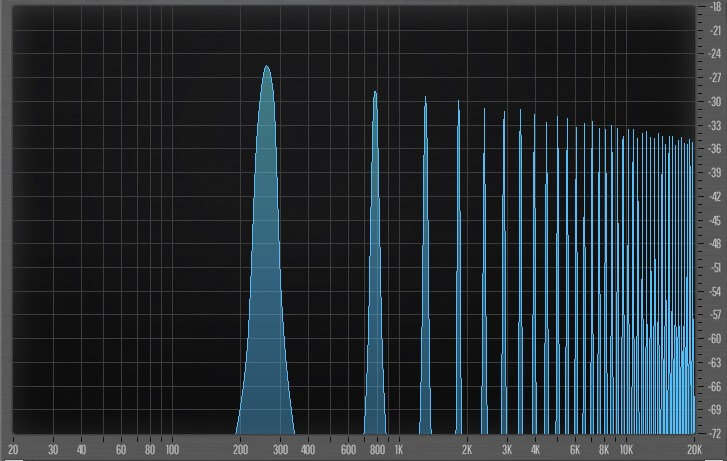
Square waves are also rich in harmonics with a pleasant buzzy sound. Though they’re not as bright as a sawtooth, they’re certainly not as mellow as a sine wave either.

Looking at their dramatic shape, you can see the sudden drop from positive to negative in amplitude. Square waves earn themselves the name “pulse waves“ because they fluctuate between their positive and negative amplitudes so suddenly.
They’re unique waveforms because their harmonics repeat at every second oscillation cycle too. And each harmonic interval is a third as low in amplitude as the previous interval too!
The harmonics of square waves sit at odd intervals. So a square wave at 100 Hz has harmonic intervals at 300 Hz, 500 Hz, and 700 Hz, etc. Moreover, each harmonic decreases in amplitude at different rates, thus affecting the wave shape differently each time.
Square wave oscillators are great for creating ghost notes, 8-bit sounds arpeggios, and even wind instruments thanks to their hollow sound.
Triangle wave
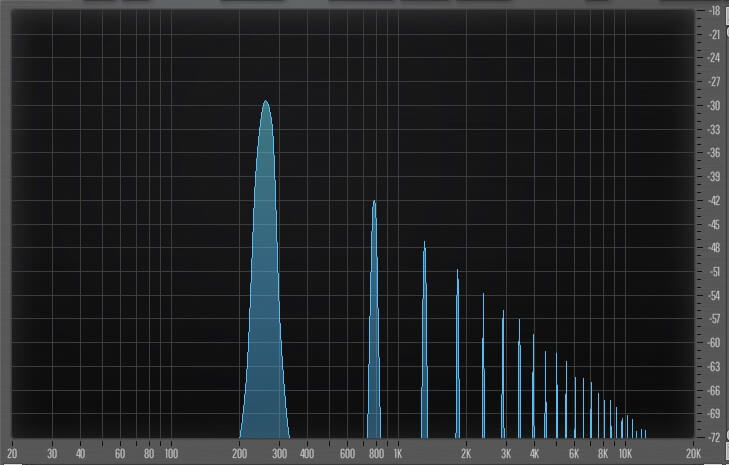
Finally, we have triangle waveforms.
In terms of harmonics, they sit somewhere between square and sine waves
Their harmonics sit at odd multiples above fundamental but their harmonic amplitudes drop off dramatically faster than those of square waves!

Therefore, the triangle waveform isn’t as buzzy as a square wave but they’re not as smooth as a sine wave either. They sound much clearer than square waves and much brighter than sine waves, and that’s why they’re great for creating “breathy” sounds like ghost notes, pads, and so on.
Yes, but what exactly are harmonics?
No natural sound or instrument has as pure a tone as a sine wave.
For example, any musical note would sound the same whether it was produced by a piano, a guitar, or a saxophone if this were the case. So what gives each of these instruments its unique sound is the harmonic overtones that their build produces.
In practice, a hammer striking a tight piano string sounds different from the vibration of guitar strings resonating in its body, which also sounds different from how sound resonates in the brass housing of a saxophone.
Put simply, all instruments and sound sources produce a combination of overlapping waveforms based on their build. And this includes organic structures like the human throat!
These overlapping waveforms are called harmonic overtones, or just harmonics, and the tone of a sound depends on the source producing it.
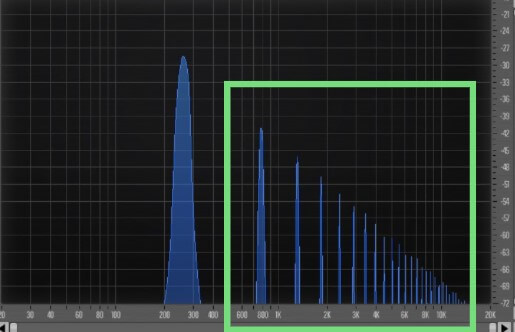
The example above presents the harmonics overtones of a triangle waveform where the fundamental is the note of C 3 (approximately 260 Hz).
The dominant frequency – the biggest spike on the left – is the fundamental note (frequency) of C 3. And every spike to the right (harmonic overtones) adds character and tone/timbre to the sound.
In summary, while the fundamental frequency is the pure tone of a sound, harmonic overtones are what make it unique.
Understanding ADSR amplitude envelopes
ADSR envelopes (Attack, Decay, Sustain, Release) let you modulate the amplitude of your sound and much more.
Giving your sound shape dictates how the sound will behave once you trigger it, so you’d manipulate the ADSR envelope based on the type of sound you want to make (pluck, pad, bass, drone, etc.).
Adding movement and shape to your signal in this way is possible via modulation – and ADSR envelopes are one type of modulation. As we have alluded to, you can add movement to more parameters than just the amplitude of the signal too.
Deconstructing the ADSR envelope
ADSR envelopes utilize four main parameters to control how the envelope behaves when triggered: Attack, Decay, Sustain, and Release
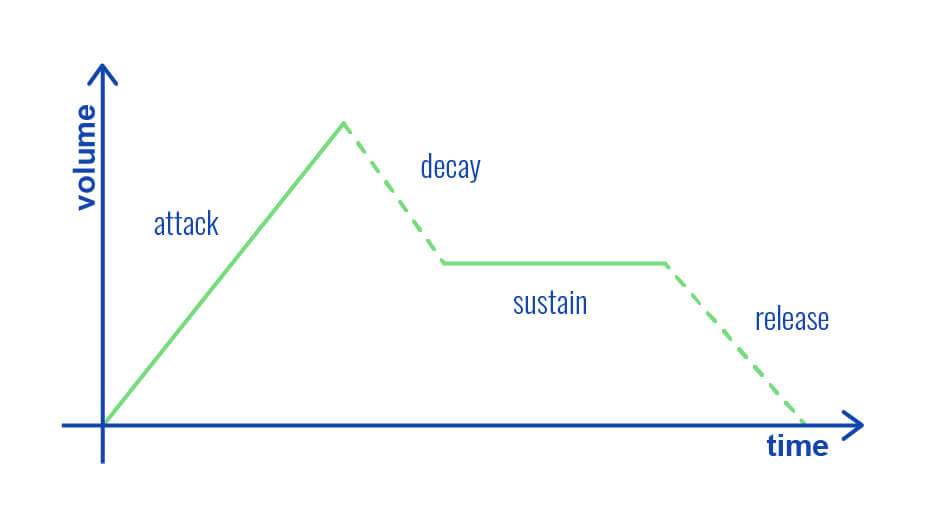
Attack
Attack is the first phase of the envelope and it determines the time your signal takes to reach its peak amplitude.
Different sounds require different attack settings. For example, bass sounds, drums, and heavy-hitting leads typically have extremely quick attack times. In contrast, a pad and other soft sounds have slower attack times.
Hold
Not found in all ADSR envelopes (that being why we don’t call them AHDSR envelopes) Hold maintains the peak amplitude after the attack phase.

In practice, the hold parameter is great for shaping long-sustaining sounds like pads and drones before even reaching for the sustain setting.
Additionally, a fast attack and a bit of hold allow for an impactful bass sound too. And once the Hold phrase ends, the amplitude begins to decay.
Decay
As the name suggests, Decay determines how subtle or abruptly the amplitude of the signal drops from its peak level over time before the sustain phase kicks in.
Utilizing this transition from attack to sustain means you can create intricate movement within your signal. While a sudden decay drop creates a pulsing motion, a gradual decay offers a gentle attenuation.
For example, you can create a pluck sound with a fast attack (with no hold) and a fast decay. Alternatively, you can create a softer sound with longer attack and decay settings.
Sustain
Sustain maintains the amplitude level that the signal reaches at the end of the decay phase.
Longer envelopes require you to hold a note down so it can complete its full cycle. And holding a note down for longer than the envelope lasts then the amplitude of the envelope will remain at the sustain level until you release the key.
So the sustain phrase begins at the amplitude point that your decay phrase ends. In addition to a bit of hold, pad sounds and other long sounds make use of a longer sustain time.

Release
Finally, Release lets you decide how long your sound takes to reach silence once you release the key. Put simply, a longer release time will give your signal a longer fade-out.
As we discussed earlier, many synths feature multiple ADSR envelopes that you can map to almost every parameter such as pitch, phase, frequency (oscillator rate), and so on for a multitude of results!
What is an LFO? The other modulation source
Low Frequency Oscillators (LFOs) and signal oscillators aren’t really that different. They both oscillate in the same manner, but an LFO – as the name suggests – oscillates a lot slower. So slow, in fact, that you can hear the oscillation.
“Low frequency” is described as somewhere below the threshold of human hearing which is 20 Hz (20 cycles per second). In short, LFOs are repeating waveforms that oscillate at slower rates and apply modulation to a parameter rather than output a signal.
Like envelopes, LFOs can modulate almost any synth parameter. But in contrast to envelopes which cycle through only once, LFOs repeat their cycles.
The one and only job of an LFO is to transition between its minimum and maximum amplitude values while modulating parameters as a result. And the best part is you have full control over how fast this cycle happens!
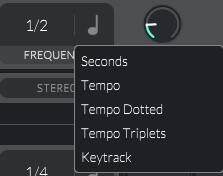
Determining LFO rate
LFO rate determines the speed (or rate) of oscillation. While signal oscillators oscillate at least 20 times per second, LFOs can oscillate just once over the course of five minutes!
But the speed of an LFO is relative to the length of musical bars. Here is a list of standard oscillator rates that you will find when you use an oscillator:
2/1 – 8 beats (2 bars)
1/1 – 4 beats (1 bar)
1/2 – 2 beats (half a bar)
1/4 – 1 beat (a quarter of a bar)
1/8 – half of a beat (an eighth of a bar)
1/16 – a quarter of a beat (a sixteenth of a bar)
The number on the left of the ratio shows how many bars one cycle of the LFO will play out for while the figure on the right shows how many times the LFO will repeat in a bar.
In practice, you can set your LFO to oscillate either once or up to sixty four times in a bar. Alternatively, you can set it to oscillate once across two bars, three, four, and so on.
Moreover, you can synchronize the speed of your LFO with the tempo of your project before using the “LFO Rate” control to adjust its speed.
Ultimately, the rate of oscillation that you use will depend on the type of movement you want for your sound. A softer sound calls for a lower rate while an aggressive sound will utilize a faster one.
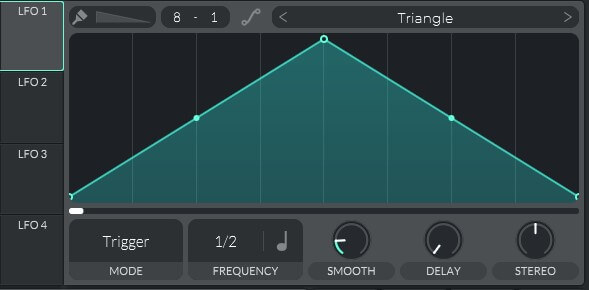
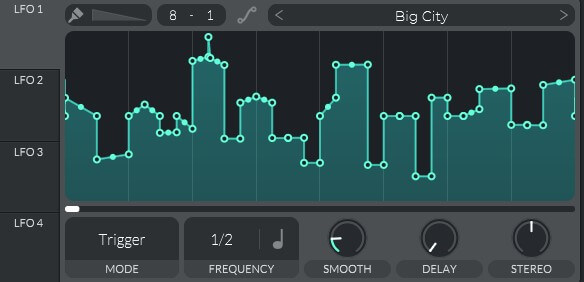
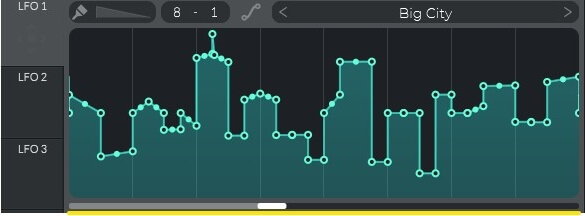
Switching up LFO waveforms
LFO waveforms constantly repeat by default. How fast they repeat depends on the rate, but the shape of the movement is set by the LFO waveform. Like ADSR envelopes, the shape of the L:FO wave dictaes how the LFO will modulate a parameter.
The most common waveforms are sine, triangle, sawtooth, and square just like signal oscillators. But digital and many software synthesizers like Serum and Vital offer a lot more hybrid LFO wave shapes!
As a result, you can create sounds with a lot of complex movement occurring across numerous settings.
Controlling the intensity of your LFO
You can control how much impact your LFO has on the parameters it’s mapped to too. After all, once you’ve set your rate and LFO waveform you may find your LFO is applying too much modulation.
And this is why intensity control – otherwise known as Amount or Smooth – is a very handy tool. As you may have guessed, this parameter gives you control over whether the LFO applies dramatic or subtle modulation.
Some synth LFOs even have a built-in envelope too. These inner envelopes allow you to add even more shape and character by modulating LFO parameters like the delay and decay times.
LFO modes explained
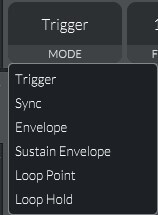
Some synthesizers, especially software synths, let you change the behavior of LFOs with different modes that adjust how they behave. The three common modes you’ll find are:
Trigger: LFO begins its cycle when you play a note, stops when you release the note, and re-triggers when you press another note.
Sync: Synchronises the LFO to your DAW tempo, and the modulation stops when you release a key and starts in the same place when you press another.
Envelope: The LFO will behave as an ADSR envelope where the modulation cycle only occurs once when you press a note.
Meanwhile, Loop Point & Loop Hold present two different looping options.
Loop Point tells the LFO to restart its cycle from a specified point – rather than the beginning of its cycle – after its first cycle.
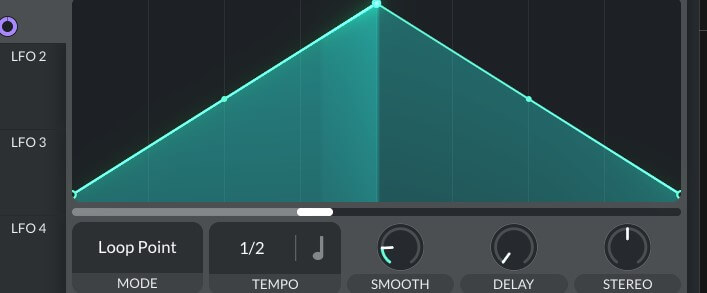
Loop Hold, on the other hand, will loop the LFO cycle up until a specified point and won’t go any further in the cycle. So it’ll begin at the start of the modulation cycle and restart its cycle when it reaches the loop point you set.
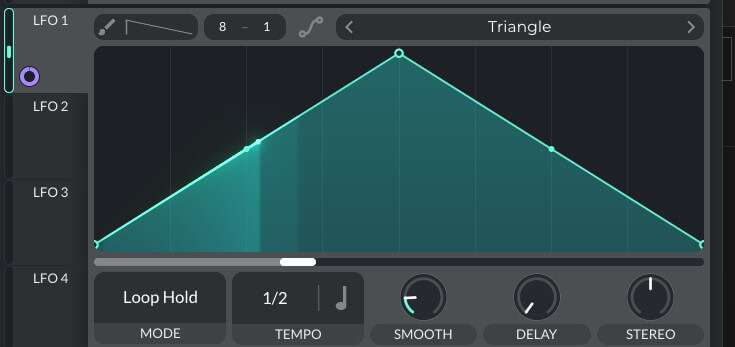
In Vital, you can set your loop point and loop hold timestamps with the phase offset bar we have highlighted below.
Take note that when in Trigger mode the phase offset bar tells the LFO where in the LFO to begin the modulation cycle each time you trigger the LFO.
Polyphonic and monophonic LFOs
Some LFOs even offer polyphonic LFOs as opposed to monophonic LFOs.
A monophonic LFO means that every note is sent to the same LFO while a polyphonic LFO means that each note has its own LFO. In short, polyphonic LFOs make it possible to trigger multiple LFOs at one time.
Synth filters explained
The final synth parameter we’ll look at is a tool for both cleaning up and applying more movement to your sound.
Synth filters let you cut frequencies out from your sound. Though you can clean a sound up with filters, you can modulate the cut-off frequency and even the shape of the filter and add serious movement to your sound too.
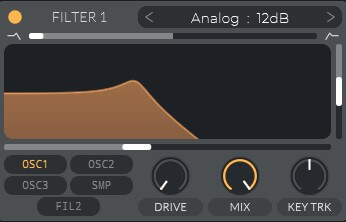
The shape of a filter curve (its slope) defines how abruptly any frequencies not in the “pass” band (in orange) will be filtered out.
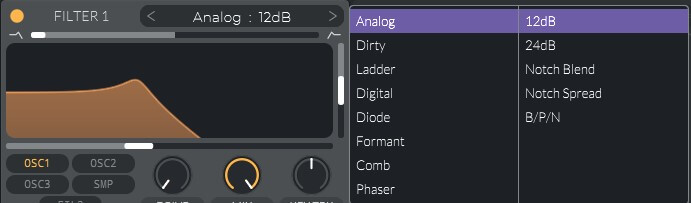
The standard slopes you’ll see on most filters are 6dB, 12dB, 18dB, and 24dB. These figures represent how much attenuation occurs per octave to any frequencies that aren’t in the pass band.
If you were to apply an 18dB high pass filter to your sound while playing the note of F5, frequencies in the octave below (F4) are attenuated by 18dB while frequencies an octave below that (F3) are attenuated by 36dB, and so on.
In short, filters attenuate by multiples with each octave. A 12dB low pass filter on F5 attenuates the next octave (F6) by 12dB, F7 by 24 dB, F8 by 36dB, etc.
Synth filters are a tool for refining your sound. In practice, we use them to get rid of harsh or muddy frequencies and polish our signal while using them to accentuate movement.
Filter parameters
Filters are made up of three main controls: frequency cut off, resonance, and filter slope.
Cut off
Cut off determines the target/center frequency around which your filter works around. However, you may find that some frequencies refer to cutoff as “frequency”.
Resonance
Resonance is a level of emphasis you can apply to the frequencies around your target frequency.
Slope
Slope sets the steepness of your filter type. A steeper slope applies more abrupt filtering while a gentle slope applies more gradual filtering.
Filter types
Different sounds occupy different spaces in the frequency spectrum and so require different filters. The most common filter types are:
- High pass
- Low pass
- Band cut
- Bandpass
- Notch filters
- Comb filters
High pass (low cut) filters
A high pass filter removes frequency groups in the low end of your sound.
If you had your cutoff set to 500 Hz, any frequencies below the cutoff are cut. As you shift the cutoff up or down, the filter will cut more or fewer frequencies respectively.

A high-pass filter is great for cleaning up any muddiness in your low end. For example, a sound with unnecessary frequency content below 100 Hz can be cleaned up with a high pass filter.
Low pass (high cut) filters
In contrast, a low pass filter cuts any frequencies above your cutoff point. A high pass and low pass filter work in exactly the same way, just at opposite ends of the scale.

As the opposite of a high pass filter, a low pass filter cleans up any signals with harmonic content in the high end.
Band cut filters
A band-cut filter filters out a specific group of frequencies between two frequency points. Removing some body from a pad can make room for more instruments, and a band cut filter will do the trick.

Best used on background elements like pads, a band cut filter can create a lot of space in a mix with instruments that are overpowering.
As well as clearing space, band-cut filters are fantastic for creating movement. For instance, you can automate the cut-off points over time if you want your pad to be more prominent in some phrases than others.
Bandpass filters
Bandpass filters work in the exact opposite way to a band-cut filter.

A bandpass filter allows you to define a frequency range and cut all frequencies around that band. However, you’re more likely to use a bandpass filter on a live recording or even a sample rather than a synth.
Notch filters
Next, we have notch filters. A notch filter is exactly the same as a band cut filter, but it cuts a much smaller group of frequencies with a far narrower bandwidth.

Notch filters are fantastic post-processing tools for removing specific frequencies from a sound. You can use these to tidy up any sound you can think of – especially complex sounds with lots going on.
If there’s a nasty resonant frequency or a frequency band that’s not hitting that sweet spot then a notch filter can simply get rid of it.
Comb filter
Finally, we have comb filters. These are essentially a series of notch filters, and the name derives from the final shape of a chain of notch filters that looks like the teeth on a comb.
Comb filters are commonly associated with flangers, and they’re a great effect when looking to add a level of aggressive harshness to any sound.

Comb filtering occurs naturally when duplicates of the same sound reach your ears or a microphone with a tiny bit of delay in between their arrival times. In fact, this delay can be up to 15ms–20ms! But if the delay breaches this threshold our ears perceive the following sound as an echo or delayed signal.
Some frequencies cancel each other out while others emphasize one another. What frequencies are affected depends on the amount of delay there is, but it’s this frequency cutting and boosting that give this filter type its comb look.
Polyphonic vs monophonic synths
Okay, now you know about the main modules and controls you’ll find on a synthesizer. To finish the article off, we should talk about the two common types of synthesizers: monophonic and polyphonic synthesizers.
What is a monophonic synthesizer?
Monophonic synths output only one “voice” at a time, meaning you can only play one note at a time. In other words, pressing a note cuts the previous note off.
Monophonic synthesizers are fantastic for creating sounds that sit in the center of the stereo image like bass, percussion, and drum sounds. But they’re by no means limited to these types of sounds!
A monophonic synth sound packs a powerful character that is hard to replicate on a polyphonic instrument. This is why monophonic synths are very desirable for creating bass sounds.
Synthesizers were largely the same when they first hit the market. Analog circuitry and control voltages powered them all because it was pretty expensive to build hardware capable of routing multiple voices through its signal chain.
And that’s why the explosion of polyphonic synths owes its thanks to the age of digital audio! Digital and software synthesizers don’t require complicated circuitry – just streamlined binary code and chipboards!
What is a polyphonic synthesizer?
In short, polyphonic synths have multiple voices so you can play more than one note at once. Therefore, monophonic and polyphonic synthesizers present two different playing styles.
You can only press one note at a time with a monophonic synthesizer while you can play a polyphonic synthesizer as you would a keyboard. However, many digital synths actually utilize both monophonic and polyphonic modes.
Anyway, polyphonic synthesizers are great for pad sounds, synth chords, melodies, and aggressive leads too!
Final thoughts
Thanks to digital audio, the synthesizer has evolved to become a staple instrument in home and professional music production studios. Software synthesizers allow anyone with a taste for sound design to get started, and the hardware synths of today have a lot more capabilities than early analog synths.
Now you know how synthesizers make sound, and you should be feeling confident in how to use a synthesizer yourself.
Common synthesizer terms
Now that we’ve explored everything synthesizer, here’s a big list of synthesizer terminology just for you!
ADSR: Attack, decay, sustain, and release.
Amplitude: The volume of a waveform which is the height of a waveform represented on an oscilloscope (click here in case you don’t know what that is).
Analog: An analog circuit is an electronic circuit that uses a continuously variable signal. The term “analog” describes the proportional relationship between a signal and a voltage/current that represents the signal.
Arpeggiator: Arpeggios are broken chords – where the notes of the chord are broken up and played in sequence. A broken C Major chord would entail the notes of C, E and G played in sequence – like strumming out each string on each guitar string in sequence rather than one quick flourish.
Attack: How long it takes for the sound to go from silence to its amplitude peak. A longer attack time means your signal will gradually increase in amplitude rather than immediately start at its peak amplitude.
Attenuation: A method of reducing the amplitude of a signal – reducing its volume.
Frequency Band: A group of frequencies within a specific band where multiple bands make up the threshold of human hearing (20 Hz – 20 kHz) on an EQ and other tools.
Band Pass Filter: A filter that allows only the selected frequencies to pass through while cutting the frequencies around the band.
Bandwidth: The width of a frequency band. A bigger bandwidth includes more frequencies in the band.
Bank: Rather than a coin slot in your synth, a bank refers to a group of patches on MIDI instruments or modular synths.
Bass: The bandwidth of low (bass) frequencies between 20 Hz to 300 Hz.
Chorus: An effect that plays multiple copies of a signal that are slightly out of time – creating a new tone. Compare a solo singer singing the same note as a choir of singers.
Clock: A clock creates consistent timing that you can connect your hardware synth and external gear to and keep in sync with one another
Cutoff: This controls what frequencies a filter or effect plugin affects. A high pass filter with a cutoff of 2000 Hz will cut all frequencies below 2000 Hz.
Control Voltage (CV): CV controls parameters in an analog synth. Use CV to adjust oscillators (VCOs), filters (VCFs), and envelopes (VCEs).
Decay: The time your signal takes to attenuate in amplitude after you trigger the signal.
Delay (modulation parameter): The time it takes for your modulator to kick in after you trigger the signal.
Delay (effect): Creates copies of your signal that playback with a delay between them and the original signal. It comes in many different forms, find out more here.
Digital: This refers to a synth module or whole hardware unit that operates on digital processors and binary data.
Distortion: Distortion adds additional harmonics/overtones that are mathematically higher than the fundamental frequency of the note played.
Dynamic Range: The difference between the loudest and quietest points of a signal
Envelope: A filter that determines the amplitude of your signal, but you can map them to many synth parameters. An ADSR only has one cycle.
Equalization: Referred to simply as EQ’ing, equalization is the fine-tuning, cutting/boosting, and adjusting of frequencies within a sound. EQs are filters with multiple frequency bands that allow us to edit the tone of a signal.
Eurorack: A standardized modular synthesizer format that uses compact, 3.5mm mono jacks and cables for patching signals and set width/height module dimensions. To find out more, head here.
Filter: Filters are tools for removing unwanted frequencies and defining the shape of your synth sound.
Gain: The level of a signal at the input stage.
Gate: Gates are tools for “muting” sounds that are too quiet. By determining a threshold your signal(s) must breach, you can determine what sounds should remain silent while others play. If you set a threshold of -10dB, any signal not matching that level remains silent.
Harmonics: Additional frequencies at even or odd intervals equal to the fundamental frequency of a signal.
High Pass Filter: A filter that cuts frequencies below the cutoff while keeping those above it.
Low Frequency Oscillator: LFOs are oscillators that can cycle slower than 20Hz per second. We use LFOs to modulate synth parameters rather than generate signals.
Low Pass Filter: A filter that cuts frequencies above the cutoff while keeping those below it.
MIDI: Stands for Musical Instrument Digital Interface. MIDI is a digital system that allows you to control your softsynth and DAW parameters with a hardware keyboard/pad/knob-based interface.
Modulation: Describes automated changes in a signal. You can modulate most elements of an audio signal to define its output and how it travels.
Module: Hardware units that make up modular synth. You can find out more about what these modules can be and how they work here.
Noise: Noise is an audio signal with no fundamental/dominant frequency. You can simulate white, brown, and pink noise in synthesizers.
Octave: The number of intervals between frequencies in separate octaves. On your keyboard, you can play C in octave 4 and C in octave 5 – and they are a whole octave apart.
Oscillator: Generate waveforms. Defining the shape of these waveforms has a huge impact on the sound you produce from a synthesizer.
Oscillations: The number of times an oscillator repeats its cycle per second. A higher oscillation rate generates a signal of high pitch.
Panning: The position of a signal in a stereo field with left and right channels.
Patch: A pre-programmed sound made from oscillators/samples, customized and saved as a preset on a synthesizer. The name comes from manually patching cables together and creating a sound.
Pitch: The frequency of a soundwave. The higher the frequency the higher the pitch of the sound will be to the ear.
Polyphony: The number of voices that a synth can play at a time. A monophonic synth can play only one voice, a paraphonic and duophonic synth both play 2 voices but work differently from one another. A polyphonic synth simply refers to multiple-voiced synthesizers.
Portamento: Sweeps the pitch up or down between two notes when played one after the other.
Pulse Width: The time difference between the 50% amplitudes of the rising and falling edges of a soundwave.
Quantization: Lines a signal up to the closest increment in a specified range. Most commonly used when referring to rhythm and aligning notes up in time with a rhythmic grid.
Release: Defines the time taken for a sound to reach silence after you release a key.
Resonance: Boosts the frequencies around the cutoff in a filter. Use this to emphasize harmonics around the cutoff.
Sample: Can be both a sound bite from a larger piece of audio or the larger audio itself. You can use a sample as is or manipulate it.
Sequencer: Creates musical patterns which you can repeat and create beats and melodies.
Sine Wave: The most basic of the waveforms. A sine wave is the pure tone of a frequency.
Square Wave: A waveform with sudden changes jumps between its minimum and maximum amplitude values, creating a shape with near right angles. The harmonics of a square waveform repeat at every second oscillation cycle. Each harmonic interval is a third as low in amplitude as the previous interval.
Sustain: The level that your signal maintains when you hold a note.
Tempo: The speed of your track in any given project.
Threshold: The level a signal must breach before a given effect like a compressor kicks in.
Timbre: The tonal character of a sound that isn’t related to its pitch or intensity. You can also refer to this as the tone color or tone quality.
Treble: The bandwidth of high-end frequencies between 5kHz and 20kHz.
Tremolo: A modulation effect that impacts the volume of a signal.
Triangle Wave: Waveforms with a linear rise and fall that give it a triangular shape.
Trigger: The method we use to activate a module or synthesizer’s sound via pressing a note on your keyboard.
Velocity: The power/loudness of a note – represents the dynamic attack of a trigger.
Vibrato: Effects the pitch of a tone and gives your signal a warbling effect.
Voice: The sound created by an oscillator or a group of oscillators together.
Volume: The level of your signal at the output stage.
Waveform: The visual display of a soundwave.