Sampling in Ableton: how to chop samples manually and to the beat in Ableton with Simpler
Sample slicing is one of the most popular ways of making music in many musical genres.
We’re going to show you how easy it is to slice samples in different ways inside the Ableton Live DAW. Ableton’s Simpler sampler is arguably one of the best bits of software for sample slicing, and using samples in Ableton is simple too.
So we’re going to show you how to unlock the potential of samples with Simpler.
In this video, my colleague Simon – who has a long career in sample-based music – demonstrates everything I’m sharing in this article. In fact, Simon has produced and remixed many tracks, including music from Nas, Mos Def, Talib Kweli, and Dilated Peoples, with many more production credits elsewhere.
Bear in mind, though, that every artist is different. We’re only showing you a small number of ways to do slice samples that work well for genres like Hip Hop, Lo-Fi music, and other related genres. But there are quite a few ways of going about it! The more you slice and the more music you make, the more you’ll develop your own ways of doing things.
Where to get samples for Ableton?
Of course, you’re going to need samples in order to slice something, right?
Well, you can get free sounds for this tutorial from RouteNote Create! You can get royalty-free samples right now, or you can subscribe for as little as $2.99 a month for a whole lot more!
The site makes it easy to browse hundreds of thousands of royalty-free sounds right now and download one-shots, loops, FX & full sample packs from top producers.
Don’t forget to download your free samples before moving on to this tutorial!
How to chop samples in Ableton using Ableton Simpler
Firstly, let’s talk about the different methods of sample slicing in Ableton. We’re going to focus on “beat slicing” and “manual slicing“.
The sample you’re planning on manipulating more often than not dictates the slicing method you’re going to want to use.
For example, rhythmic loops with content that sits on the grid tightly and in time with the metronome click slice up nicely with the ‘Slice to Beat‘ sampling method in Ableton Simpler.
Beat slicing automatically slices the sample on each beat according to your specific time signature. In other words, it’ll slice your sample by half notes, quarter notes, eighth notes, and so on.
Alternatively, you can physically choose where you want to apply your slice points with the ‘Manual‘ slicing option.
The manual slicing option lets you get as creative as you like. In practice, you can chop up any sample how you like – so you could chop vocals based on the lyrical content, a guitar look based on plucks, and so on.
On the other hand, you could slice a non-rhythmical sample into dozens of little segments no matter how randomly spread they are throughout the sample.
But Ableton does have a few other slicing options such as ‘Transient Slicing‘. Transients are the very peak of the attack phase of a sound, so this sampling option cuts your samples where Simpler detects those peaks.
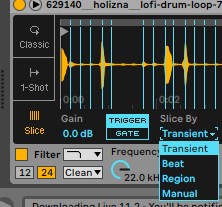
But the Transient chopping method can be quite random! Some artists love this as they can get creative with the results while others like things to be a little more controlled.
How to slice samples in Ableton Live: Slicing to the Beat
Before we begin, insert the Ableton Simpler into an audio channel.
As we said before, the ‘Slice by Beat’ method is best for samples with content that sit on the grid. And that’s great news for you because the vast majority of samples on RouteNote Create sit on the grid perfectly!
But if your sample of choice doesn’t sit on the grid (such as an old breakbeat) then you’ll need to warp the sample so it’s mapped to the grid before moving forward.
You can test whether your sample sits on the grid by adjusting the tempo of your Ableton project so that it matches the tempo of the sample – all samples RouteNote Create provide you with this information. Turn the metronome on and play the sample or a basic 4/4 beat to test this.
Furthermore, ensure that the start and end points of your sample are trimmed so that there’s no empty space. In any event, the beat-slicing option uses both the start and end points as reference points for the slice algorithm, so ensure they’re trimmed for the best results!
Now drag your sample into Ableton Simpler.
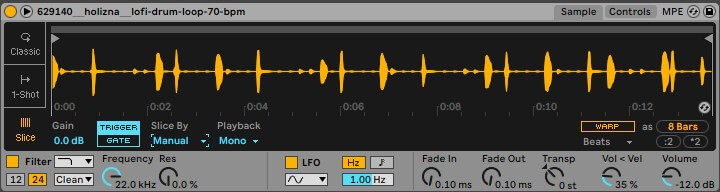
Next, set Simpler to ‘Slice‘ on the left so that you can see a number of blue lines – slice markers – and then set this to ‘Gate’. Selecting Gate ensures that the sample stops playing when you release the key.
To the right of ‘Slice By’ you can adjust how the sample playback – two examples include ‘Through‘, ‘Mono‘, and ‘Poly‘.
- ‘Through‘ removes the end-point when the sample gets sliced and the sample slice plays continuously from the start point.
Simon recommends selecting Through if you’re working with anything other than one-shots but this is totally up to how you like to play samples out. - ‘Mono‘ does feature the end-point, but you can only trigger one sample slice at a time. one-shots
- ‘Poly‘ lets you trigger multiple sample slices at once, but it also features the samples’ endpoint.
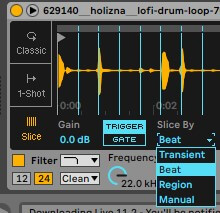
Next, head to ‘Slice By‘ and select ‘Beat‘. Then you’ll see some division options, and this is where you can determine what incremental value you’re going to slice by.
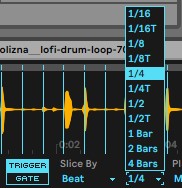
The various division options include:
- ‘1 Bar‘ which slices the sample based on how many bars make up the sample.
- ‘1/2 Bar‘ splits each bar into two
- ‘1/4 Bar‘ splits each bar into quarters
- ‘1/8 Bar‘ splits each sample into eighths
Think about how you’re going to use the sample slices before choosing an option. Should you select the ‘Through’ playback option, slicing by quarter notes or eighth notes gives you plenty of sample start points to play with.
But before you execute the slice there are a few other settings you can change too.

‘Velocity‘ determines how hard-hitting each sample slice will be, therefore determining how loud they will be.
If you set Velocity to 0 then each sample slice will play at the same level and you can manually adjust the level of the sample. But if you give this setting a numerical value then the level of each sample will correspond to how hard you press a key.
‘Fade In‘ introduces each sample slice gradually and ‘Fade Out‘ diminishes each sample slowly. But if you’re chopping drums we would advise against adding a value to Fade In.
Finally, ‘Warp’ time stretches each sample allowing it to follow the tempo of a track. Warp can present problems when trying to tighten the timing of a chopped sample so we would suggest leaving this off for now but reapplying afterward in the drum rack if warping is required. Like fade-ins and outs, if you’re chopping drums then Warp isn’t a necessary setting.
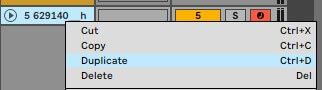
One final step – before you slice, duplicate the channel! Once you slice your sample and map it to the drum rack then the Simpler device will be overwritten so you can’t go back and make any changes.
Once you’ve done so, right-click anywhere on the waveform in Simpler and select ‘Slice to drum rack‘. And now each sample slice will be waiting for you in the drum rack
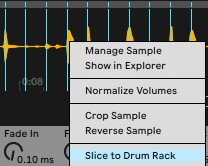
Each sample will be mapped to your keyboard or drum pads ready for you to start making music!

And if you click on any of the drum pads, you’ll see that each sample chop has its own instance of Simpler. Therefore, you can play around and edit the sample chops as you please.

Chopping samples in Ableton Live with Manual slicing
This next method of sample chopping in Ableton gives you full creative control.
Manual chopping is a fantastic sample-slicing method if a sample isn’t overly rhythmic or isn’t on the grid. In practice, you’re essentially free-hand drawing the slice points for the sample. In fact, this live slicing function is built into the Ableton Push MIDI controller.
But if you’re not a user of the Ableton Push then we recommend downloading the Az Labs Max for Live add-on. The add-on enables you to undertake real-time sample chopping on your MIDI controller even if it isn’t an Ableton Push!
With the add-on installed it’s time to load your sample of choice into Simpler.
First things first, load the AZ Pad Slicer onto the track and drag it in behind simpler. Then, click on “Slice Sample” to activate pad slicing mode
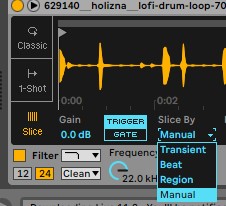
Next, adjust the settings in Simpler that we discussed in the previous section to how you like them. The only necessary setting to change is “Slice by“, so set that to “Manual“.

Now you’ll notice that the blue slice markers have vanished!
But don’t panic, that’s because you simply haven’t drawn them in yet. Before adding some, find the root note of the sample on your MIDI keyboard controller (Ableton Simpler gives you visual cues as you press the root note).
All you need to do to add a slice to the sample is press any key to the right of the root note on the keyboard. While playing the root sample with your left hand, tap a key with your right hand at any time while the sample plays.
Now, Simpler will map your new sample to the next key up. Though you could continue chopping in this way, you could also go rogue and chop the whole thing live in one go like – in the words of my colleague – a Sample Jedi.
But unless your bloodstream plays host to midi-chlorians then you’re unlikely to catch all the samples perfectly. Thankfully, you can tighten the samples up in Simpler by adjusting the start points or editing the start points once you’ve exported the sample to a drum rack.
Finally, if you need to delete a slice point then just double-click it and it’s gone! But if you want to add more splice points then go to the original sample in Simpler and press any empty key to the right of the root note. Each time you add a new sample in this way it will nudge all the proceeding samples up a key.
Final thoughts
Sampling, resampling, and sample chopping have become staple techniques in modern music production.
Hopefully, this video & article duo have demonstrated how easy sample chopping is in Ableton Simpler! In fact, Ableton Live’s sample chopping workflow is one of the most efficient out there.
And the best bit is that there are multiple ways to go about sample chopping – not just the methods that we have described! Every artist develops their own style of working when they make their music, but this breakdown of Manual chipping & beat slicing should give you some pointers if you’re just starting out.