The Complete Guide to Using Apple Music for Artists
Image Credit: Apple
Discover your full potential on one of the world’s most popular streaming services and unlock new promotional potential.
Apple Music for Artists is your central hub for managing your presence on one of the world’s leading streaming platforms. In today’s fast-paced, competitive music industry—where thousands of new tracks are uploaded daily – simply releasing music isn’t enough. Standing out requires a smart strategy, clear branding, and active engagement.
Streaming platforms like Apple Music offer more than just exposure. With access to real-time listener data, you can understand who your fans are, where they’re listening, and what resonates most – helping you tailor promotions and plan future releases. At the same time, a well-maintained artist profile boosts visibility, strengthens your identity, and deepens connections with listeners worldwide.
In short, Apple Music for Artists isn’t just helpful – it’s essential for growing your audience, navigating today’s streaming-first landscape, and building a sustainable music career.
Use the table of contents below to find the section you want to know more about, or simply read on to find out everything you need to know about being an artist on Apple Music.
- Upload your music to Apple Music
- Get streaming analytics in real-time
- Customize your artist profile
- Promote your music on Apple Music
- Pitch songs to Apple Music playlists
- Add lyrics to Apple Music
- Get discovered on Shazam
- Add your concerts to Apple Music
- Add your team to your Apple Music for Artists
- Frequently Asked Questions
Upload your music to Apple Music
First things first: getting your music on Apple Music! Thankfully, like Spotify, there’s an easy and free way to do it. RouteNote takes the hassle out of distribution, sending your music straight to Apple Music (along with plenty of other platforms, stores, and social apps) at no cost.
Here’s how it works:
- Get started for free: Create your free account at www.routenote.com and gain immediate access to all of our features.
- Upload your music: RouteNote empowers you to upload unlimited singles, EPs, and albums of any size.
- Choose your reach: Target all the top music services worldwide, or customize the territories where you want to be heard. Go global or keep it local, the choice is yours!
- Earn on your music: You keep an impressive 85% of all streaming revenue your music generates across all stores. Want 100%? Upgrade to Premium anytime for a small upfront fee and maximize your earnings.

Once your music has landed on Apple Music you’re ready to take control with the Apple Music for Artists hub. The process is straightforward and the more information you give – like social media accounts – the quicker your application will be reviewed.
The time it takes for your music to become available in stores after you’ve uploaded it varies. Typically, it can range from a few days to a couple of weeks. Each service has its own processing times, so it’s advisable to check their specific guidelines or FAQs for more detailed information. Additionally, ensuring that your uploads meet all the required specifications and guidelines can help avoid delays.
Here’s what you need to do:
- First you’ll need to either download the Apple Music for Artists app or head to artists.apple.com.
- Either sign in using your Apple ID, or create one if you haven’t already.
- Click Request Artist Access.
- Search for your artist name or copy & paste an iTunes Store artist link.
- Select one of your releases to show you’re claiming the correct page.
- Choose what role you’re filling, artist or artist manager, and fill the rest of the application.
Once you complete your application your status will change to Pending so that you know when you gain access. Once you can log into the platform, your journey begins!
Get streaming analytics in real-time
To determine who is streaming your music, you should analyze listener demographics, geographical data, and the overall performance of your tracks in terms of streams, radio plays, and downloads. This will provide insights into the specific audience segments that are engaging with your music.
With Apple Music for artists you will get detailed data sets and analytics giving you insights into:
- Who your audience is
- What location your listeners are from
- Milestones your music has reached
- Detailed streaming data and figures
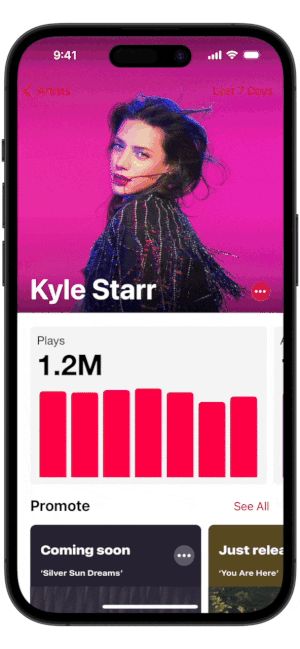
Find your Artist Analytics on your hub to get started. From here, you can immediately see how many people are streaming your music in the moment from the Listening Now section in the top right. Of course, this unfortunately doesn’t include plays from those listening offline (so it might be even higher!).
From the Overview you have your Key Metrics breaking down an overall view of how your music is performing on Apple Music. Change the date range for the data from the small red button in the top right. Plays are counted when a listener listens to your song for more than 30 seconds. Plays are counted no matter where they come from on Apple Music, including from their in-app radio stations.

Next are your Average Daily Listeners, showing the number of unique listeners tuning in each day. Song Purchases reveal how many times your song or albums have been bought on iTunes. Then the last part of the Overview page shows the number of times your song has been scanned on Shazam, representing listeners vibing to your track out and about and wanting to hear more.
Find who your audience on Apple Music is
Using the data above is a fascinating way to watch your success grow. Here’s where you can really start using the results to enhance your music career though.
In the Trends tab you can take a deeper look at exactly which of your releases are making an impact. From the top left dropdown menu you can choose from Plays, Listeners, Shazams, Song Purchases, Album Purchases, or Video Views. Customize the time frame to choose when you see the data for in the top-right.
From the other top left dropdown menu you can filter the data by Song, Album, Playlist, Gender, Age, Continent, Country or Region, City, or Video.
Use these filters to find the demographics that love your music the most. If your audience are younger then you know you’re more likely to reach them by marketing through apps like TikTok.
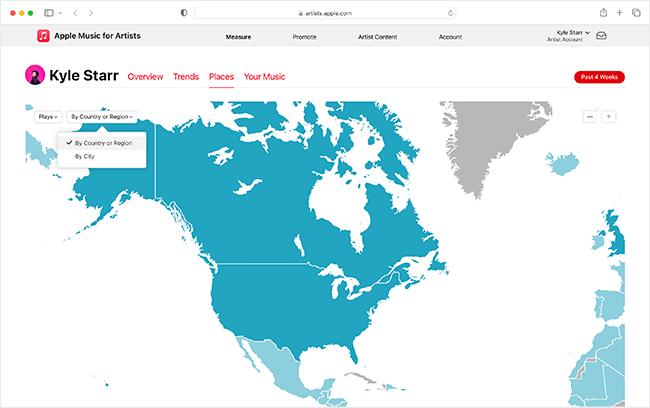
From the Places tab you can start to see who your fans really are. You’ll find a map here that breaks down your popularity across the world. You can change the filters to select the time-range for the data and which metrics you want it to count between Listeners, Plays, or Shazams.
Select a country or region to take a deeper look inside your influence in that area. It will show your top songs in the region and the cities where you’re having the most impact.
You gain access to location data which reveals where your listeners are based. Using the location data can be a great help when choosing to play live. This feature helps artists understand where their listeners are based, enhancing their ability to target specific markets and tailor promotional strategies accordingly.
While the numbers are exciting, the real value comes from using these insights to actively shape your digital footprint and build your brand. With the robust tools available, you can monitor what’s working, identify opportunities for growth, and cultivate stronger, more loyal relationships with your fans—setting your music up for long-term success in the streaming era.
Customize your artist profile
Once you have a profile, you want that page looking good. Make it personal and not only will new listeners be pulled in by your page, but they’ll also be able to recognise you, increasing your fan loyalty and bolstering your brand.
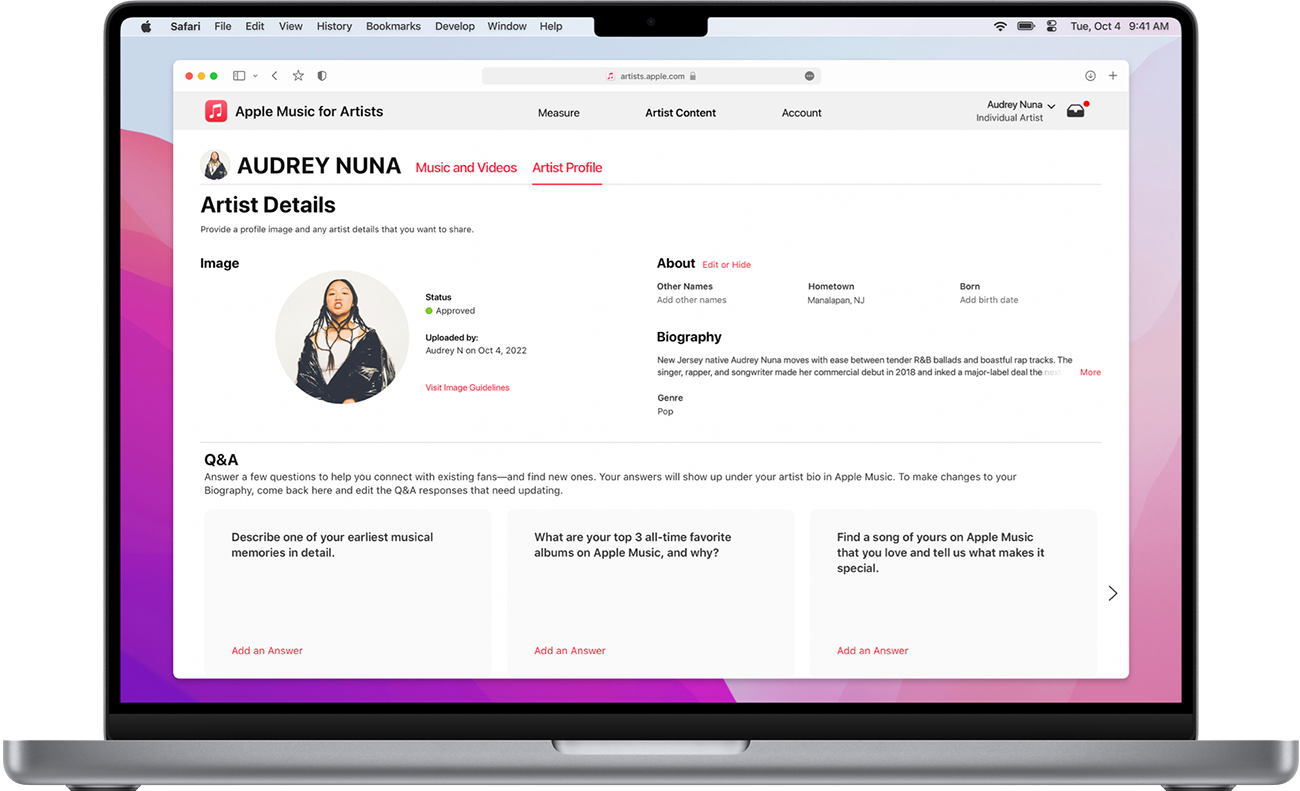
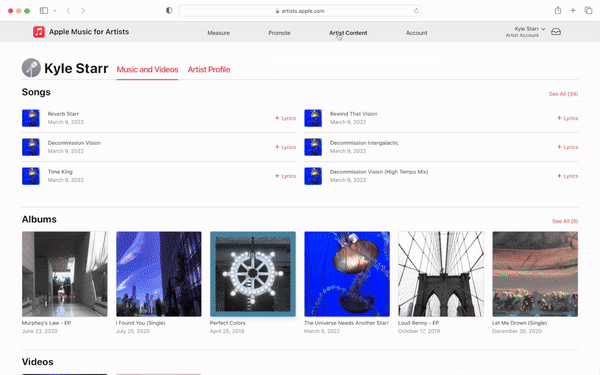
From the Artist Profile section you can update everything on your profile from your artists image to your biography and beyond.
Upload your artist image to your Apple Music artist profile
Choose an image that represents you as an artist. That can be as simple as a photo of you – pick a good one! Whilst it’s not necessary, it can really help to establish your artist identity if you use the same image on music streaming services as you do across social media and other platforms.
How to upload your artist image on the iOS app:
- Sign in to the app and tap the artist you want to view.
- Tap the ellipsis, then tap Account.
- Tap the Camera button, and choose to take a photo or pick a photo from your library.
- Resize your image to meet our formatting guidelines.
- Tap Submit.
How to upload your artist image on a computer:
- Sign in to your account and click the artist you want to view.
- Click Artist Content, then click Artist Profile.
- Click Edit from the Image section.
- Select your image file, then resize it to meet our formatting guidelines.
- Click Submit.
Once your artist image has been uploaded, Apple Music will review it. Their review process can take up to five business days. Your image will remain in Submitted for Review until Apple has reviewed it.
Apple artist images must be:
- 2400 x 2400 pixels or greater preferred, 800 x 800 pixels minimum
- 72 dpi
- JPG or PNG
See Apple Music’s full artist image guidelines to ensure your profile photo is accepted here.
Add and update your artist biography on Apple Music
Your artist bio is the place for you to tell your story and what you’re all about. You want to write a bio that reveals something about you as an artist and allows for a deeper connection between you and the listener.
You might find that you already have an artist bio on your Apple Music artist profile. Apple Music source their biographies from AllMusic a lot of the time. For any issues with the biography provided by Allmusic you can click the Report an Issue button.
If you either don’t have a biography or you want to replace the one provided by AllMusic, there’s a space in your Artist Content section to write more in your own words. Fill out the Q&A in Artist Profile, which will display on your Apple Music artist page.
There are guidelines for your answers that you need to stick to. You can read them here. Apple Music can’t guarantee they will publish your submissions.
Additional information for the editors
In the Artist Content section there is space to describe your musical influences and that artists that you’ve collaborated with. You can also add the members of your group if it’s not a solo project. Additionally, you can provide your preferred pronouns from your Artist Content section.
None of this information will be displayed on your profile but the editors will use it to get to know you better.
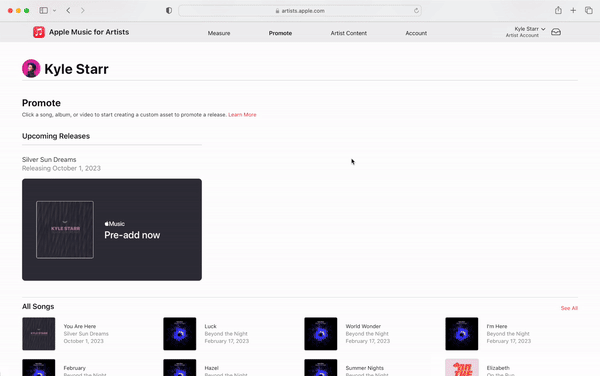
Promote your music on Apple Music
You can’t just upload your music and expect the listeners to roll in (unfortunately). Thankfully, Apple offer a bunch of tools to help you spread the reach of your music.
Their Promote section within Apple Music for Artists is available in the iOS app and on the website.
Share your Apple Music releases on social media
From the Promote section, you can create and customize assets to market your music. You get to pick a design to use and Apple Music will put your song, album, or music video into a shareable form that you can use to promote your release elsewhere and get people listening to it on Apple Music.
Seeing your successes as an artist is special. Sharing it with the listeners who made it possible makes it even more special. Apple Music offers shareables that allow you to share your milestones as well as your music releases with your fans across social media.
Share big moments like your song featuring in one of Apple Music’s top playlists or reaching a milestone number of streams. You can create and customise a snazzy shareable to post directly to Twitter, Snapchat, Facebook, and Instagram Stories.
You can choose from two design templates, customize the background colour, preview it all, and finally choose the asset size that you want to create.
How to create and customize assets for release promotion in the iOS app:
- Open the Artists iOS app, scroll to Promote, and choose a Milestone or release you want to share with fans.
- Tap the ellipsis, then tap Customize. You can also use the default share card if you don’t want to make any customizations.
- Swipe to select your template.
- Select a background colour for your share card.
- Tap the share icon to select the platform where you’d like to promote your content. Options to share on Instagram Stories, Facebook Stories, Snapchat, and Twitter will display if you have those social apps downloaded on your device. Prepared text that includes your accomplishment and a link to your content on Apple Music will populate alongside an image.
- You may choose to update the text for your post. Remember to include the shortened link to share your content with fans.
How to create and customize assets for release promotion on a computer:
- Sign in to your account and click Promote.
- Select the content or Milestone you want to share with fans.
- Select your template.
- Cover Art: Features the cover art from your content.
- Artist Image: Features your Apple Music profile picture and content cover art. If you haven’t added an artist image yet, you can upload an image in the Artist Profile section of the Artist Content tab. Learn how to add an artist image.
- Blur: Features your promoted content with a blurred background.
- Customize your asset by choosing a background colour.
- Choose the template sizes you want to download. You can choose one of the options below or all three.
- Portrait (1080×1920 pixels)
- Landscape (1300×740 pixels)
- Square (1080×1080 pixels)
- Click Create Assets to generate the image and video assets for the content you wish to promote. Assets will take a few minutes to fully render.
- Download and share. You’ll also have the option of emailing the digital assets. Download one asset at a time, or all together.
- Post the assets and the Linkfire link to social media, on your websites, and in emails and digital advertising.
Share links to drive listeners to your music on Apple Music
Create smart links and landing pages that you can share to send listeners straight to your music. Apple are partnered with Linkfire to provide smart links and landing pages for free through Apple Music for Artists. However, you can create smart links for your releases that send listeners to many more services through PUSH.fm.
You can create links to encourage listeners to pre-add your music in advance of the release date and to drive listeners to music that has been released. Clicking the links will take users straight to the release on Apple Music or add it to their library.
How to generate a Linkfire link for Apple Music
- Head to Promote on Apple Music for Artists
- Click on the release you want to promote
- Follow the steps to create and customise your shareable asset
- Find your Linkfire link at the final step on the Assets page
- Copy the link and post it to your social media or share it with your team
Pitching songs to Apple Music playlists
Sadly, Apple Music do not accept direct submissions to their editorial playlists. However, there are moves that you can make to improve your chances of being discovered and selected by their tastemakers.
Firstly, ensure you have claimed your artist profile and filled in as much detail as possible so the editors can get to know you.
Secondly, do what you can to increase your following and engagement on Apple Music. The more listeners you have, the more chance you have of being noticed by Apple Music’s editors and recognised as an artist worth sharing.
Add lyrics to Apple Music
Add the lyrics of your songs to Apple Music and, in their own words, you’ll “spare your listeners the embarrassment of singing the words wrong”. You can add your own lyrics to your songs on Apple Music.
How to send lyrics directly to Apple Music:
- Go to Artist Content and select a song. Any songs that don’t have lyrics will display a ( + ) button.
- Click Add Lyrics.
- In the Song Lyrics field, copy and paste your formatted lyrics. Follow the lyrics formatting requirements in the lyrics guidelines.
How to update your lyrics on Apple Music:
- Go to Artist Content and select a song.
- Under Lyrics, click Request a Change.
- Give us a brief description about what lyric needs to be modified.
- Provide the corrected lyrics. Follow the lyrics formatting requirements in the lyrics guidelines.
Lyrics are subject to the Apple Music for Artists Terms of Service and there is a chance that they may not use your provided lyrics or “may adjust lyrics for stylistic reasons”.
For a free and easy way to get your lyrics added across services like Apple Music, Amazon, and more then check out Musixmatch. Find out more in the article below.
Get discovered on Shazam
When someone hears your song but doesn’t know what it is, they can Shazam it to find out. It’s a fantastic method for expanding your reach, ensuring that no-one misses out on your music when they discover it.
But you need to make sure your music is on Shazam for listeners to be able to identify it. Thankfully, when you distribute to Apple Music through RouteNote your music will be automatically included on Shazam.
For clarification, here’s how you upload your music to Shazam with RouteNote:
- Sign up or log-in to RouteNote
- Click on Create New Release
- Add your audio files, all necessary metadata and your artwork
- Select your stores and territories – here is where you can select iTunes/Apple Music or Select All Stores
- Decide between Free or Premium distribution
- And…you’re done!
Make sure your music is easy to find
When you distribute your music to Apple Music (and, as a bonus, Shazam) through RouteNote, it’s not just about uploading the audio. To boost your chances of being discovered, it’s essential to provide accurate and complete metadata at every step. That means double-checking your artist name, song title, and album title so fans -and Shazam users – can easily find and identify your work.
Proper metadata ensures your tracks are displayed correctly across Apple Music and Shazam, helping you reach the widest audience possible without any confusion. Take a moment to review everything before submitting, and you’ll be setting yourself up for a smooth release and maximum exposure.
Add your concerts to Apple Music
If someone’s come to your artist profile on Apple Music to listen to your music, chances are they’d like to see you live. Adding your concerts to your profile gives you the best chance of reaching potential attendees and boosting ticket sales.
Concerts will automatically show up in Spotlight Search and can also be shown in Apple Music Guides and Set Lists. Spotlight Search allows users to swipe down on their Home Screen to search for artists and find out more information. Here’s where they’ll find upcoming concerts.
When users tap on one of your concert dates a dedicated concert page powered by Shazam will appear. From here, fans can browse their options for buying tickets, find out more about the venue, as well as seeing an artist’s top songs.
Apple Music are partnered with Bandsintown to show concerts that are registered on their service. If you want your concerts to show up on Apple Music and Shazam then you will need to set them up on Bandsintown. You can find it here.
Add your team to your Apple Music for Artists
Bolster your power over your profile by giving your team access to make changes when needed. This helps your team support you and makes promotion easier when you can share the responsibilities.
You can assign different users different roles, providing them permissions specific to their needs. Different roles you can assign your team include:
- Admin: More than one user can be assigned the Admin role. Admins can view artist analytics, promote content, make artist profile updates, and manage who has access to your page. They can also view all of the available sections: Measure, Promote, Artist Content, and Account.
- Analyst: Users can view the artist’s data and promote content. Analysts can see the sections Measure, Promote, and Account.
- Profile Editor: Users can upload artist images, add and edit lyrics, and edit artist details, such as date you were born, hometown, Q&A, and influences and collaborations. Use this space to highlight your influences and collaborators, giving fans and editors a clearer picture of your artistry and the story behind your music.
As Apple say themselves: “It is vital that you keep your team current. As you progress, your team may change and grow, so it’s important to keep an accurate user list. Stay on top of adding new users to manage your artist page and removing users who are no longer an active part of your team.”
The admins of the account have the power to grant access at their discretion when they receive requests for access to an Apple Music for Artists profile. You’ll get a notification within your profile once you receive a request. You can turn requests off.
How to add a member to your Apple Music for Artists team on iOS:
- Sign in to the app and tap the artist you want to manage.
- Tap the ellipsis, then tap Account and scroll to the Users section.
- Tap Invite User, then enter the user’s email address. This email address should be the Apple ID they wish to use to manage their account. The email you provide is where the artist page invitation will be sent.
- Select the user’s role to assign the permissions you want to grant to the new user.
- Tap Invite.
How to add a member to your Apple Music for Artists team on a computer:
- Sign in to your account.
- Go to Account, then click + in the Users section. If you belong to more than one artist profile, be sure that you have selected the correct artist you wish to add a user to.
- In the Invite User window, enter the user’s email address. This email address should be the Apple ID they wish to use to manage their account. The email you provide is where the artist page invitation will be sent.
- Select the user’s role.
- Click Invite User.
You can remove users at any time by hovering over their name and selecting Remove.
Frequently Asked Questions
Here are answers to the most common questions about Apple Music for Artists.
Is Apple Music for Artists free?
Yes, Apple Music for Artists is completely free to use. Once your first release is live on Apple Music you can claim your account.
Is there an app for Apple Music for Artists?
Apple Music for Artists is available on iOS here. Unfortunately, there is no Android application for Apple Music for Artists.
How long does it take for Apple Music for Artists to approve?
You should receive a response within 10 business days. Check the email inbox associated with your Apple ID. If it has been more than 10 business days then contact Apple for assistance.
Can artists upload directly to Apple Music?
No, you will need to use a distributor like RouteNote to get your music uploaded to Apple Music.
How much does Apple Music pay artists?
There are no set streaming rates for music streaming services. Apple Music’s streaming rate can vary depending on the listener. Find out more here.
How do I regain access to Apple Music for Artists if you lose access?
After ensuring you are using the correct login details, contact Apple for support to regain access to your Apple Music for Artists profile.
How do I get an artist page in Shazam?
Your artist page will be automatically created on Shazam when you upload your music through RouteNote. Your profile is linked to your Apple Music for Artists. So keep your Apple Music for Artists account up to date to refresh your Shazam artist page.