How do audio interfaces work? Recording professional audio at home
Today, audio interfaces are the staple recording product we find in home and professional studios.
Vocalists, instrumentalists, producers, and mastering engineers all utilize digital audio interfaces to make music and edit audio every day.
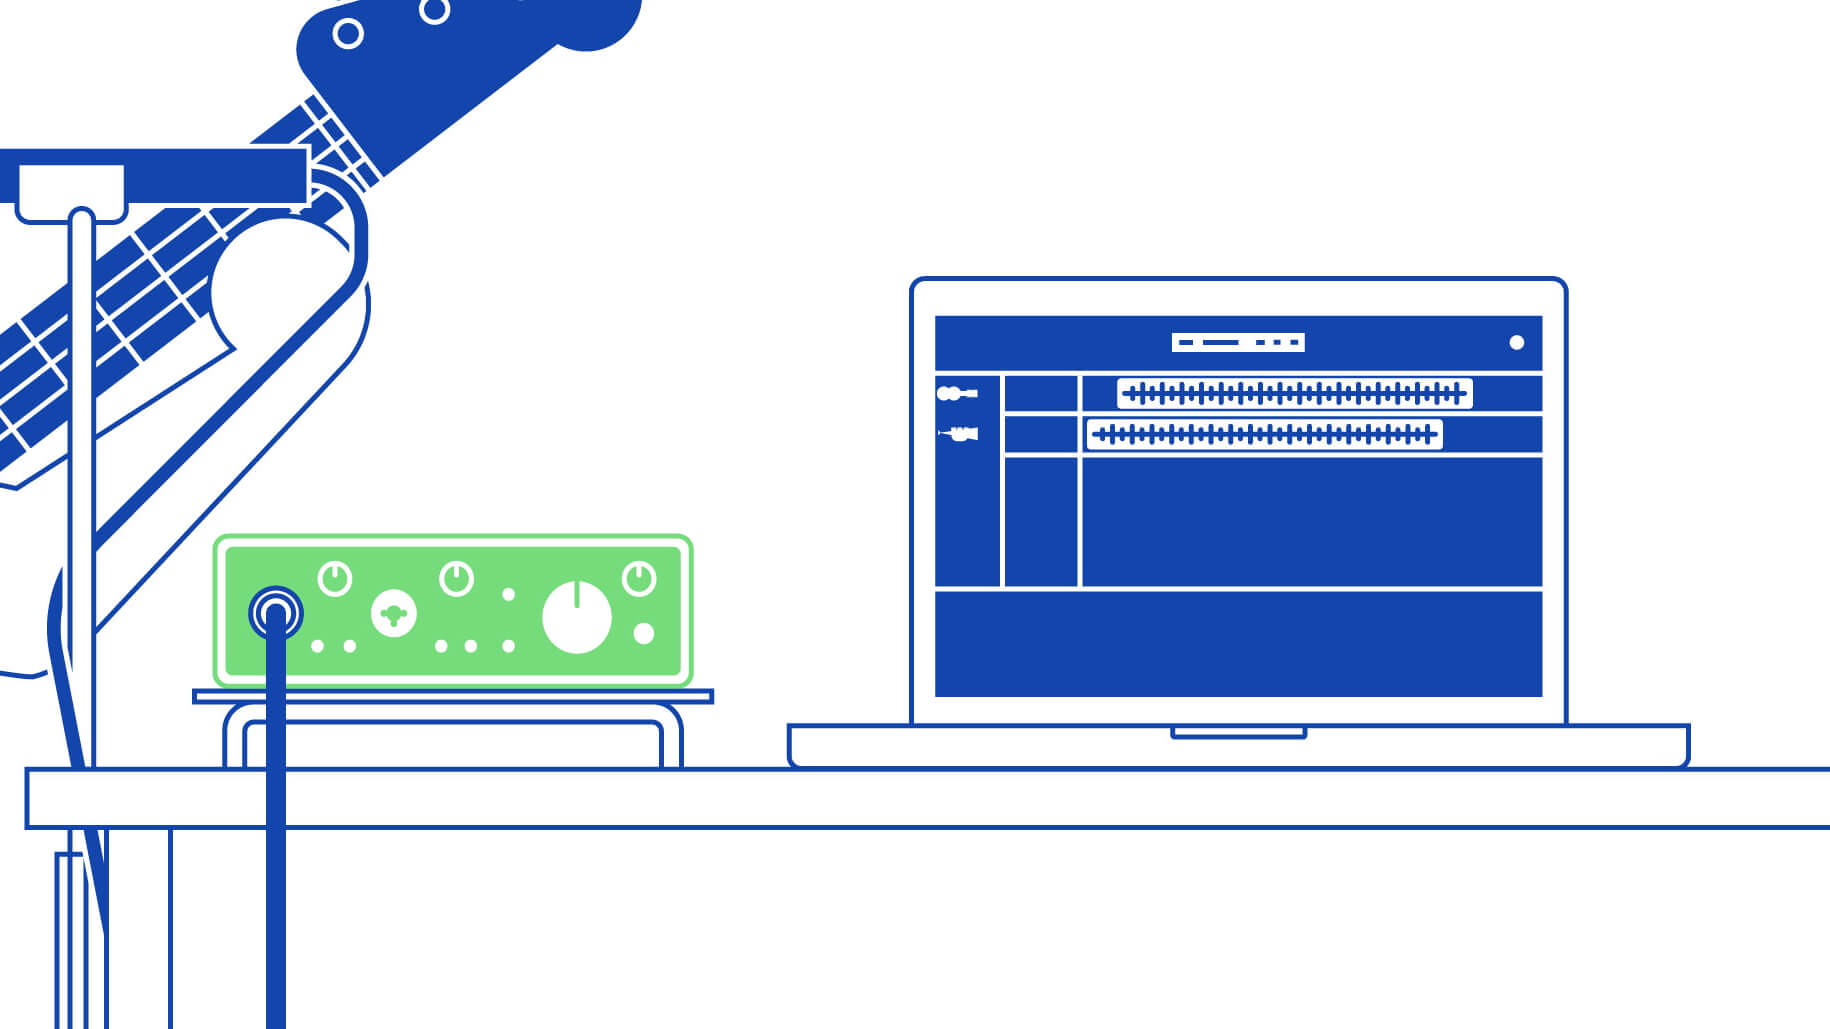
That’s because an audio interface is at the heart of the microphone, computer, and studio monitor signal chain. That’s right, the audio interface is the captain of the A(udio)-Team in your home studio.
So, with the following topics, we’re going to find out what makes audio interfaces such desirable recording tools:
What is an audio interface?
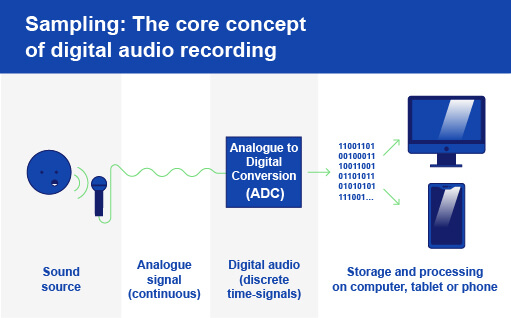
An audio interface is a digital recording device. Via analog to digital conversion, we can record ourselves with a microphone and send that recording to our computer.
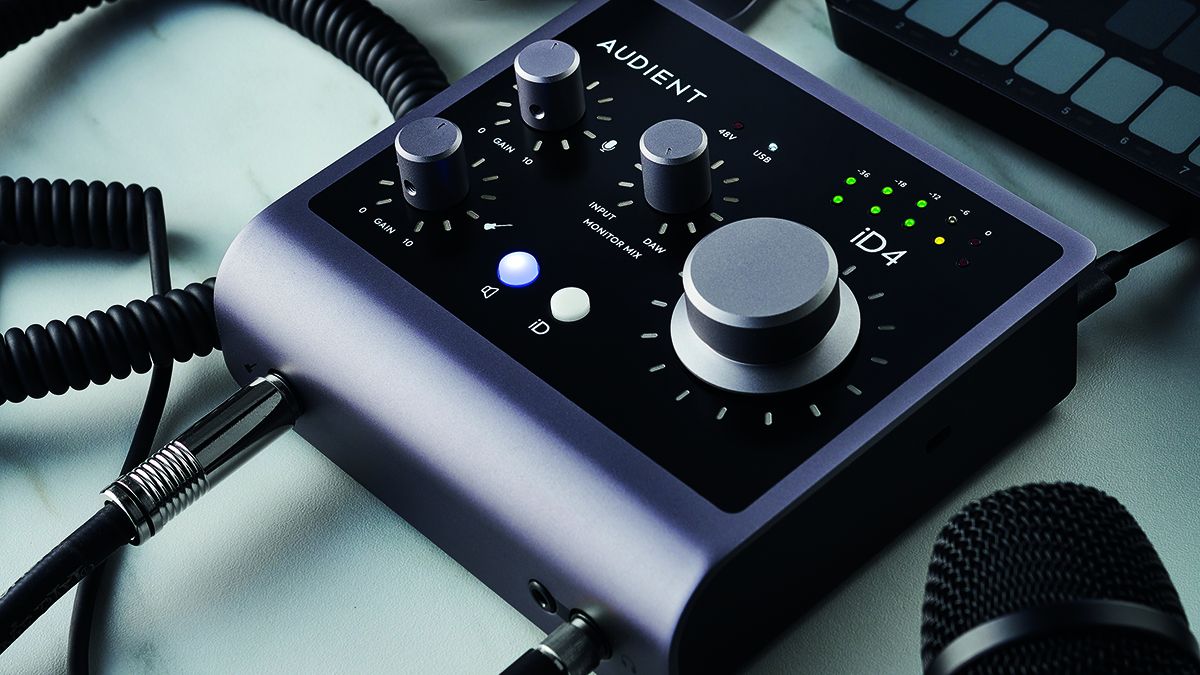
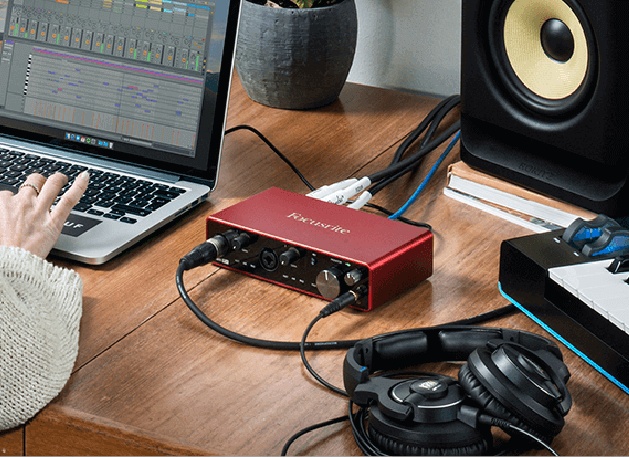
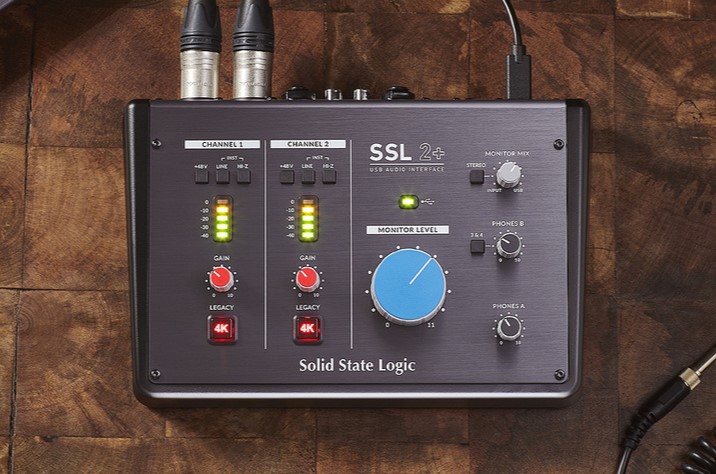
There are lots of fantastic audio interfaces for beginners and professionals. Here are three great audio interfaces for beginners by trusted brands like Solid State Logic, and Audient.
What do audio interfaces do?
The purpose of audio interfaces is to convert electrical signals from microphones and electric instruments into digital signals that computers can read.
Though they come in all shapes and sizes, they share the same purpose.
Binary data is the only data that computers can understand.
Therefore, electrical signals from microphones (microphone-level signals) and electric instruments like guitars and keyboards (instrument-level signals) are not computable.
So we need to convert our electrical signals to digital binary, and we need an audio interface to do so.
How does an audio interface work?
Audio interfaces convert analog signals into a digital format for your computer.
But for a computer to receive that signal, it must be in digital format – not electrical. And that’s where audio interfaces employ analog to digital conversion (ADC).
Input: what is analog to digital conversion? (ADC)
Analog to digital conversion is the process of converting electrical analog signals into digital binary signals.
In the analog to digital conversion, an interface takes thousands of snapshot samples per second of your electrical microphone/instrument signal.
Here, the interface measures the amplitudes (signal strengths) and frequency information of the soundwave.
Instead of sampling the acoustic sound wave itself, fluctuations in the electrical signal represent this information.
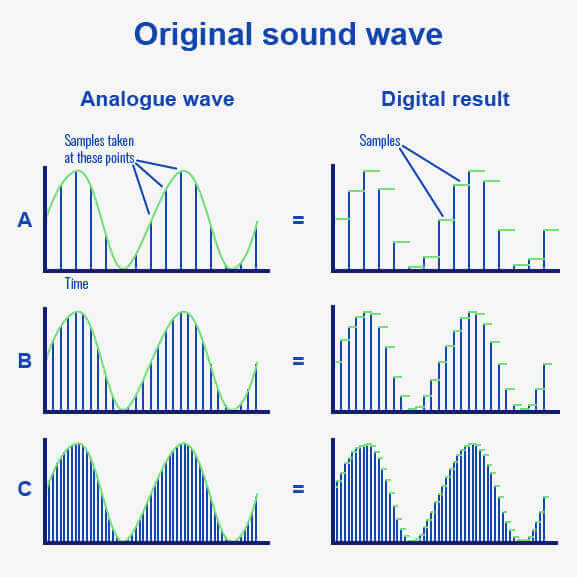
In example A, we have taken far too few samples to reconstruct the smooth soundwave.
It’s only in example C that we have enough samples to reconstruct the smooth soundwave.
The number of samples we take per second and the speed at which take them is the sample rate – measured in kHz.
But computers store information in bits. So, in order to measure and reproduce the thousands of per second samples of our signal, we need enough bits to store that information.
The number of available bits is the bit depth.
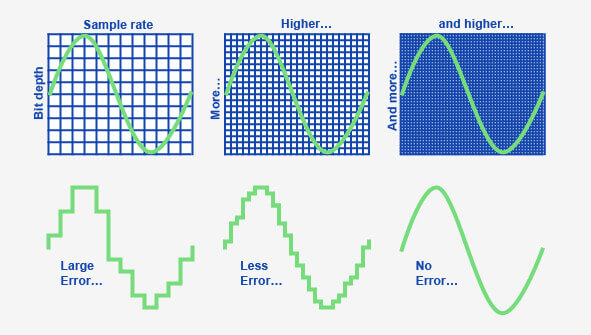
In the first example, the digital result is very blocky because too few bits were available to reconstruct the smooth soundwave in full resolution.
But in the third example, we see a perfectly smooth soundwave. This is the result of a bit depth high enough to recreate the sound wave in full resolution.
Sound waves have a countless number of possible amplitude values. But we must establish them as digital bits to measure and store them.
If you had a digital 4K image with a low bit depth, its color information would be fairly vague despite the potential details available with 4K.
By the same logic, a 1-second audio recording with a 96 kHz (96,000 samples per second) sample rate but an 8-bit depth limits how we can map those 96,000 samples to 256 bits in 8-bit audio.
What this means for your signal, then, is without enough bits to measure and store samples, your digital signal will be of low quality and just won’t sound how you intend it to.
Sample rate and bit depth in home recording
It’s in the tech specs that you’ll discover the sample rate and bit depth for an interface, so make sure you investigate those when shopping.
The most common sample rate and bit depth you’ll see are 44.1kHz (sample rate, 44,100 samples per second) and 16-bit (bit depth, 65,536 bits).
Therefore 16-bit provides enough bits (65,000+) to measure and store the 44,100 samples of our signal.
Consequently, we can reconstruct the frequency and amplitude information accurately of the original signal.
Furthermore, 16-bit offers enough dynamic range and a low enough noise floor to record professional quality music while starting out.
Once recorded, you will inevitably want to play our recording back to yourself.
Output: what is digital to analog conversion? (DAC)
Digital to analog conversion (DAC) is the process of converting a digital binary signal into an electrical analog signal.
When we want to play our digital recording back, we must re-convert it to an analog signal.
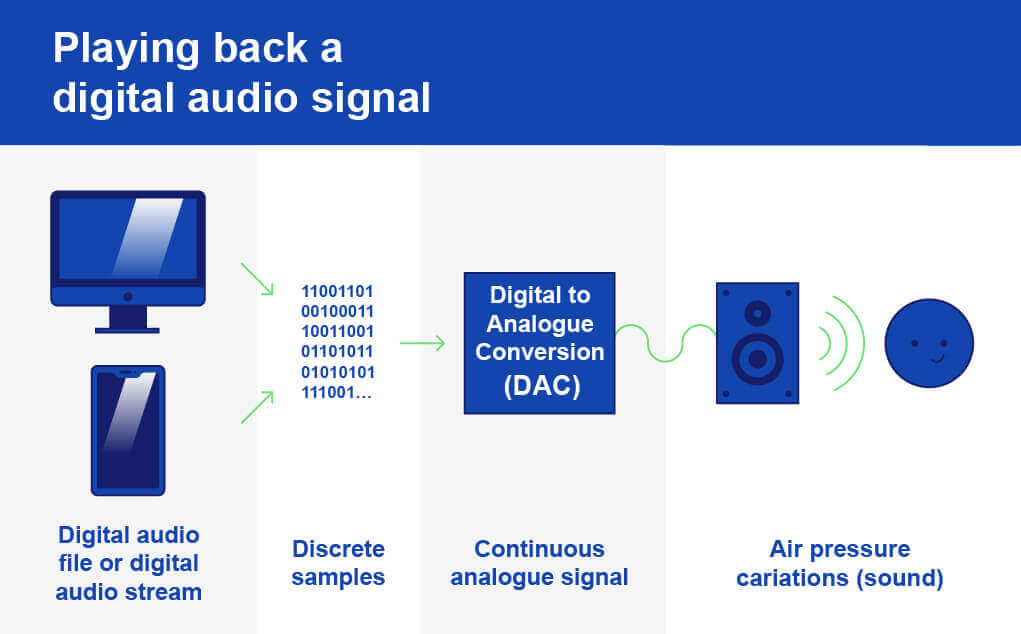
After the DAC process, this electrical signal then travels to the studio monitor, is amplified, and powers the speaker cones.
But to play our sound back, we need to press play on our computer. And to do so, our recording needs to get to our computer first.
How does an audio interface connect to a computer?
Audio interfaces connect to your computer via a USB connection.
USBs are digital cables, and so can transport your digital recording to your computer.
Additionally, we can connect USB audio interfaces to tablets and smartphones too.
For Mac, there are a growing number of audio interfaces with Thunderbolt connectivity as well as standard USB 2.0/3.0.
Thunderbolt connections have the advantage of faster data transfer speeds compared to USB, but they do have the disadvantage of being pricier.
What are the inputs and outputs of audio interfaces? (I/O)
Here is a list of the inputs and outputs you will find on an interface. Take note, though, that you won’t get every feature on every interface.
Audio interface inputs
- Microphone inputs (XLR)
- Instrument inputs (1/4″ jack)
- MIDI In (5-DIN)
- SPDIF In (1/4″ jack)
Audio interface outputs
- Speaker outputs (1/4″ jack or XLR)
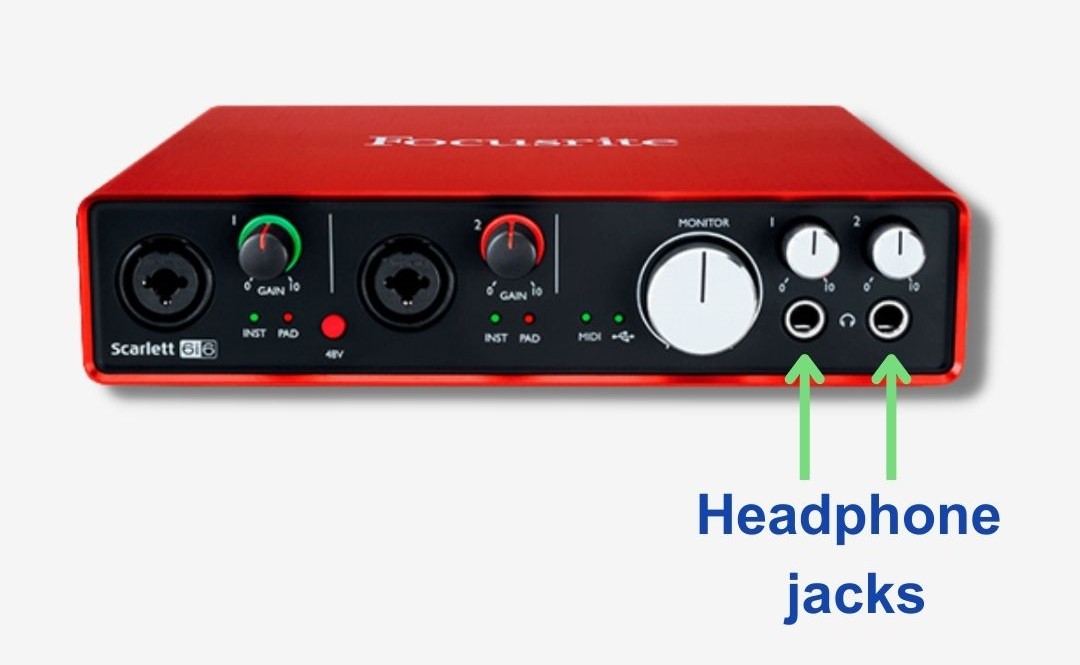
- Headphone outputs (1/4″ jack)
- MIDI Out (5-DIN)
- SPDIF Out (1/4″ jack)
The inputs
Firstly, the most common input found on interfaces is XLR inputs and they’re explicitly for microphones.
This is so because XLR cables have 3 pins (the most common ones do anyway). However, it’s common to double up this input.
Sitting in the center of the 3 pin ports is a 1/4″ jack input for electric instruments, making it an XLR / 1/4″ combo input.
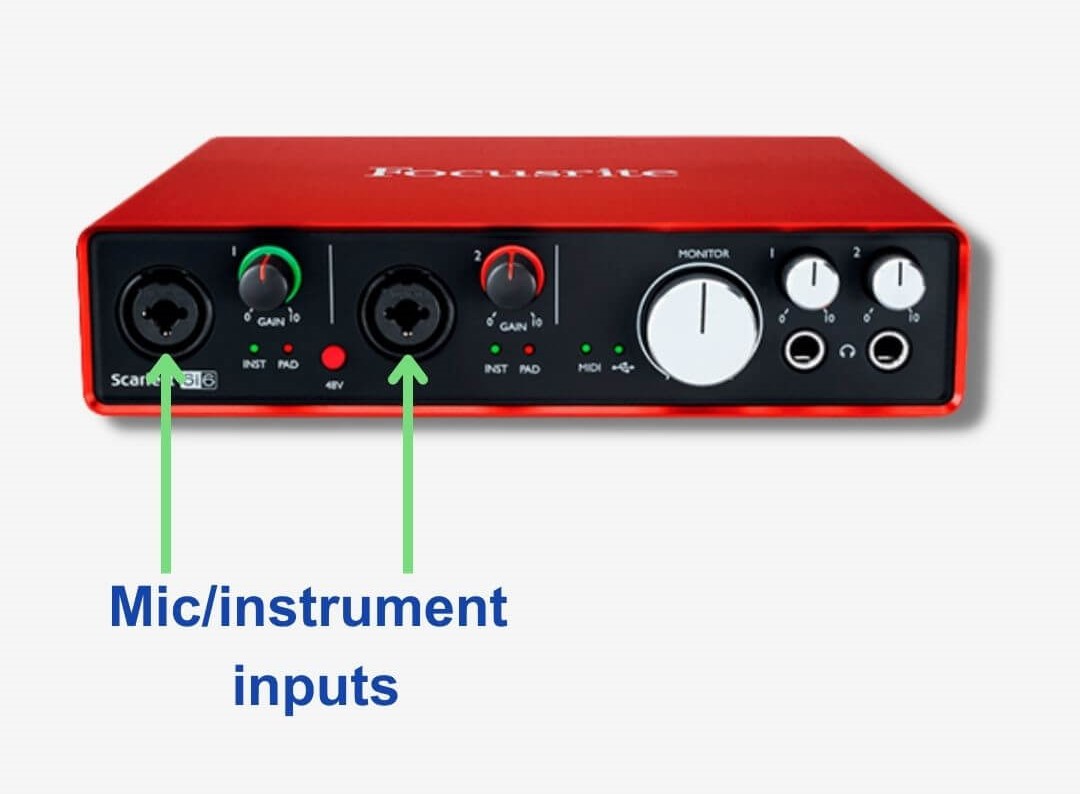
Then we have 1/4″ instrument inputs themselves. When in pairs, both jacks and XLR inputs can be in either mono or a stereo pair.
Both XLR & 1/4″ inputs receive electrical audio signals that represent sound waves.
- XLR = microphone-level signal (weakest voltage)
- 1/4″ jack = instrument-level signal (stronger voltage)
Next, DIN MIDI In ports.
DIN MIDI ports allow us to connect equipment that has DIN ports too. 5-DIN MIDI cables have 5 pins, and so DIN ports are exclusive like XLR ports.
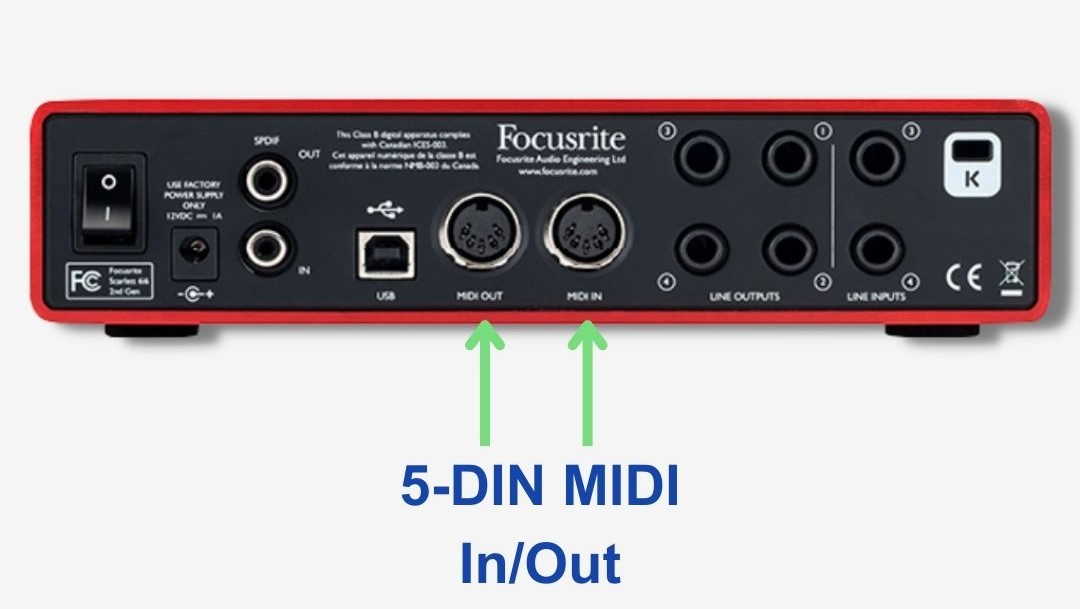
MIDI In ports receive electrical signals from equipment which represents information such as notes pressed and parameter adjustments. DIN MIDI ports do not receive or send audio, in contrast to the combo inputs.
Finally, we have S/PDIF ports.
Radically different from XLR and 1/4″ cables, S/PDIF transfer digital audio signals – binary – with no analog-to-digital conversion necessary.
These optical cables are common with home sound entertainment systems, though some interfaces have them.
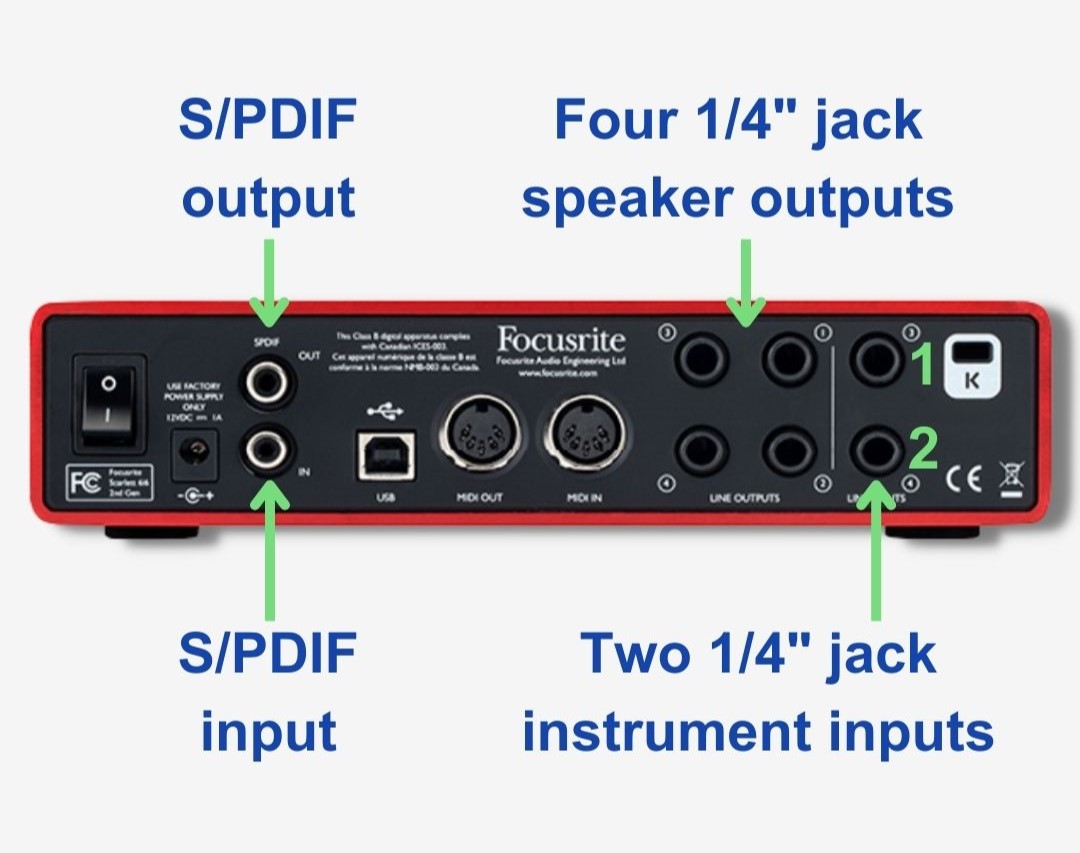
But because we use microphones to record sound – which converts sound into electrical current – these aren’t overly common on interfaces; especially not entry-level models.
However, we can use S/PDIF ports to receive digital audio signals from other digital devices
The outputs
Speaker output ports can be either XLR or 1/4″ on an audio interface. Again, these cables carry electrical currents.
After the digital to analog conversion, the signal travels through these cables and into speakers. Then, speakers increase the signal strength to speaker-level to power the driver and convert the signal to sound.
Headphone outputs are usually 1/4″ output ports but could be 1/8″ (aux) ports too. Again, these are outputting electrical currents.
Then DIN MIDI Out ports output control information to any connected equipment. This information may come from a device connected to the interface’s MIDI In port, or from the interface itself via a computer.
And, finally, S/PDIF Out ports distribute the digital audio signals to compatible speakers/entertainment systems.
Controlling the signal strength
Because electrical current represents sound waves, we need to adjust the strength of that current to adjust gain and volume.
- Gain = input level
- Volume = output level
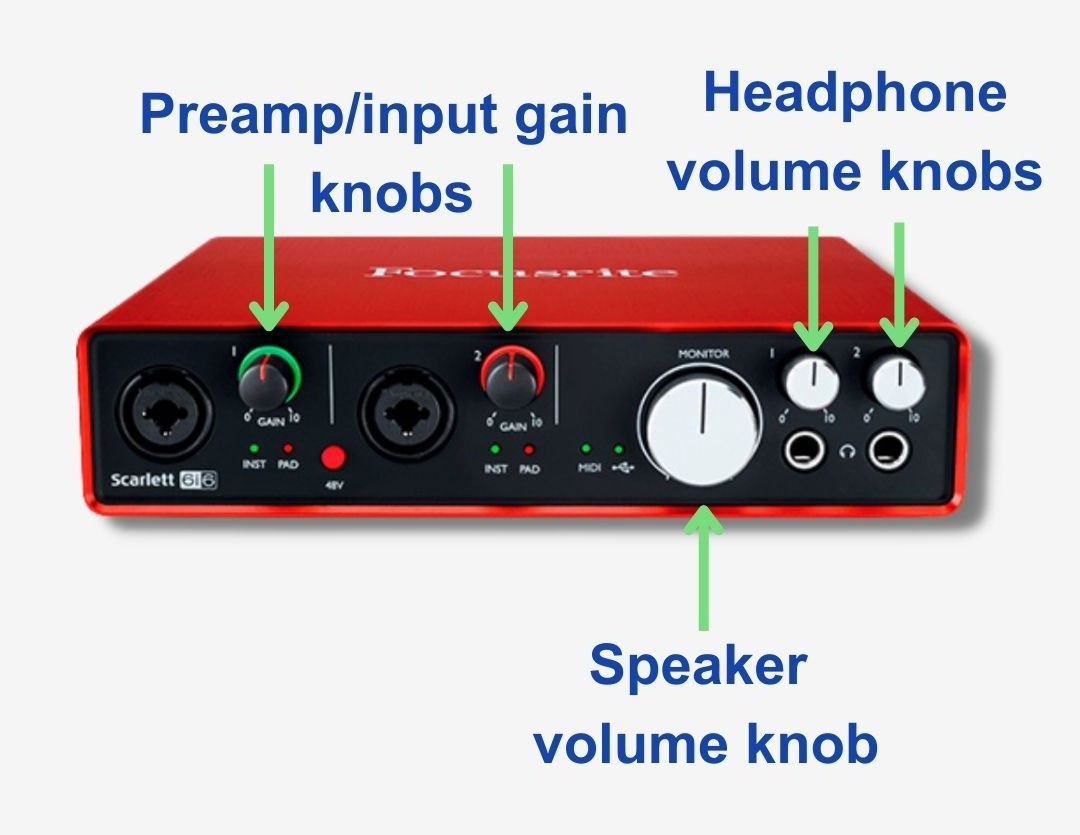
And audio interfaces provide knobs for doing so.
Microphones, particularly condenser microphones, produce a very weak electrical signal – a quiet output signal.
Therefore we need to increase the signal strength via an input gain knob, known as preamplification, to make the signal louder.
Furthermore, we can control the signal strength of our speaker and output headphone volume knobs.
- Loud signals = strong electric currents
- Quiet signals = weak electrical currents
How does 48V phantom power work?
As we said, condenser microphones are a special case.
These microphones need phantom power – different from preamplification – in order to power the diaphragm and its internal amplifier.
Phantom power powers the microphone diaphragm, but preamplification increases the level of the input signal.
Phantom power, often listed as +48V or P48 is a way of sending an essential direct electrical current from the XLR input port and through the XLR cable to power the microphones’ diaphragm.
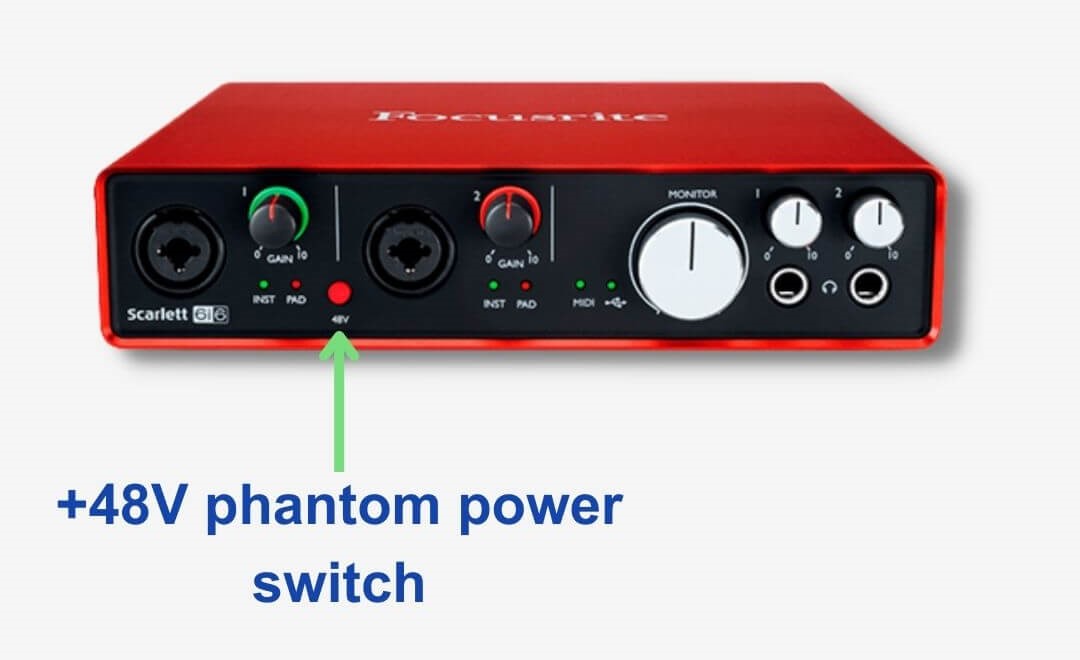
In other words, phantom power sends a direct current through the XLR cable and delivers the necessary voltage that powers the condenser microphone.
Audio interface specifications – what to look for in an audio interface
Now that we’ve covered the uses of audio interfaces, let’s talk about some more specifications that you will find when you shop for an audio interface.
1. Sample rate
The sample rate is the number of snapshot samples an ADC unit takes per second of audio.
Enough samples must be taken to accurately capture the frequency and amplitude information of an input signal.
The lowest and most common sample rate is 44.1 kHz. This means the ADC unit takes 44,100 samples per second.
2. Bit depth
Bit depth refers to the number of bits available to measure and store those samples.
Without enough bits, we are limited as to how much frequency and amplitude information can be reconstructed digitally. And without enough bits, you will record at low audio resolution.
The lowest bit depth you’ll see is 16-bit. And, as we explored earlier, this gives us enough bits to measure and store the 44,100 samples our ADC unit takes with a sampling rate of 44.1 kHz.
3. Total Harmonic Distortion + Noise (THD+N)
THD+N is all output from your interface that isn’t your desired output signal.
In other words, THD+N is a numerical value that tells us how much noise an interface produces.
All electronics produce a level of noise.
When shopping for an audio interface, look for as low a THD+N as possible.
[A good THD+N]
4. Dynamic range
Dynamic range is the difference between the loudest and quietest signal that an interface can capture, measured in dB.
If an interface has a dynamic range of 100 dB, that means it can register signals as loud as 100 dB.
In contrast to THD+N, we want as big a number as possible here.
[A good Dynamic range]
The benefit of a greater dynamic range, which is directly linked to bit-depth, allows for bigger contrasts in quiet ad loud sections in a recording.
5. Frequency response
Frequency response represents how an interface processes different frequencies across the frequency spectrum.
Interfaces can usually capture frequencies from 20Hz – 20KHz, in line with the threshold of human hearing.
However, the frequency specification may have a ± dB at the end. Therefore it’d look like this:
20Hz – 20KHz ± 1 dB or 20Hz – 20KHz ± 0.5 dB.
The value that follows the ± represents volume cuts and/or boosts at specific frequencies. Consequently, we want the value that follows the ± symbol to be as low as possible.
In the examples above, the interface will only apply cuts or boosts of 1dB or 0.5 dB at certain frequency ranges, usually in the highs and lows where speaker drivers must work harder to produce the necessary energy.
Is an audio interface necessary? FAQs
An audio interface is only necessary if you’re recording instruments (acoustic and/or electric) or vocals.
You don’t need an audio interface if you’re producing electronic music or playing around with samples. Here, all you need is a laptop and headphones.
But for any home recording, an audio interface is essential if you want professional sound.
Do you need an audio interface for a microphone?
Yes. If you’re looking to record vocals, acoustic instruments, or anything with an XLR microphone then you will need an audio interface.
Unless, of course, you invest in a USB microphone. Though the quality of USB microphones is improving steadfastly, they cannot compete with XLR microphones in musical applications.
Like USB audio interfaces, the analog to digital conversion happens within the USB microphone – hence how you can connect them via a USB cable.
Therefore, the quality of your signal through a USB microphone is limited by the A2D conversion of the small size microphone and the data rate of the USB connection.
In other words, USB microphones don’t really stand up to the audio fidelity available with audio interfaces – and the ones that do are pretty expensive.
In any case, most USB microphones are tailored for talking online and podcasts.
They often roll off some high and low frequencies, their dynamic range isn’t quite where a vocalist may need it, and so on.
So, back to the point. For recording vocals and acoustic instruments at home, an XLR microphone and audio interface remains the best method for studio-quality home recordings.
Do you need an audio interface for MIDI?
No, you do not need an audio interface for all MIDI connectivity. But this does depend on what type of MIDI connection a MIDI controller requires.
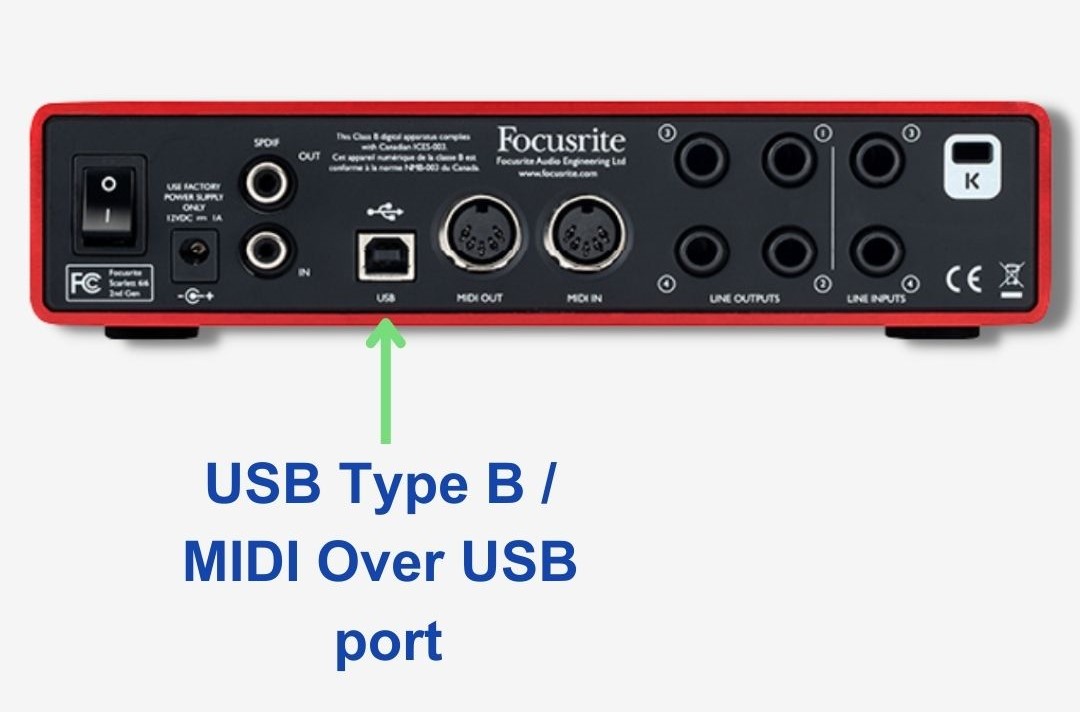
For a 5-DIN MIDI cable connection, you will need an audio interface. But for a USB Type B / MIDI over USB cable, you only need a USB A input on your computer.

This is a 5-DIN MIDI cable. Its build requires a specific port DIN MIDI port. It’s usually the more expensive MIDI hardware that requires a 5-DIN MIDI connection.
So, naturally, many of the more expensive audio interfaces like the Scarlett 6i6 feature 5-DIN MIDI ports
DIN MIDI provides many advantages. There is three possible DIN ports, and these include:
- MIDI In (input).
- MIDI Out (Output)
- MIDI Thru (MIDI Through)
DIN MIDI cables allow us to connect different pieces of gear together, so long as they have a DIN MIDI port. Examples include some synthesizers, higher spec MIDI controllers, and audio interfaces.
You’ll find a DIN In and DIN Out on some audio interfaces like the 6i6. This means you can connect a signal with multiple bits of equipment to your interface and record the results.
On the other hand, we have a MIDI over USB cable – or just a USB Type B cable. Entry-level MIDI controllers and audio interfaces all use these connections.
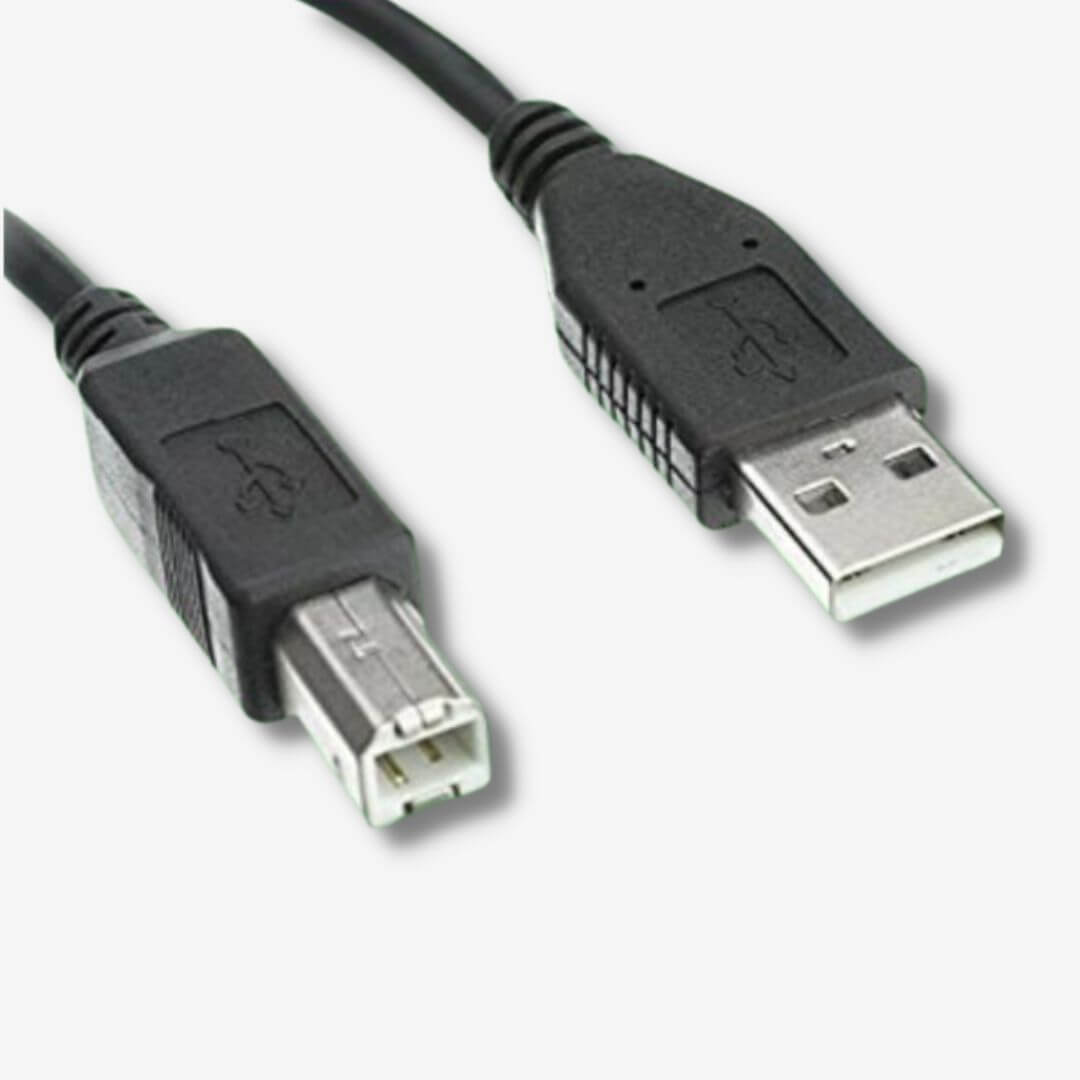
USB Type B connections only have one route compared to DIN MIDI – output on the controller that connects to a USB input in your computer.
Therefore you don’t need an audio interface if you’re connecting a USB B controller. You can plug them straight into your computer!
Do you need an audio interface if you’re not recording?
No, you do not need an audio interface if you’re not recording any audio.
But if you want to connect studio monitors to your setup with balanced cables, or a pair of headphones with high impedance, then an audio interface is essential for connectivity.
Additionally, if you want to connect a synthesizer or a line-level instrument to your setup then you will need an audio interface too.
Do audio interfaces improve sound quality?
As far as recording is concerned, yes – an audio interface improves sound quality every time.
Though each audio interface is different, you won’t be able to capture professional quality audio with a smartphone.
Though you could utilize a USB microphone and connect straight to your computer or even your phone, these aren’t optimal for home recording.
Furthermore, audio interfaces offer so much more connectivity. You can connect multiple mics, electric instruments, and more to an audio interface!
Anyhow, an audio interface coupled with a condenser microphone together will make for a professional-grade recording with vocals or acoustic instruments.
Final thoughts
An audio interface is a critical tool for recording professional sound at home.
And now you know the process that makes home recording possible, and you know what tech specs to look out for.
It’s thanks to audio interfaces and digital audio that millions of people can record at home today. In fact, people would have to pay big bucks to professional studios if this technological evolutino had not happened.
Now that you know how digital audio makes home recording, don’t you think understanding what digital audio makes possible will benefit fit your creativity and musical career?