Guide to XLR cables: What are microphone cables?
After spending some time with studio microphones, you’ll notice that they require an oddly specfic cable you may have not seen before. The three pins inside the base of most microphones require an XLR (external line return) cable.
Something truly baffling about the music industry is the disparity between the price of low and high-end cables. Though not as critical as the specifications of studio monitors and audio interfaces, you do have to wonder why XLR microphone and speaker cables can get so expensive.
- What does XLR Mean?
- The history of XLR
- The anatomy of microphone cables
- Why are microphone cables so expensive?
- Types of XLR cables
- Final thoughts
We’ve explored the purposes of different audio and digital cables you’ll come across while recording and producing music. But now it’s time to get our hands dirty and talk about the intricate details of microphone cables.
There are a number of different types of XLR cables – from 3-pin to 7-pin XLRs – but 3-pin XLR cables are the most common you’ll find. And we can hedge our bets that the only other XLR cable you may use one day is a 7-pin cable. We’ll explore these a bit later on. But for now, let’s focus on the anatomy of XLR microphone cables.
What does XLR mean?
The term “XLR” originated from the innovative developments by the company ITT-Cannon. Initially, the connectors were labeled as the “X series” by Cannon. As improvements were made, a latch mechanism was incorporated to prevent accidental disconnections. This iteration was then named “XL” for “X series with Latch.” Further refinements led to the integration of a rubber compound to protect the connector’s contacts, culminating in what is now known as the “XLR” series.
The history of XLR
The XLR connector was first introduced by ITT-Cannon in 1958, marking a standard that would become pivotal in audio and broadcasting industries. The original design lacked the latch feature, but the reconfiguration of the pins and the addition of a latch enhanced its utility and reliability. This connector type employs a three-pin setup—two pins carrying the audio signal with reversed polarity to cancel out interference, and one for grounding. The robust design, including the latch mechanism, ensures secure connections and high-quality audio transmission, free from noise and interference typically introduced along cable runs.
Over the years, the usage of XLR connectors has become generic across various audio applications, embodying a trademark of reliability and quality in audio connectivity. The history of the XLR connector is a testament to how technological innovations can evolve to set industry standards, ensuring improvements in quality and usability in audio systems globally.
The anatomy of microphone cables
There are 5 parts that you’ll find inside an XLR microphone cable.
- Two Conductors (+/-)
- Insulation
- Fillers
- Shielding
- Outer Jacket
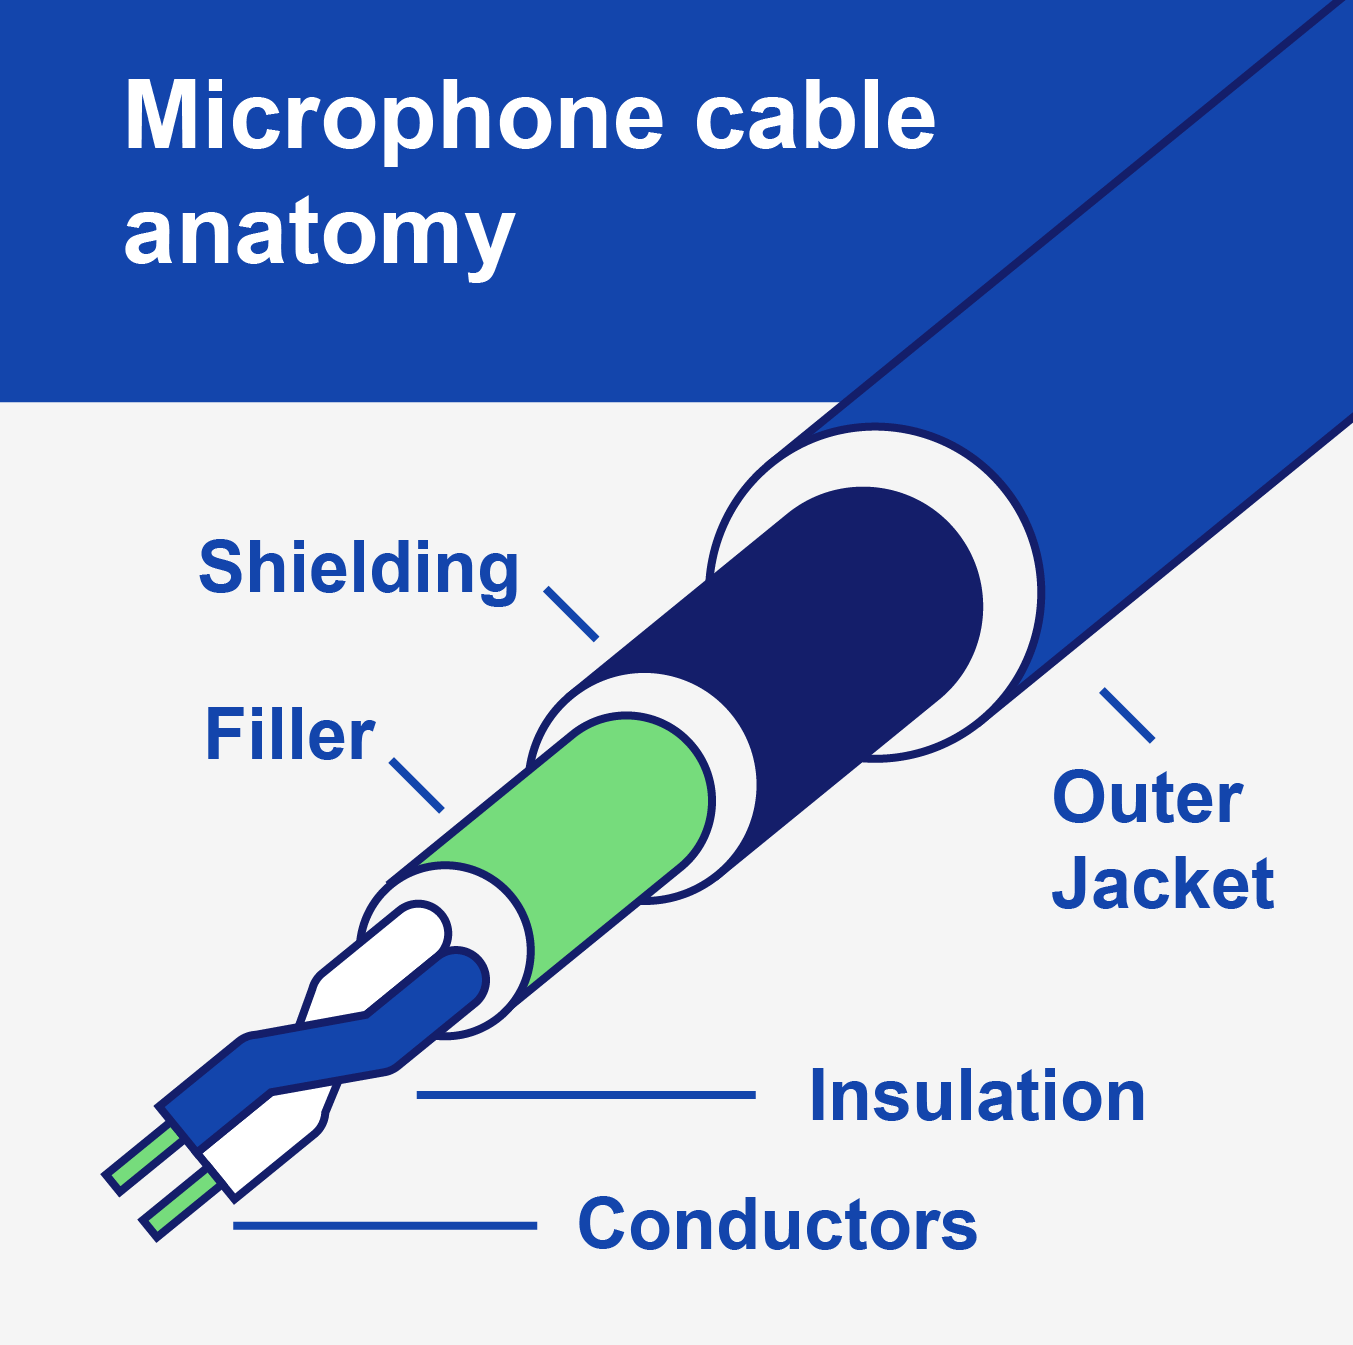
Two conductors (copper wires) lie at the core of microphone cables. And manufacturers wrap both cables in individual strips of insulation.
Then manufacturers twist both wires together and user filler to smooth the cable out. As a result, filler removes any warping that may occur and gives us a nice round cable.
Next, shielding – which is usually copper too – protects the conductors from potential sources of interference like electrical gear.
Finally, manufacturers cover the cable with a rubber outer jacket that protects its internal components from physical damage.
Why are microphone cables so expensive?
Well, there are a number of factors that contribute to both the cost and quality/performance of the microphone. These are:
- Strand count
- The lay
- Shielding
- Impact absorption
- Connector conductivity
- Star quad cabling
1. Strand count
Upon closer look, you’ll notice a number of thin strands make up the copper wires at the heart of your XLR cable.
If cable X has more fine strands making up its conductors than cable Y, cable X has a higher strand count. The result is an XLR cable that is more flexible and durable. And if a cable is subject to heavy abuse – like during a live performance – a higher strand count is far more desirable. But this adds to both manufacturing time and production cost.
2. The lay
Remember when we discussed how manufacturers twist the two copper wires together? Well, that’s what the lay is concerned with.
Expensive cables have more twists than affordable cables. The lay is simply a measurement of the distance between the twists! A higher lay means more distance between the twists/fewer twists!
A shorter lay count on expensive cables goes a long way in improving both noise-cancelling and cable flexibility. However, a higher lay requires more cable length which adds up the cost and manufacturing time too.
3. Shielding
There are three common types of cable shielding.
- Braided shielding (found in high-end cables) uses strands of braided copper. It’s highly conductive, very strong and therefore durable.
- Serve shielding uses flat copper strands as opposed to braided. Manufacturers wrap the strands in one direction, and this type of shielding is less-effective compared to braided. But it has far better flexibility!
- Foil shielding uses a combination of both foil wrapping and a copper drain wire. Though it’s less durable and less effective at shielding, it’s actually the standard option for permanent installations and snakes/multi-cores.
4. Impact absorption
If you’ve not heard of the triboelectric effect, you’re about to.
The triboelectric effect a type of contact electrification on which certain materials become electrically charged after they are separated from a different material with which they were in contact.
Wikipedia
So… how is this relevant to microphone cables?
If you drop or stand on a cable, the cable will compress momentarily before flexing back into shape. However, you may hear a distinct slapping sound – especially if you drop the cable. That slapping sound is the audible result of the triboelectric effect. Cable manufacturers making cables for live performances need to take the triboelectric effect seriously because these cables take a lot of rough handling.
So high-end cables usually use a specific material for their insulation, filler, and outer jacket, making them better at absorbing impacts. Whether dropped or stepped on, these cables can tolerate a lot more rough handling.
But we don’t need to armour studio cables so well. Studio cables generally experience less rumble and tumble so they don’t need such expensive casing. Take a look at your home studio cables and feel how thin they are…
5. Connector conductivity
In order to get the most electrical conductivity, manufacturers can coat cable connectors with a range of metals. Gold and silver are the two more popular choices. However, neither are perfect…
The favourite material is silver because it has higher conductivity, but silver tarnishes faster than gold. And gold is more expensive than silver – something we’re sure you already knew. If that wasn’t enough, silver also requires cleaning to keep its conductivity up.
As a result, gold is usually a more popular choice.
6. Star-quad cabling
Star-quad cabling, or just quad cabling, is fairly new to the world of microphone cables.
Rather than using two conductors, quad cables utilise 4 smaller conductors (2+/2-).
Using smaller conductors cuts electromagnetic interference by about 20dB by minimising the “loop area”. So quad cabling is a very useful method to ensure cables won’t pick up unwanted noise around electrical equipment. As for the actual sound quality, reduced intermodulation distortion (see below) and phase shift allows for a cleaner signal.
Intermodulation distortion results when two or more signals of different frequencies are mixed together and additional signals are formed at frequencies that are not at harmonic frequencies of either source signal.
Digitization Guidelines
Types of XLR cables
Now let’s talk about the different types of XLR microphone cables you may come across. Because you’ll only really find 4, 5, and 6 pin-XLR on gear such as intercom headsets, we’re only going to talk about 3 & 7-pin XLR cables.
3-Pin XLR Connector
The 3-pin XLR is the most common XLR cable, and it’s somewhat of an industry standard for professional microphones. Not only do we use them as microphone cables, but we also use these XLR cables as speaker cables too. Where condenser microphones are concerned, 3-pin XLR cables are capable of carrying phantom power. For example, your audio interface sends +48V DC (direct current) through pins 2 and 3. However, the constant voltage that is phantom power doesn’t interfere with or affect your audio signal.
In each cable you use, every conductor has a contact point. In XLR cables, the pins are the contact points.
- Pin 1 – ground wire (the ground wire surrounds the signal wires and acts as a shield).
- Pin 2 – signal wire (-)
- Pin 3 – signal wire (+)
So pins 2 & 3 are conductors and pin 3 is a ground shield pin.
Additionally, XLR cables are “balanced” cables. Balanced cables cancel out unwanted interference and noise that the signal may pick up as it travels through the cable. In contrast, “unbalanced” cables don’t cancel out any interference that the signal picks up along the way.
The balanced signal configuration of XLR cables ensures that both signal wires carry the same audio signal with opposing polarities, effectively eliminating any interference and resulting in an audio signal with no unwanted noise.
XLR connectors are particularly equipped to handle the needs of professional audio equipment by providing the ability to carry 48 Volt phantom power, which is essential for powering high-quality condenser microphones.
The XLR cable design includes three specific wires and contact points: Pin 1 is used for grounding, while Pins 2 and 3 are used for the signal. These pins are crucial because they carry copies of the audio signal but with reversed polarity. When these signals are combined, they effectively negate any electrical interference that might be picked up along the cable’s length.
In short, the two signal wires carry the same audio signal with opposing polarities
When you sum 1 & -1 together, you get 0. Balanced audio cables, both XLR and TRS cables, use this same technique to eliminate any interference your audio signal may pick up. When the signal travelling through both the positive & negative signal wires reaches the receiving gear, the gear flips the polarity of the signals before combining them. The result is an audio signal with no unwanted noise!
Note that the receiving gear must have balanced inputs for the flipping of polarity to occur. If the inputs on the receiving gear are unbalanced, the signal will keep the unwanted interference it picked up.
7-Pin XLR Connector
The only gear that requires 7-pin XLR cables is tube condenser microphones. Though the specific pin wiring schematic can vary between different tube microphones, every cable generally has the same. This consist of:
- 2 signal wires (+ & -) that carry audio
- 2 wires that send DC voltage (which can vary between microphones)
- 2 wires to complete the tube’s heater circuit (see below)
- 1 wire for the ground/shield
What is a tube heater? All vacuum tubes follow the same basic principles: electrons are released at the cathode and attracted to the anode. This happens because of a phenomenon known as thermionic emission. Basically, as you heat a piece of metal, electrons become more likely to fly off it towards any positively-charged surface nearby. Different classes of tubes, like pentodes and triodes, have various layers of metal mesh inside to manage the flow of electrons, but every tube requires a hot cathode to get the flow started in the first place.
Tropical Fish
Final thoughts
Over time, you’ll learn how to identify and work with the different audio cables. But XLR cables have long been in a league of their own. After all, they’re usually more durable, can carry phantom power, and have a balanced signal configuration.
Furthermore, XLR connectors come with a secure latch mechanism that prevents the cable from being accidentally unplugged during use, ensuring a stable and reliable connection.
To maintain the integrity of the signal, it is also advisable to avoid running XLR cables parallel to power cords, as this can introduce unwanted hum and interference. This attention to detail in both design and usage recommendations underscores why XLR cables are so valued in professional audio setups.
Whether you’re performing live or recording in the studio, it’s always a good idea to have spare XLR microphone cables. You may lose one, break one, or an ill-prepared bandmate may do so.
So, have you decided what tier of XLR cable you need?