
Studio monitor placement guide: everything artists need to know about music production speakers
Studio monitors are the ultimate tool for identifying imperfections in a mix. But owning a pair doesn’t actually mean anything in and of itself…
Though studio monitors are more suited to music production than regular consumer-grade speakers like Hi-Fi speakers, the room your monitors are in and how you position them are pretty important things to consider.
Regular speakers make anything sound good, but studio monitors are designed to show what’s bad about a mix. But poor acoustic spaces and sound reflections make it harder to identify those imperfections even if you’re speaker positioning is good.
So let’s talk about studio monitors, what rooms are good acoustic spaces, and how to position music production speakers.
- What are studio monitors?
- Finding the best room for a home studio
- How to place studio monitors
- What is a stereo image?
What are studio monitors?
Studio monitors are a special kind of speaker designed for critical listening.
Unlike home entertainment and Hi-Fi speakers that make anything sound good, studio monitor speakers are designed to show music producers sonic mistakes and imperfections in their music.
Why are studio monitors important?
Studio monitors are necessary because they give you an accurate sound while recording, mixing, and mastering.
The frequency responses of regular speakers just aren’t tailored to provide such a sound. In other words, regular speakers utilize frequency boosts and cuts to provide a more enjoyable listening experience.
Therefore, you won’t notice any sounds that are out of balance in your mix.
Monitors vs studio headphones
While studio monitors are preferable they’re not essential if you’re just starting out. A good pair of studio headphones will get you started!
In fact, studio headphones are actually an extension of a studio monitor setup. Although studio headphones aim to offer a flat frequency response like monitors, they have a harder job of it because they have smaller drivers.
The bigger a speaker driver, the easier it is to produce a more precise signal. In any case, a driver needs to work hard to produce bass & treble frequencies and it’s hard enough for a studio monitor let alone a small headphone driver!
But, of course, studio headphones do have their place because regular headphones do not give you as balanced a reproduction. Don’t forget to check out the article below if you want to know more about how a speaker driver works!
Speakers vs monitors: the difference between active & passive speakers
Regular Speakers and monitors may deceptively look the same but they are not. Each belongs to a separate type of speaker that functions a little differently.
The two speaker types are active and passive, and the “type” refers to how each speaker is powered.
An active speaker has an internal power supply that connects to mains electricity while passive speakers rely on external amplifiers.
- Signal amplification
An audio signal must be boosted in level before it is loud enough to play. And an active speaker has internal signal amplifiers while passive speakers rely on an external amplifier.
Studio monitors are active speakers, so they have separate internal signal amplifiers that power both the mid/subwoofers and the tweeter.
In contrast, passive speakers require an external amplifier to power every speaker cone.
- Frequency crossovers
A frequency crossover splits an incoming signal into separate frequency bands (bass, mids, and treble) and sends them to the right speaker driver.
In an active speaker, a crossover splits the frequencies before signal amplification while a crossover splits the frequencies after signal amplification in a passive speaker chain.
A digital crossover board sits inside an active speakers’ cabinet, but a passive crossover is an external unit that splits the frequency bands before the signal reaches the speakers.
And an active crossover doesn’t emphasize any frequencies to make the speaker sound good. But passive crossovers don’t have a flat frequency response like this, so they do apply frequency cuts and boosts to the signal.
Though they’re accurate, studio monitors are the most accurate within close listening ranges.
Close-range listening
We call studio monitors “near field monitors” because their sound is more accurate in close-range. Simply put, “nearfield” means you need to be within a few feet of nearfield monitors to hear the best sound from the speakers.
In practice, if reflected sound is infiltrating your listening session then you’re not hearing an accurate reproduction of your mix. But being in such a near range allows you to minimize the amount of reflected sound that can infiltrate your listening experience in a space.
To summarize, you’ll get a more precise listening session as a result of a close listening range with a more accurate reproduction of your mix in an upfront manner.
Mid-field and far-field speakers such as hi-fi systems are designed to fill whole rooms with sound!
Why is monitor positioning important?
Not all sound waves behave the same way, and the positioning of your speakers will influence how they behave in your room.
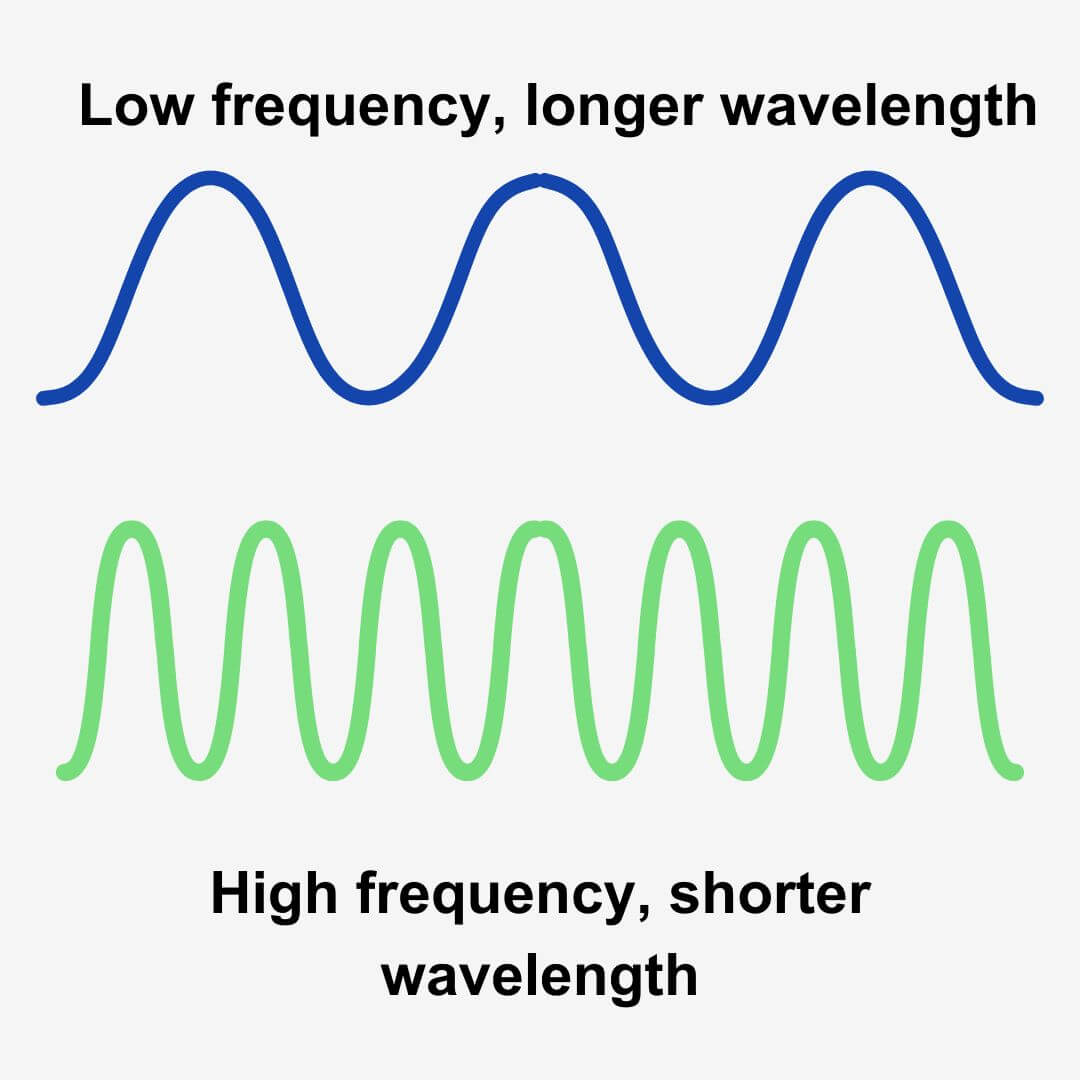
Lower frequencies travel in all directions which means they’re omnidirectional waves. In contrast, high frequencies travel in one direction at a time, making them directional waves.
As a result, poor speaker positioning has a huge effect on how you hear your music productions. Therefore, we aim to create an environment where a natural sound balance can exist when positioning studio monitors.
That is a sound that room acoustics don’t alter. Proper placement of speakers is an essential step if you want to hear a faithful reproduction of your music.
However, proper speaker placement can’t defeat physics – the shape of a room dictates how sound behaves in it. Though the close listening range of near-field monitors mitigates reflected sound problems, placing your studio monitors in a room with poor acoustics will jeopardize your critical listening session if it’s left untreated.
Finding the best room for a home studio
The ideal home studio setup is a room big enough to stop reflected sound from interfering with recording, mixing, and mastering sessions.
As we said, the shape of a room dictates how sound behaves in it – so rooms capable of a natural sound balance share some characteristics.
- Find a quiet space
Firstly, you’ll want your home studio to be the quietest room in the house. Though that will be harder in a city where thin walls let outside noise in, it’s tough to make professional music in a noisy environment. - Avoid parallel walls
A square room made of four parallel walls are where reflected sound thrives. Room modes are a common problem in smaller square rooms while flutter echo (a high-frequency metallic reverberation) is a problem in bigger square rooms.
So square rooms just aren’t suitable for critical listening environments, and rectangular rooms aren’t so great either. Though a long open space means sound waves will lose at least some of their energy before reflecting, any room with parallel walls gives sound waves a playground to bounce back and forth in.
It’s a good idea to listen in the biggest room that you can with irregular shapes and surfaces. Sound loses a substantial amount of energy the further it travels, and reflected sound becomes a dramatically smaller problem because room modes are less likely. - Look for tall ceilings that aren’t flat
Sound waves bounce more frequently in rooms with lower ceilings, and rooms with flat ceilings will bounce sound between the ceiling and the floor. Low frequencies bounce off of ceilings because they travel in all directions so they induce reflected sound if the ceiling is too low.
But many people may not have much choice here. Therefore, it’s a good idea to pad your ceiling up or tie a duvet or blanket up there to absorb at least some of the sound. - A room with as few windows and doors is best
Every opening in a room adds another hurdle to an already challenging quest. Find a space with no windows and one door for entry if you can! - No carpet
Carpets do absorb high and mid frequencies but they don’t absorb low frequencies. Consequently, carpets can unbalance the sound in your room and give you a false impression of how much low-end is in your mix.
But hard flooring (wooden for best results) with a rug covering most of the surface area will give you a better listening experience.
What are room modes?
Room modes occur when a sound wave bounces off a wall and meets an incoming copy of itself. They distort the flow of sound in a room, especially below 300 Hz, and can create a boomy sound.
Room modes form whenever the wavelengths of direct and reflected sound are multiples of each other. And when the direct and reflected sound mirror each other, they amplify the waves in time with one another or cancel out those that aren’t.
And if your room dimensions are the same length or a multiple of a wavelength, those waves are going to come into contact with one another.
To explain it, let’s think of room modes as the classic mobile game “Snake”. The snake gets a little bit bigger each time it eats an apple, thus making it that little bit harder not to come into contact with itself. And when the snake gets too big it eventually becomes impossible to direct the snake away from itself – and when it does it explodes.
It’s a brutal ending, and when two identical soundwaves in time with each other do meet they create standing waves.
Standing waves are a build-up of sound pressure that is “standing” in the area where the sound waves are meeting. In contrast, any identical wave copies that are of phase cancel each other out.
How to place studio monitors in a room
Now that we know the difference between speakers and studio monitors, and what makes a good critical listening environment, let’s take a look at how to position studio monitors in a room.
First of all, it’s best to place studio monitors against the longest wall. Whether they’re on a desk or on monitor stands, the distance between both monitors and the surrounding walls should be equal.
As a result, your monitors can create a symmetrical stereo image.
How far should studio monitors be from the wall? Avoiding the boundary effect
Keep about 60cm of space between your monitors and your wall. Sound waves will travel behind the speaker, bounce off of the wall there, and this reflected sound will merge with the direct sound from your monitors.
This is called the boundary effect and it will distort your perception of your production.
The boundary effect – like room modes – affects lower frequencies more than others because they have longer wavelengths than high frequencies. And as they reflect off of the rear wall these longer wavelengths are almost in time with the direct sound from your monitors.
But 60cm of space between the speakers and the rear wall gives lower frequency waves to
The combination of direct and reflected in time with itself will make you think that your bass is louder than it is. Ultimately, this will lead you to undercompensate on your low end. And the proximity effect is even more of a problem if you have a rear bass port!
Ultimately, the boundary effect is a real problem while mixing because it conflates and inflates reflected and direct sound in time (in phase) with one another while canceling out frequencies that are not in phase.
Should you angle studio monitors?
Studio monitors sound their best when angled toward your head. In fact, your head should form an equilateral triangle (with three equal sides) with your speakers, so angling your monitors toward your listening position allows you to do so.
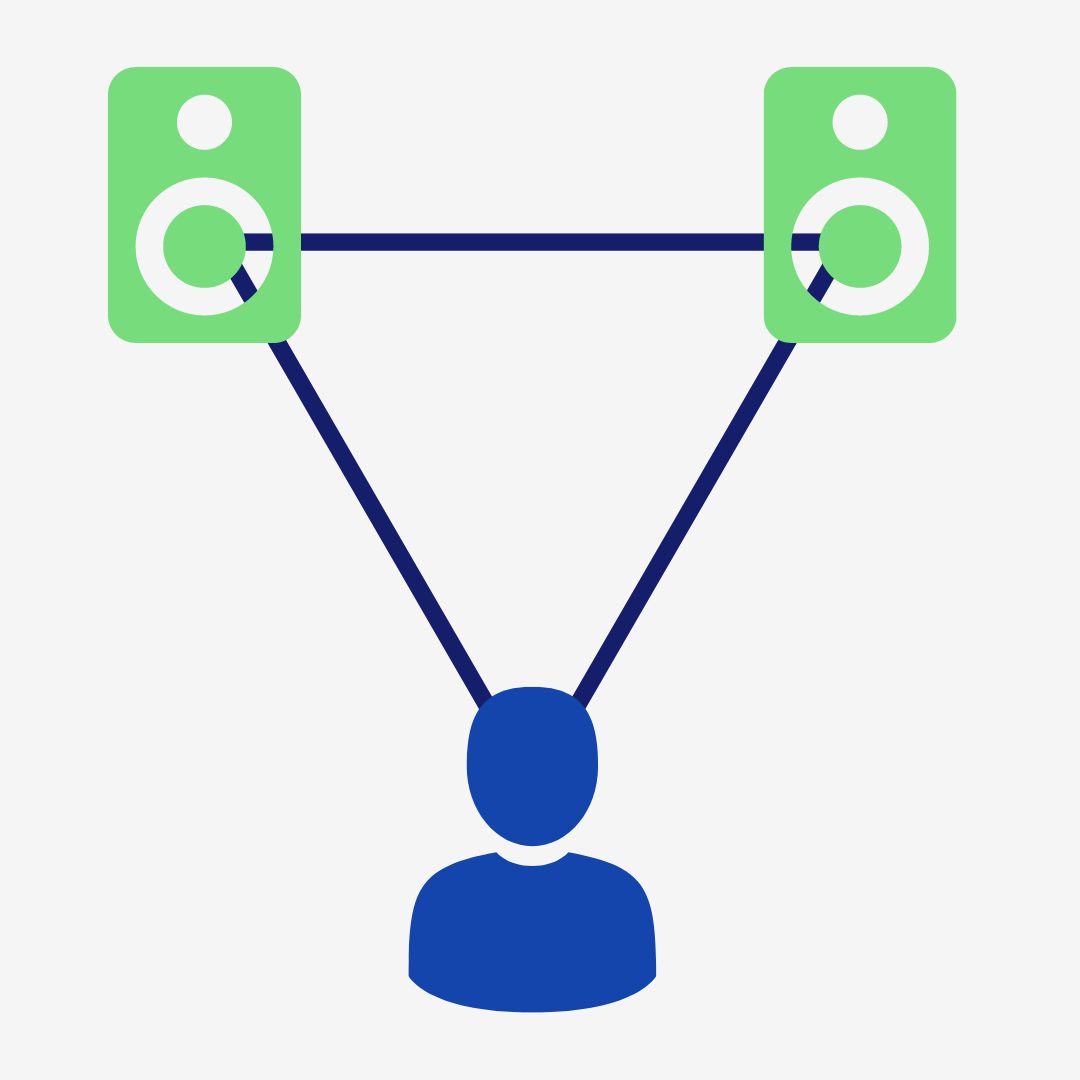
In other words, make sure the speaker cones directly are facing your head.
Again, our goal is to achieve an equal stereo image so you can create music to the same specification as the rest of the music industry.
How much space should be between your monitors and you?
Approximately five feet is the ideal distance between you & your studio monitors. Again, make sure the distance is the same between each so your head & studio monitors form an equilateral triangle.
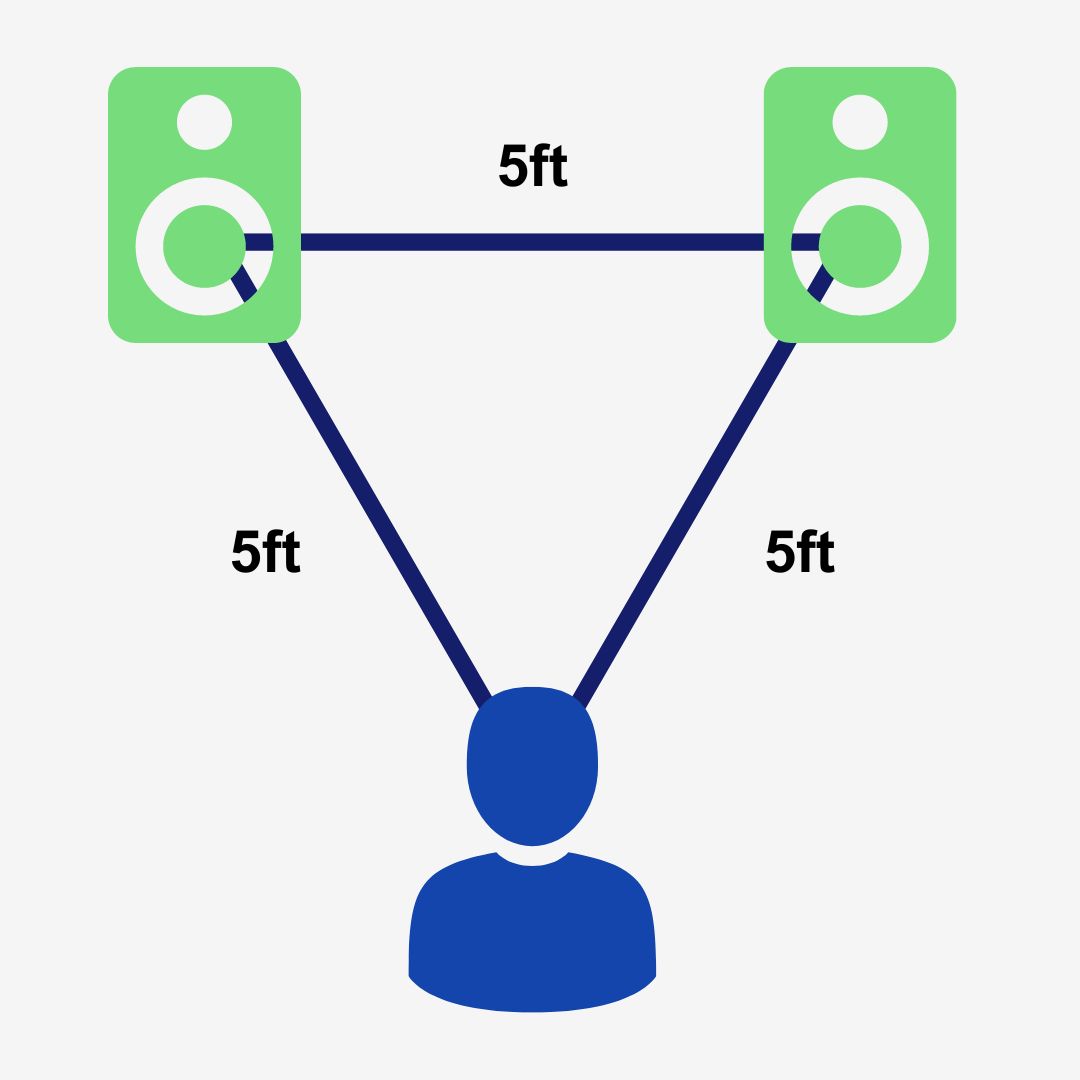
To do so, use a measuring tape and ensure there are five between both monitors and your head.
How high should your studio monitors be?
Ensure your studio monitors are the same height as your head while sitting. With that said, keep them above or below the mid-height point between your reflective floor and ceiling.
Low-frequency sound waves travel everywhere at once. These frequencies will have a party at the mid-height point and bounce off of every surface.
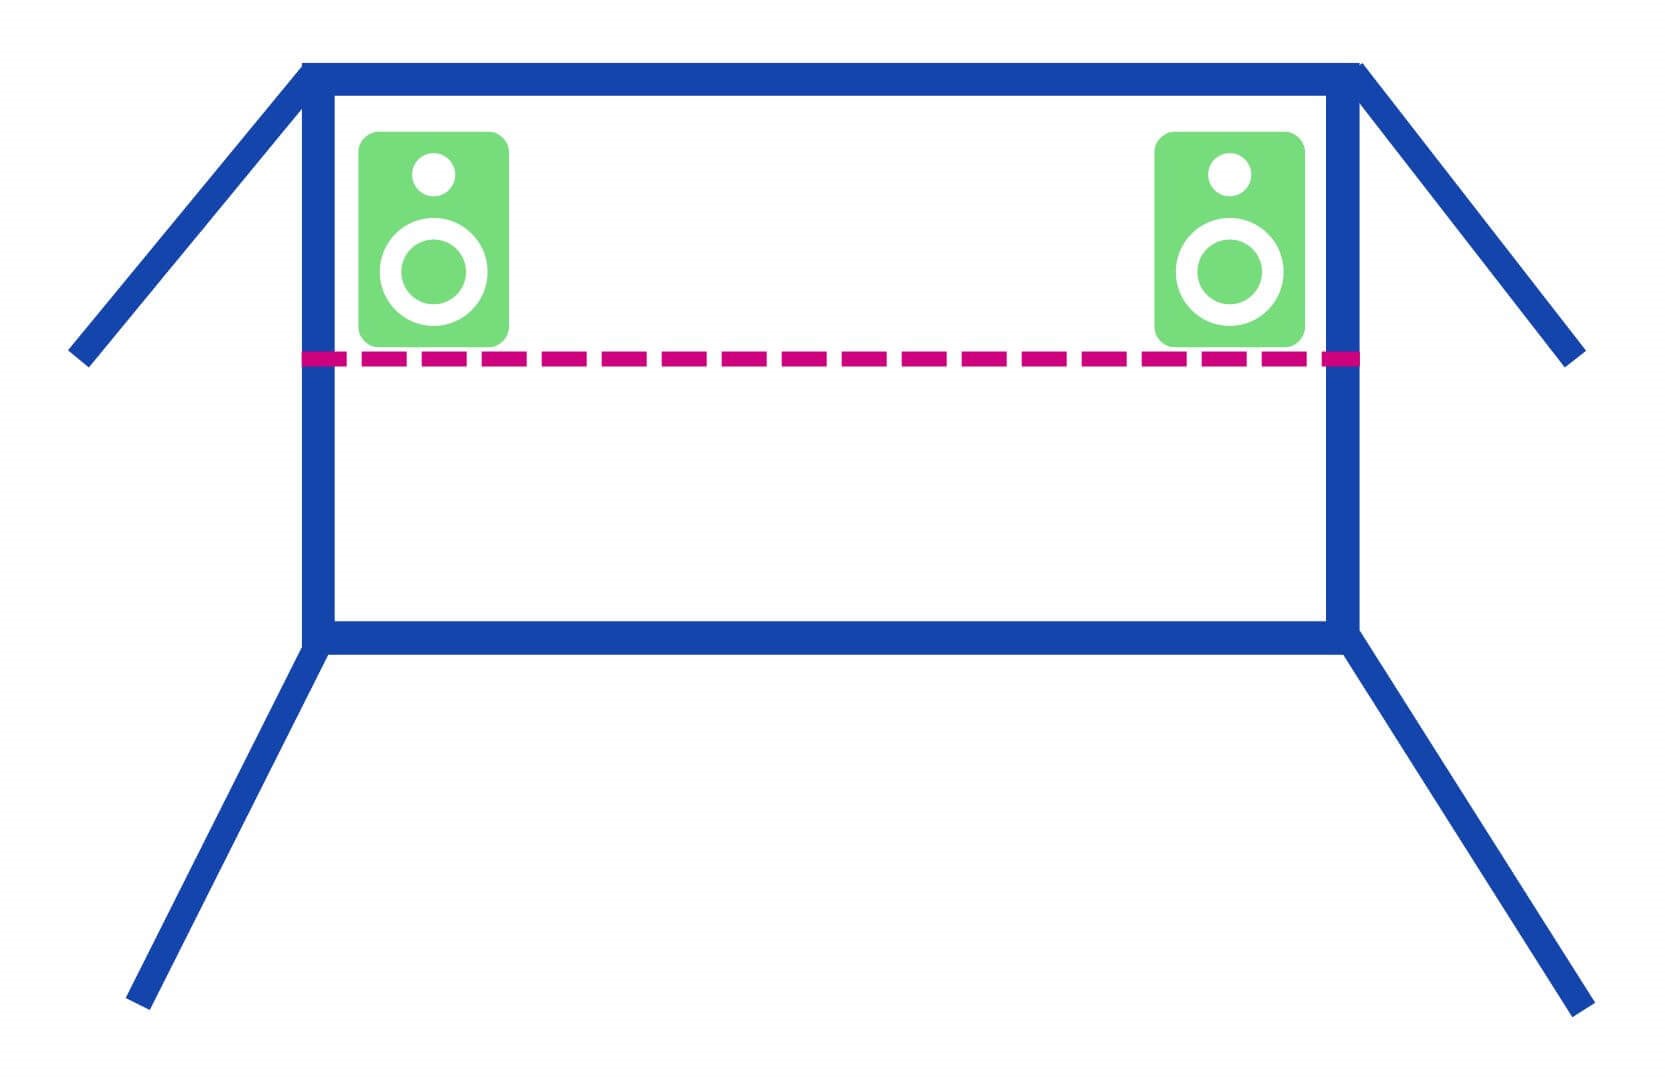
Instead, the best-case scenario is to have them slightly higher than the mid-point and tilted down toward you by about 15 degrees.
And then center your chair between your monitors and ensure your head is at the same height. Now you’ll have more chance of noticing more details in higher frequencies and less chance of low-frequency reflections – which as we mentioned before are directional.
What is a stereo image?
A stereo image is what creates a sense of width and depth in a song.
When you listen to music you notice that kicks, snares, bass, and vocals tend to be upfront in the “middle” while other elements like guitars or synths sit behind these elements and panned more to the left and right.
That “middle” is known as the center image because it’s the center of the – you guessed it – stereo image! Coupled with the center image, every instrument panned between left, center, and right makes the tracks’ full stereo image.
In addition to left/right, the instruments that sit behind the center elements add “depth” to the stereo field. If everything is only panned left and right it creates a pretty flat mix with no dynamics.
So, the more varied the spectral location of each instrument is the larger, wider, and deeper your stereo image will sound.
While placing monitors, creating a sound stage big enough to spread a song’s stereo image is critical if you want to accurately hear everything how it should be.
If the stereo image can’t stretch out enough your stereo image will be too narrow. But after reading this article you now know how to create the perfect sound stage in your home studio!
How your computer screen affects depth
One last note here: your computer screen is a highly reflective surface. Keep your computer screen behind or above (pointing down) your studio monitors.
All sound from your studio monitors will bounce off of a screen that’s in front of or equal to them. As a result, the reflected sound will interfere with your listening session and remove quite a bit of depth from your music.
Final thoughts
Making music with regular speakers is like baking a cake in the microwave. The microwave will heat the cake up but whether it’s good to eat is another question.
Likewise, regular speakers are designed to make anything sound good. So your tracks may sound good through them, but whether the tracks sound good on every other speaker is doubtful.
Although studio monitors are the ultimate tool for identifying imperfections in a mix, they’re only as good as the space and position they’re in.
A bad room will induce sound reflections which make it harder to hear those imperfections, and poor speaker positioning will cripple your chances of hearing the full sound stage of your mix.
To summarize, a room with acoustics where a natural sound balance exists and solid positioning of your monitors allows you to hear a full sound stage without the nuisance of reflected sound.
So, in which room do your studio monitors sound best?
Don’t forget to grab your free sounds from RouteNote Create today!
Browse hundreds of thousands of royalty-free sounds right now and download one-shots, loops, FX & full sample packs from top producers.