MIDI controllers: What are they? How do they work?
MIDI controllers provide a hands-on workflow that allows musicians to compose music and change software instrument parameters.
Imagine having the ability to test a melody in the context of a song, or experimenting with different sounds in a hands-on way…
MIDI controllers make that possible, and still more! You can navigate your DAW and control multiple pieces of hardware with just one MIDI device.
Forget about the mouse and keyboard and say hello to MIDI instruments with the following topics:
- What is MIDI?
- How does a MIDI controller work?
- How to create a MIDI signal chain
- MIDI 2.0 vs MIDI 1.0
- What can you do with a MIDI controller? FAQs
- The future of MIDI
- What are the most common MIDI CC messages?
What is MIDI?
MIDI is a communication protocol that allows digital music gear to communicate in the same language.
MIDI stands for Musical Instrument Digital Interface, and it allows musicians to integrate computers and digital music gear into one setup.
Roland’s founder Ikutaro Kakehashi had the idea of a universal language that communicates a musical performance in a digital language.
Consequently, MIDI has influenced the design of digital music gear ever since.
Using MIDI in our music productions
No matter the input, a MIDI controller sends digital data to our computer that the computer and other digital music hardware can read and process.
But this MIDI data doesn’t include an audio signal whatsoever. More specifically, MIDI information only includes data that describes our input – what note you pressed, what knob you adjusted, etc.
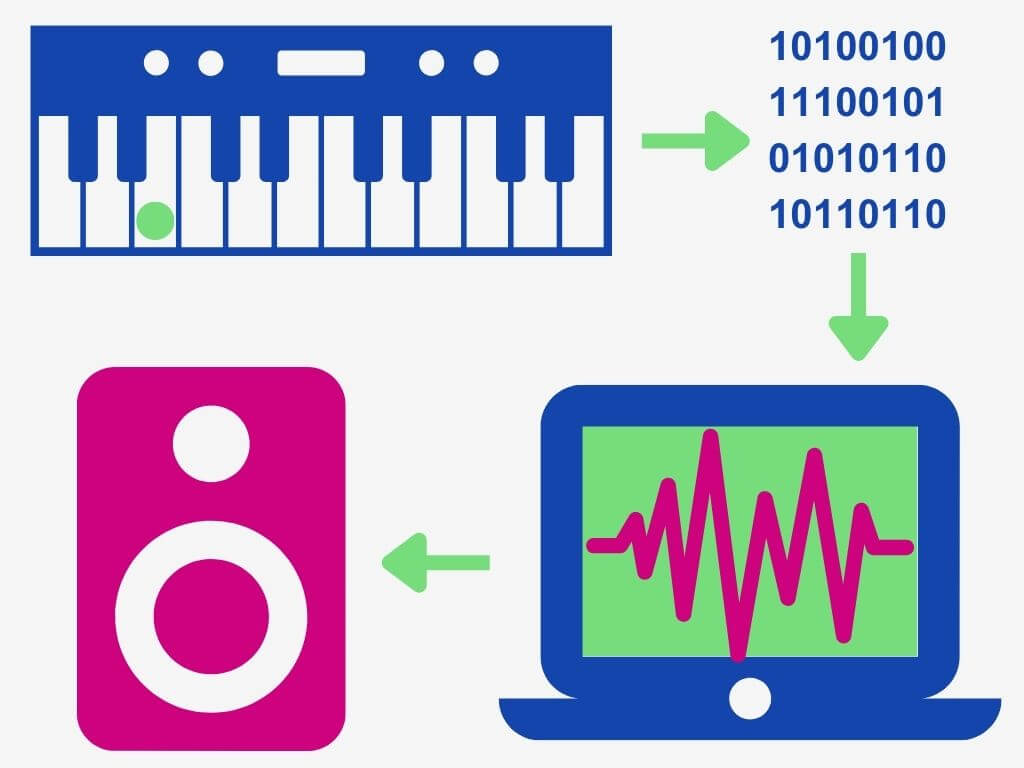
In a simple setup like the one in the image above, the sound source is a virtual instrument or software synthesizer on the computer.
Therefore, a MIDI controller allows you to get hands-on when writing music with software instruments and plugins.
Change parameters like filter cutoff, write melodies and chords, or do both simultaneously!
Then, the MIDI controller will send data that tells our computer of these inputs and make the adjustments in the software.
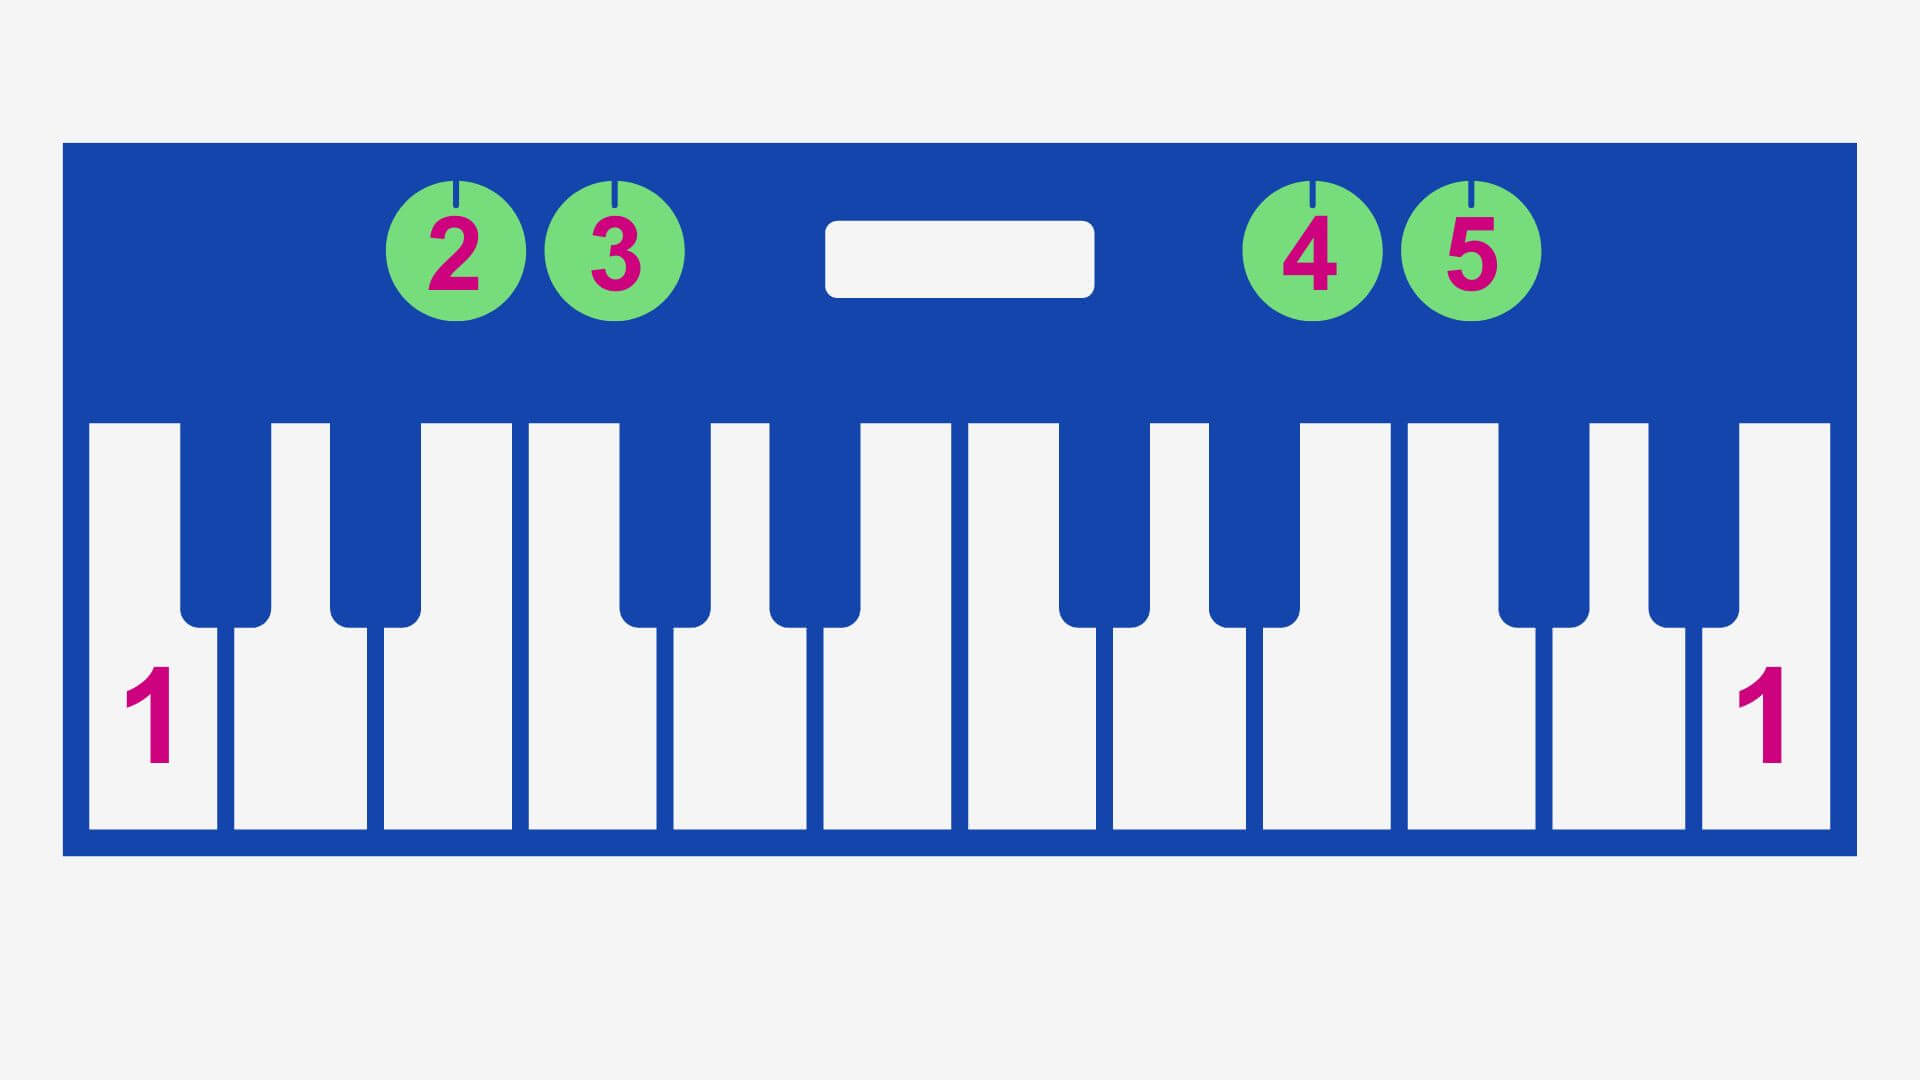
The image above features a 2-octave MIDI keyboard with four adjustable knobs. In this example the numbers represent the following:
- Keys – note information
- Volume knob – parameter information
- Panning – parameter information
- Filter – parameter information
- Delay time – parameter information
While composing with the MIDI keyboard and a virtual instrument, the knobs (2 – 5) allow us to add expression to notes (1).

We can change the volume of the sound (2) while playing, pan the signal left and right (3), clean the sound with a filter (4), and add a time delay (5) between the note press and sound generation.
Most MIDI controllers allow you to configure our setup how you like. But every controller is different, and some only have keys; some have keys and knobs; others have only pads; and so on.
Though some have pre-defined functionality, you can use MIDI mapping to route different controls to different parameters within a virtual instrument and our DAW.
As a result, our creative process becomes more personal and expressive.
However, MIDI’s biggest benefit is how it allows us to edit our performances one note at a time by adjusting their velocities, replace the virtual instrument providing the sound, and so much more.
Composing with MIDI
After we activate the record button, any note we play will draw a MIDI note in our DAWs’ piano roll. These notes appear in timeline order based on the tempo and when we press the note.
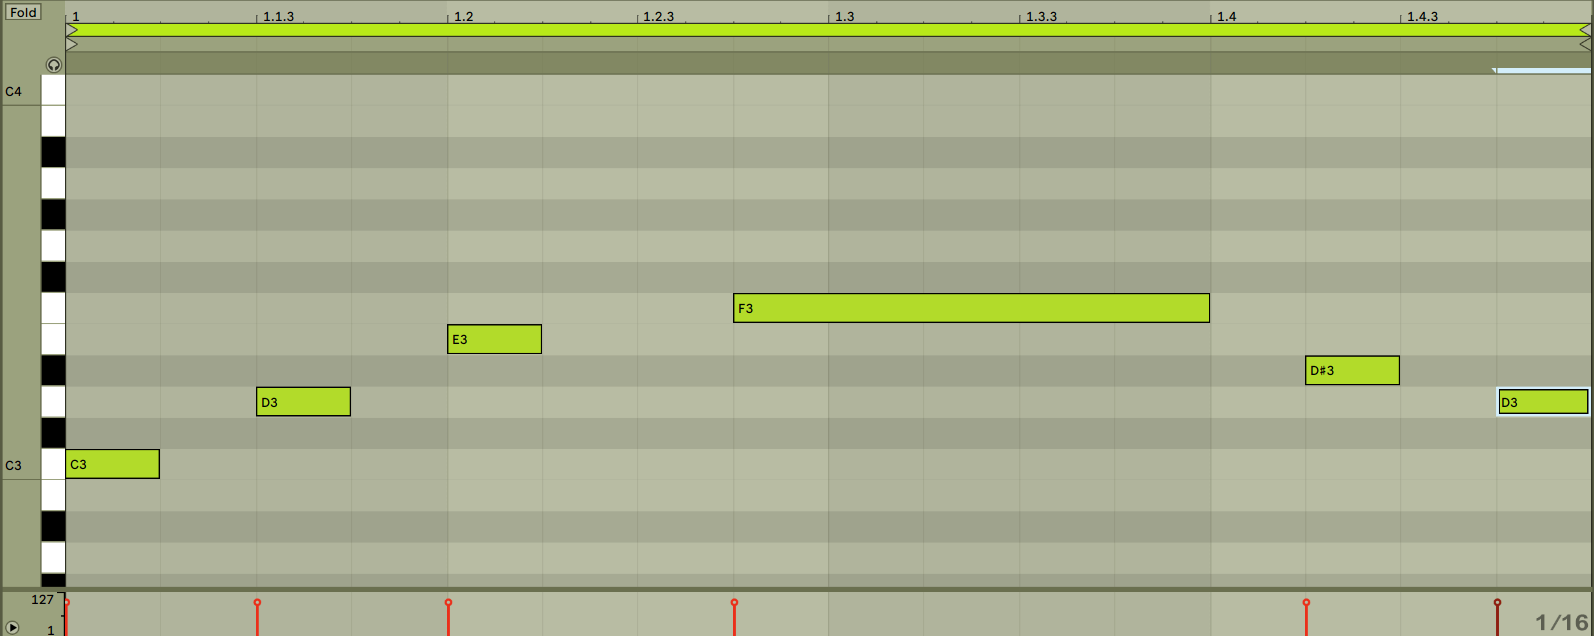
MIDI notes are full of the MIDI information that represents what notes we’re pressing and how we’re pressing them.
So when the metronome reaches the MIDI sequence the software processes the MIDI data and outputs the resulting sound of the virtual instrument on the channel.
What are MIDI Packs?
MIDI packs consist of chord progressions and melody lines in the MIDI language that piano rolls like the one above can interpret and play.
In contrast to sample packs which include audio files, MIDI packs only include MIDI notes.
Therefore MIDI packs are easy ways to utilize MIDI in our music – without using a controller. Simply download a MIDI pack and insert it into our project!
A MIDI pack can include but is not limited to:
- Looping chord progressions
- Melody lines
- Basslines
- Drum patterns
MIDI packs allow beginner producers and composers to jump right into making music with chords, drums, and melodies with no knowledge of music theory. Again, just drag and drop – and we’re away!
On top of aiding beginners, more experienced producers can find inspiration in MIDI packs too.
How does a MIDI controller work?
To understand what data a MIDI controller sends data to computers, let’s break down the essential elements of MIDI controllers.
How does a MIDI controller connect to a computer?
A USB Type B cable, sometimes known as MIDI over USB cable, allows us to connect a MIDI signal chain to our computer.
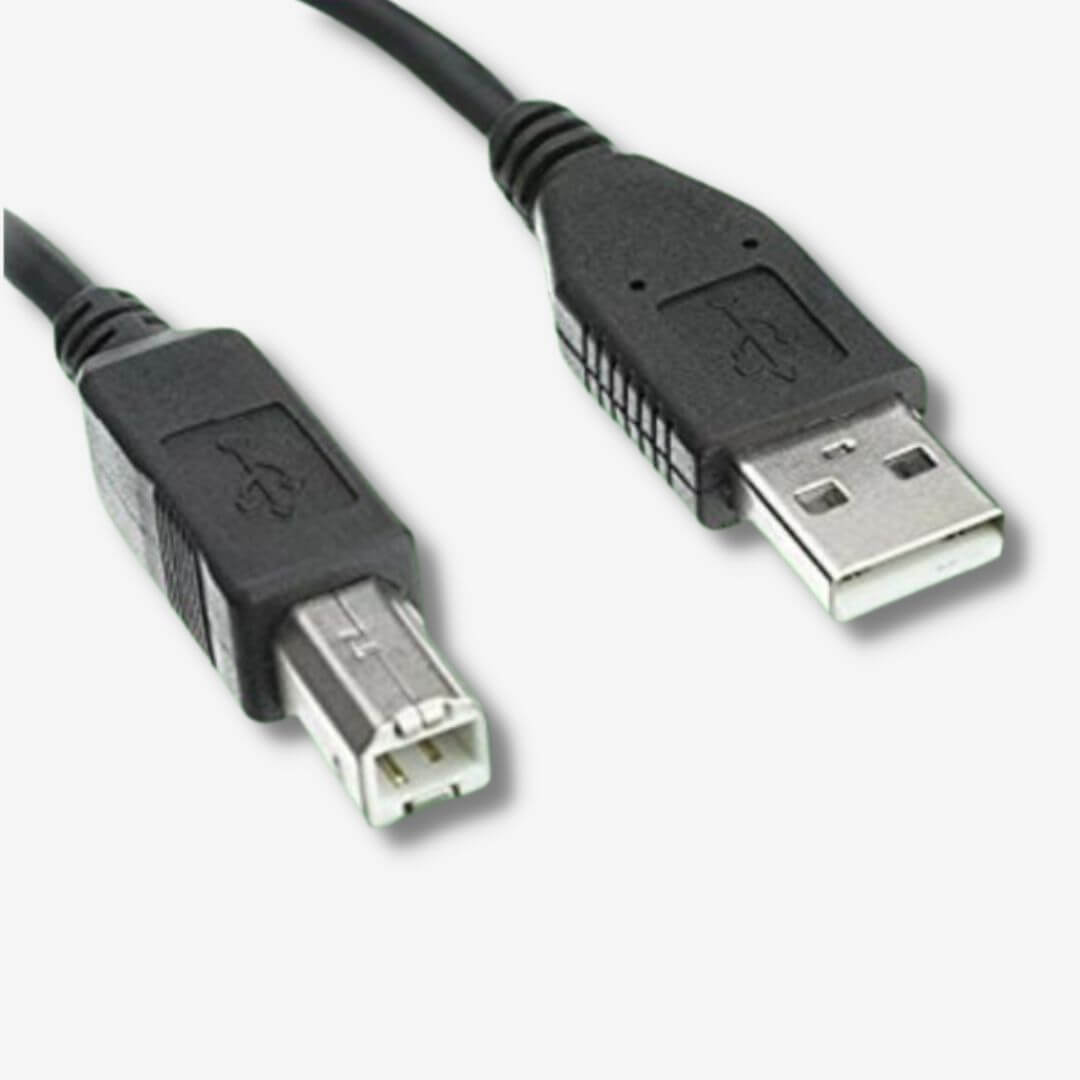
USB cables are digital cables that enable MIDI devices and computers to communicate.
MIDI messages (MIDI files)
MIDI messages are the data packages that inform our software instruments what to do.
These MIDI messages hold information about the notes we’re pressing, what parameters we’re pressing, and so on.
As we discussed earlier, these MIDI files do not contain any information about how a track, channel, or instrument sounds.
Therefore MIDI files are instructionional messages that tell our virtual instrument or DAW how to behave.
MIDI files only contain information about how we’re using the MIDI hardware – what notes we’re pressing, what parameters we’re adjusting, and how much we’re adjusting them.
Then our computer reads and executes the commands in these files by playing equivalent notes or adjusting settings based on our commands.
Where analog equipment relies on electrical current to distribute parameter change information, MIDI controllers rely on MIDI files for this information.
Below are some examples of data that a MIDI file may contain:
- Note duration
- Note velocity (how fast and how much pressure)
- Global controls: play, record, stop
- Pitch bend
- Modulation amount
What is MIDI CC?
MIDI CC stands for ‘Continuous Controller‘, and there are 127 CC messages that you can use.
From CC#0, CC#1, CC#2… all the way up to CC#127, controllers use these numbered messages to represent parameter changes.
In short, these numbers represent specific DAW or instrument parameters and expressions. To clarify, MIDI CC individual messages represent specific different settings and instrument characteristics.
So it’s MIDI CC messages that allow us to control elements like volume (CC#7), panning (CC#10), and more!
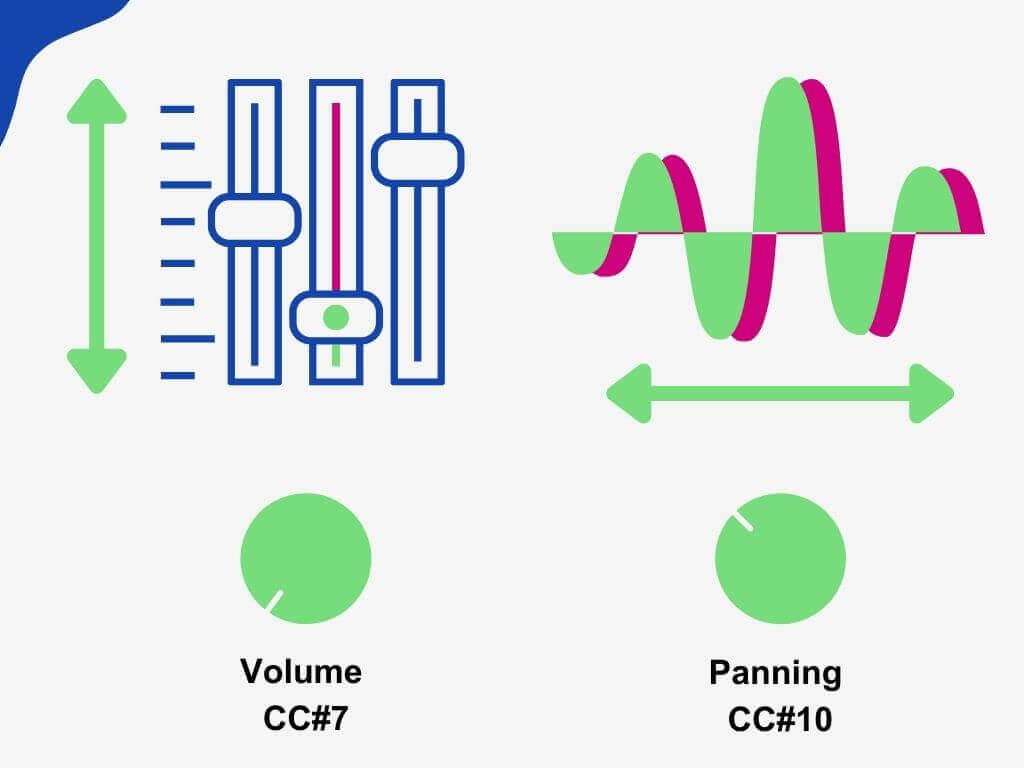
In summary, when adjusting the position of a knob or fader; pressing a pad or key; or even pressing a button, our controller sends a MIDI CC message telling our DAW what to do in response.
How MIDI aftertouch works
Upon pressing a key we’re applying pressure to it.
Whether you stab a key or hold it down, our controller sends MIDI data that informs our computer of that pressure.
And that data is called MIDI Aftertouch.
But there are two types of MIDI aftertouch.
Channel aftertouch is the most common. It refers to the amount of pressure that you can apply to all keys at any time.
Meanwhile, polyphonic aftertouch is specific to every individual note.
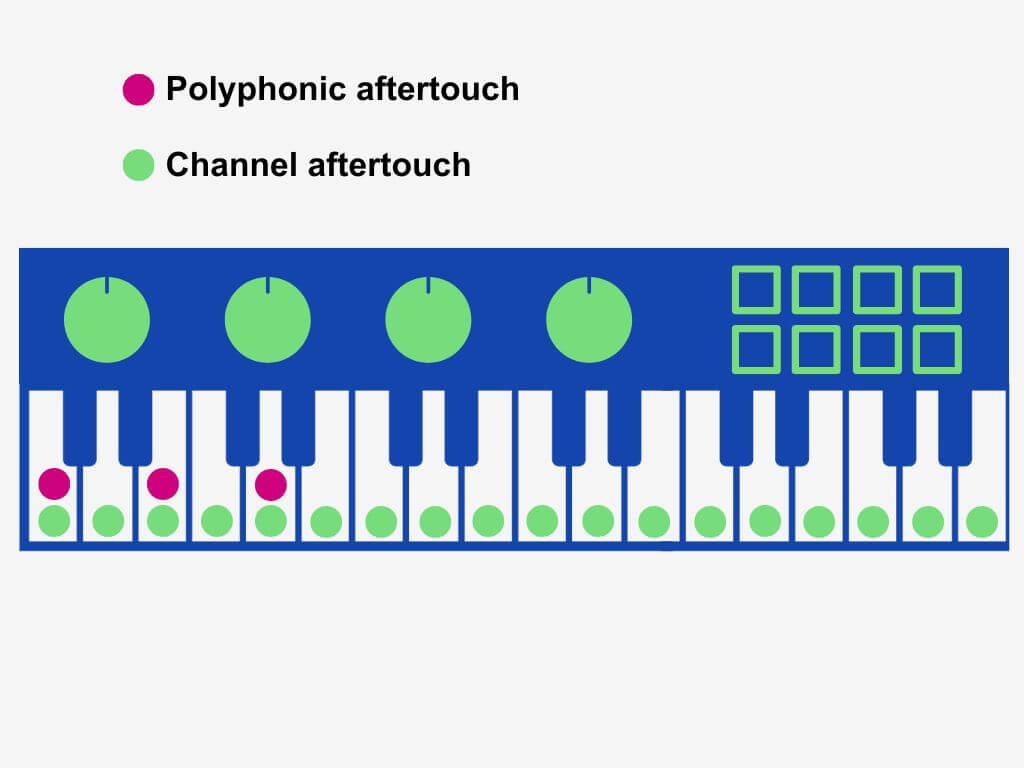
In practice, polyphonic aftertouch messages contain both a note number and data about the pressure amount.
In contrast, channel aftertouch messages only contain information on the amount of pressure.
Channel aftertouch data doesn’t contain a note number because it concerns all notes at all times.
Furthermore, channel aftertouch is found in all MIDI controllers while polyphonic aftertouch isn’t.
Polyphonic aftertouch needs a mechanism that is more expensive than channel aftertouch, so it’s not usually found in entry-level controllers.
In any case, aftertouch data allows our computer to receive pressure information about the note or notes we’re pressing.
Velocity sensitivity in MIDI controllers
Velocity sensitivity enables our computer/DAW to respond to the force and speed (intensity) that you press a key.
To illustrate, pressing a key gently generates a softer sound while pressing it harder generates a stronger sound.
Touch-sensitive keys allow us to utilize this technology in our MIDI setup.
In effect, velocity sensitivity and touch-sensitive keys allow you to play virtual instruments closer to how you would a real one.
For example, inside a piano hammers strike thin strings once you press one or multiple keys. Then, the strings vibrate and generate sound.
How hard you press a key dictates how strong the hammers will strike the strings.
In contrast, MIDI keyboards use sensors that measure note velocity. In fact, MIDI keyboards use 2 sensors to measure velocity.
One sensor tells the computer which key you have struck, and the second sensor tells the computer how fast you struck the key.
Not to be confused with aftertouch which is pressure sensitivity, velocity-sensitive sensors only measure the speed at which you press a note.
Then a value between 0 – 127 is sent to our computer.
- 127 = full velocity
- 0 = low velocity
Striking a key as fast as you can likely sends the highest CC#127 message. On the other hand, striking a key slowly will send a lower CC message.
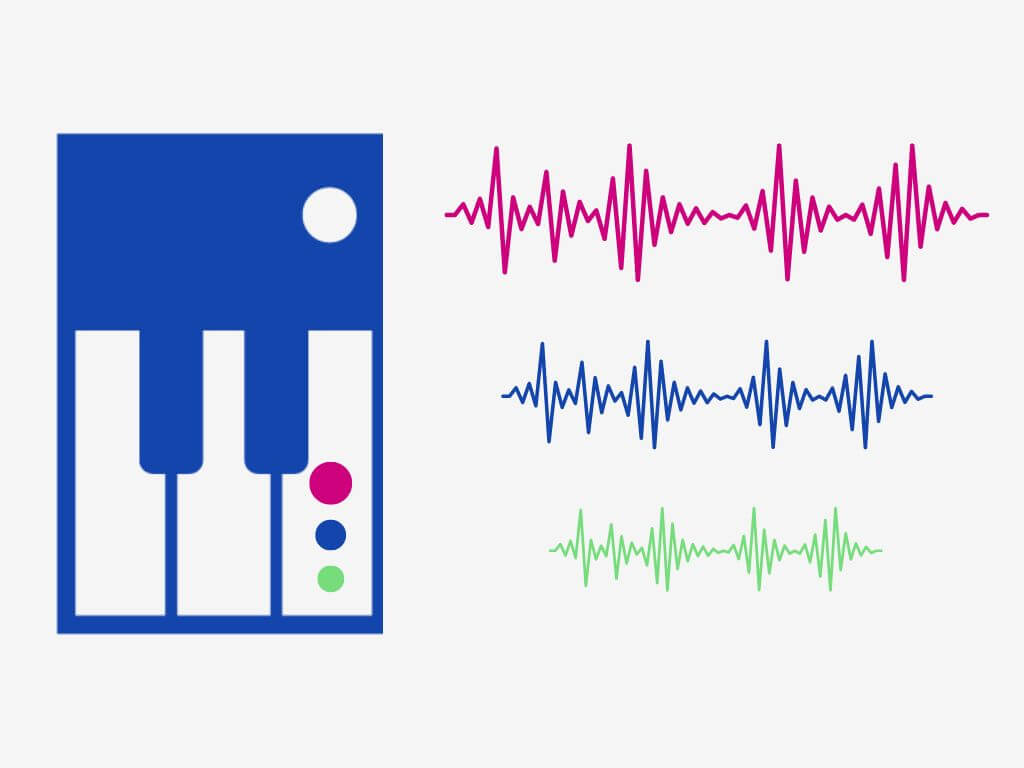
What are MIDI velocity curves?
What if I told you that you could retain a level of absolute control over note velocity? Let’s talk about velocity curves!
Velocity curves are a selection of pre-defined velocities that you can select between.
By choosing a pre-defined velocity curve, our MIDI controller will output a predetermined velocity no matter how fast you strike a key as a result.
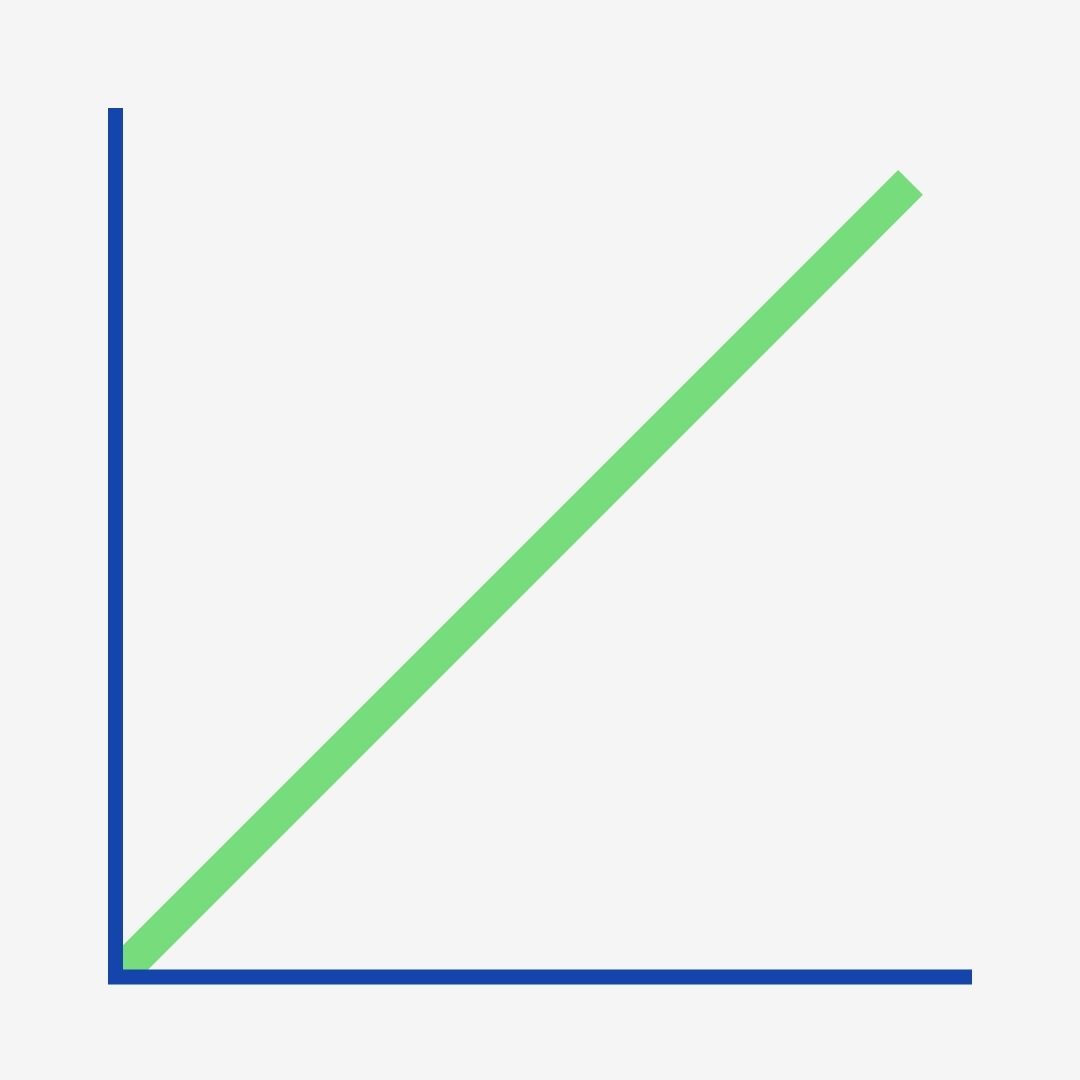
Velocity curve 1 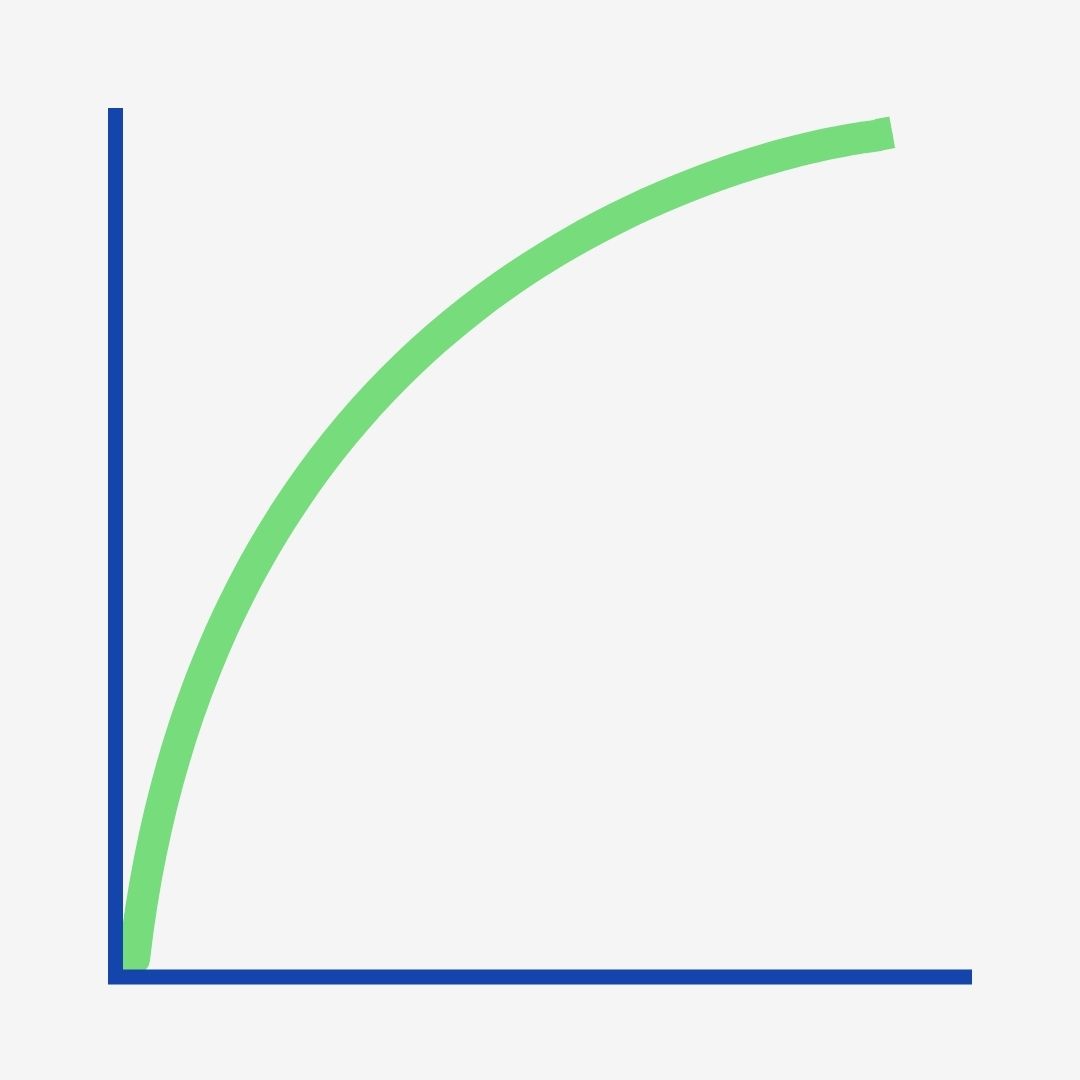
Velocity curve 2
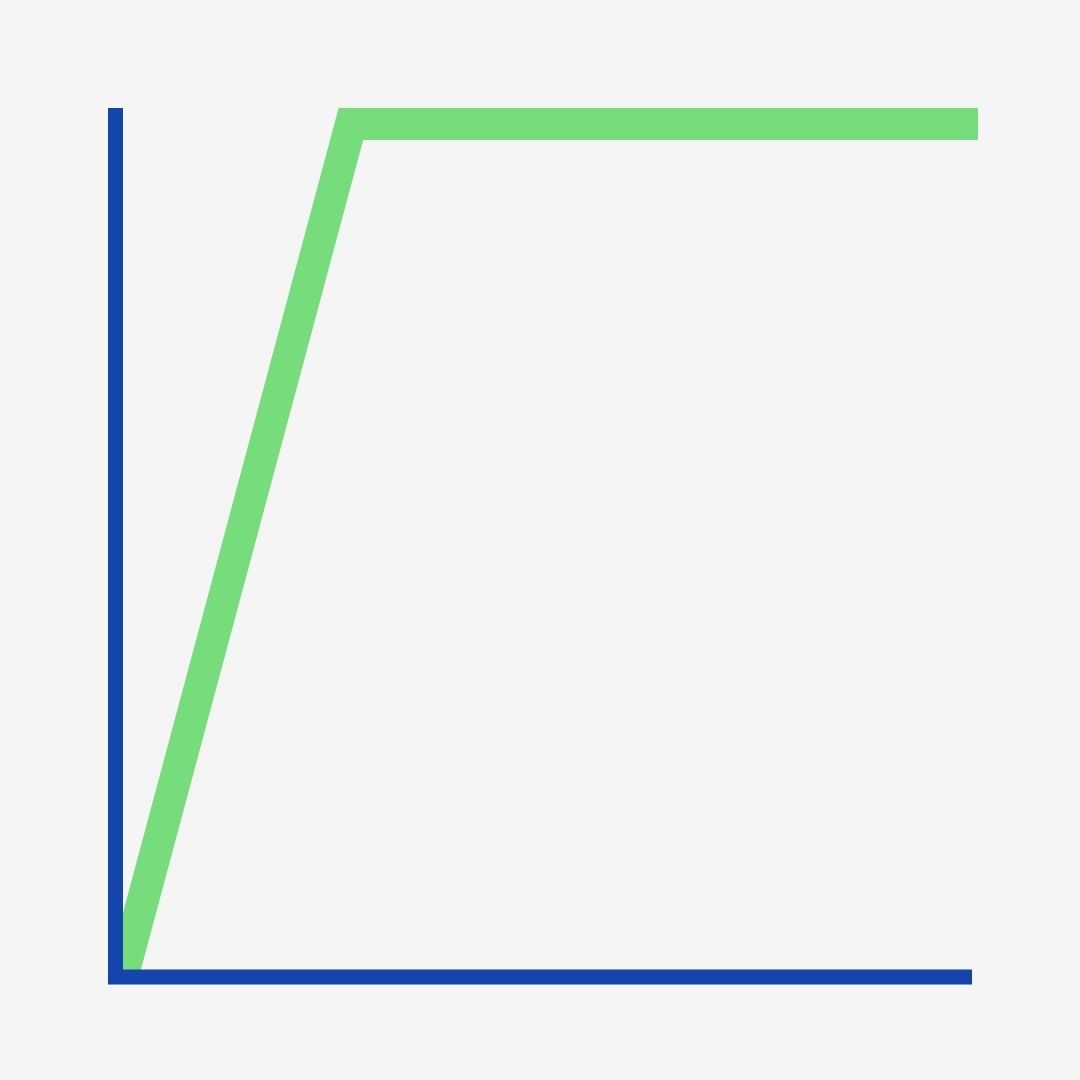
Velocity curve 3 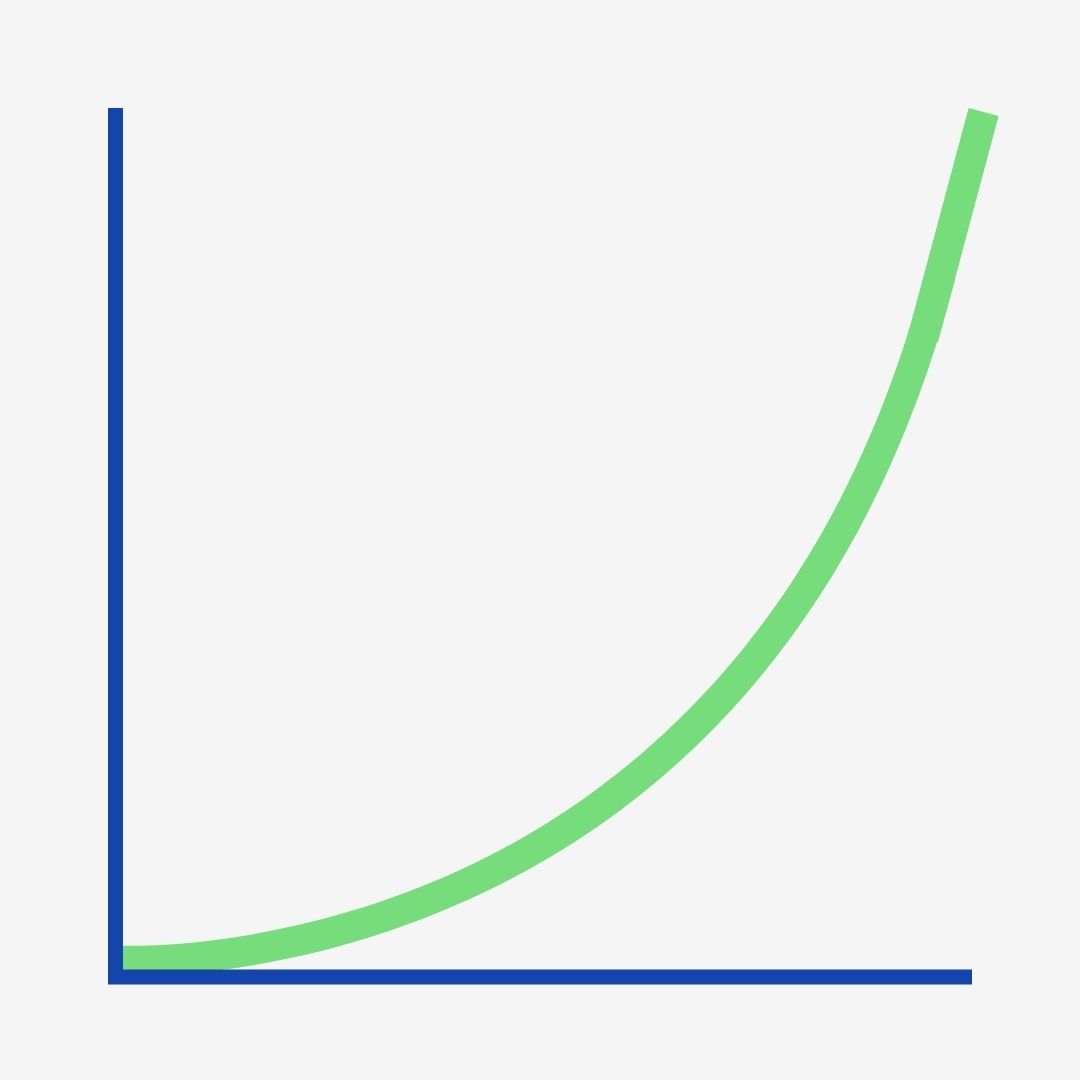
Velocity curve 4
Above are four examples of pre-defined velocity curves.
Velocity curve 1 has an even rise to full velocity. However, velocity curve 2 has a more impactful – harder – rise to full velocity.
Velocity curve 3 is the hardest velocity curve with an almost immediate rise while the final curve has the slowest rise of them all, making it the softest velocity curve.
Choosing a soft velocity outputs softer notes no matter how hard you press a key. In contrast, a harder velocity outputs a hard note no matter how soft you press a note.
In summary, we can use velocity curves to manage the loudness of our output.
MIDI Polyphonic Expression (MPE)
MIDI Polyphonic Expression (MPE) is a more recent set of MIDI protocols that allows virtual instruments to behave closer to their acoustic counterparts.
Not yet a universal feature on all controllers, MPE’s goal is to allow players to have the same spontaneous expression that they could have on real instruments.
For example, we can physically modulate the timbre, pitch, and amplitude of a sound at once as we can on a string instrument.
Different types of MIDI controller knobs
Knobs that have a 360-degree rotation are known as encoders. These knobs have an “endless” range.
But knobs that have a 270-degree rotation are known as pots (potentiometers).
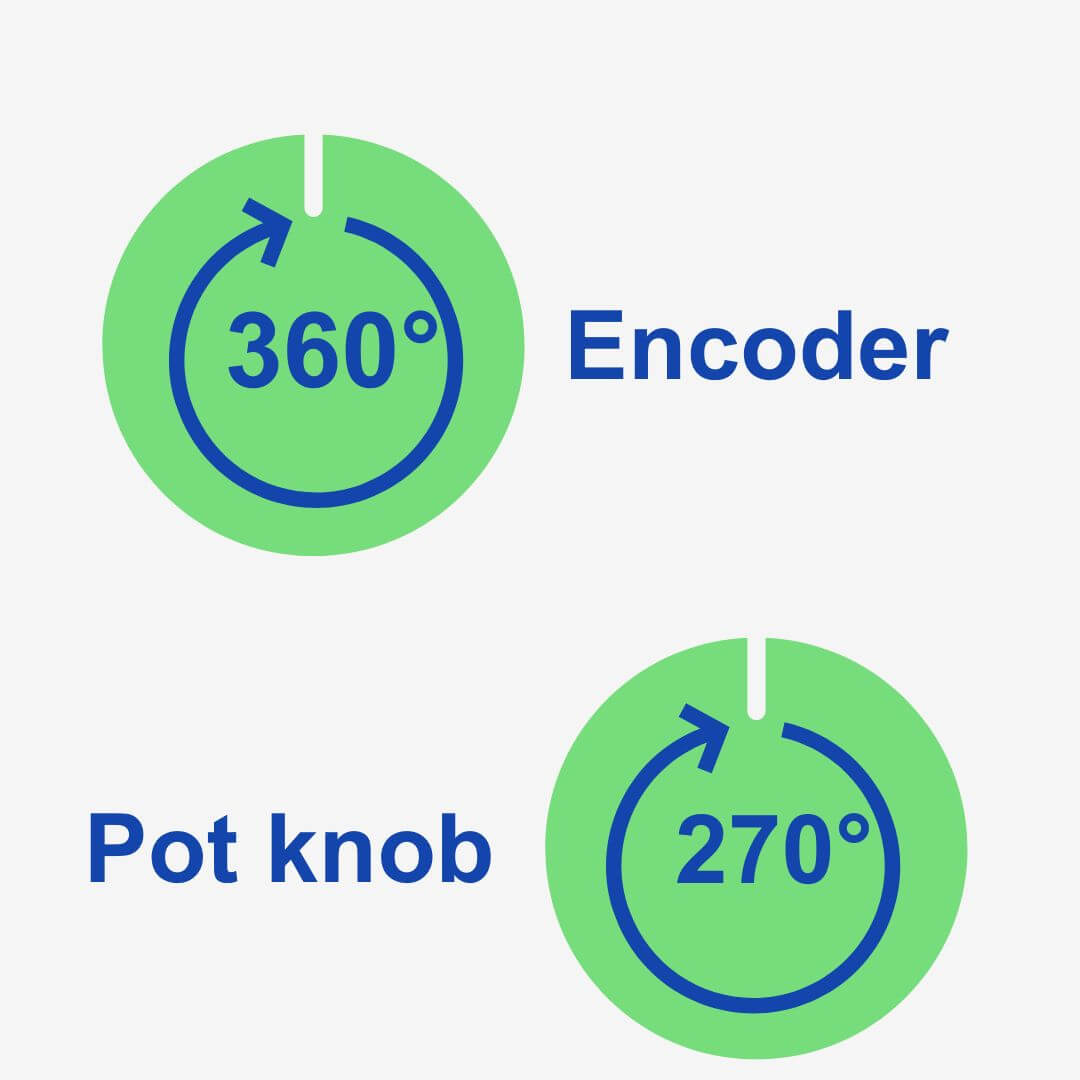
Encoder knobs, having endless rotation, allow for more creative freedom when adjusting parameters on a virtual instrument.
Potentiometers are equally useful, but endless encoders are far less restrictive when adjusting macros and other settings.
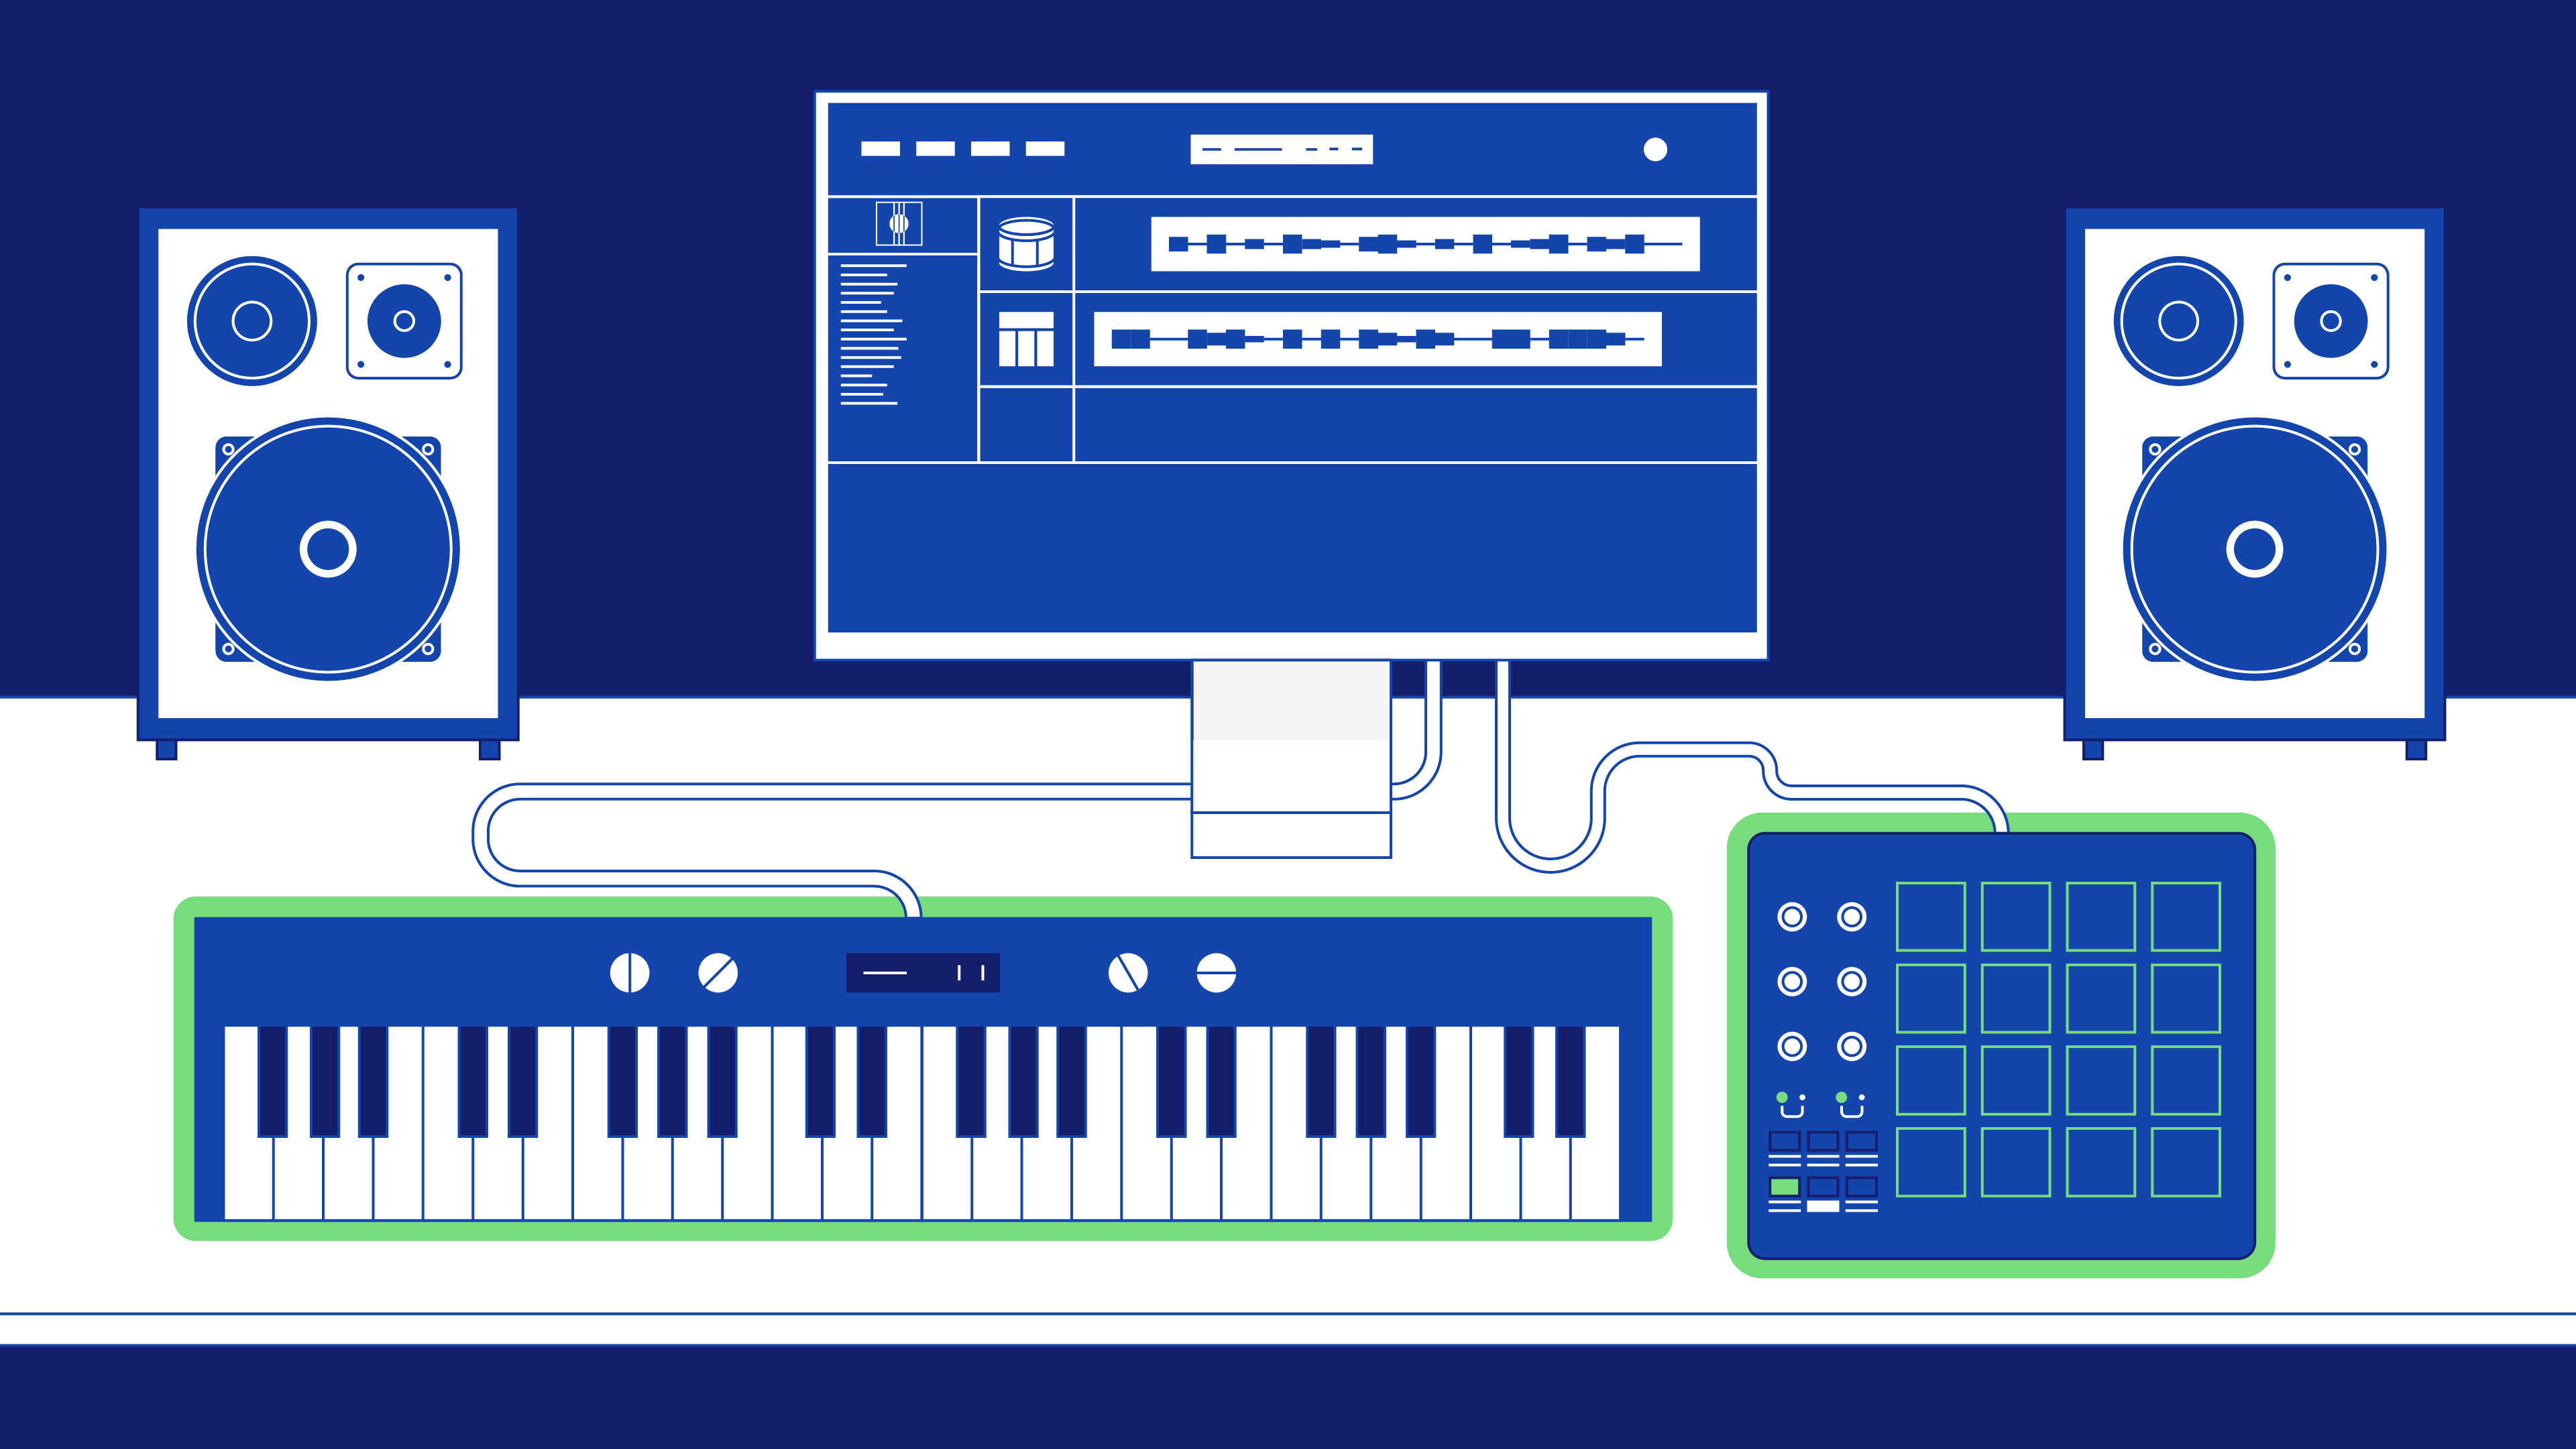
How to create a MIDI signal chain
So far we have discussed MIDI in the context of a simple setup made up of a computer and one MIDI controller.
But MIDI allows us to create an entire signal chain of MIDI-enabled equipment like synthesizers, sequencers, and drum machines that can communicate with one another.
Therefore we can include two or more pieces of MIDI-enabled hardware in one setup. Here’s how it works…
MIDI channels
Because MIDI can coordinate musical gestures between multiple instruments at once through a single connection, a way of organizing those communication channels is necessary.
There are a total of 16 communication channels per stream of MIDI data, and they’re called MIDI channels.
We allocate one MIDI channel to either send or receive MIDI data for each device in our MIDI signal chain.
Therefore, MIDI channels are a critical element when connecting multiple MIDI devices into one signal chain.
MIDI Ports: MIDI In, Thru, and Out
MIDI ports allow us to connect our MIDI devices together, and MIDI information travels in one direction per MIDI port.
So when connecting our MIDI signal chain, there are three ports available to us.
- MIDI In
The MIDI In port receives MIDI information. - MIDI Out
MIDI Out sends MIDI information. - MIDI Thru
This final port sends the same MIDI information to multiple devices.
MIDI Thru allows us to control all 16 MIDI channels with different devices allocated to them at once.
In practice, we’d connect the MIDI Thru of one device to the MIDI In of the next device in the chain. As a result, we’re duplicating the MIDI data and sending the copy down the signal chain.
But in a simpler setup, we must connect the output of the device sending MIDI information to the input of the receiving device.
DIN MIDI cables vs USB Type B cables
As we discussed earlier, we need a USB Type B cable to connect a MIDI controller to a computer.
But we need a different kind of cable to send MIDI data from one MIDI device to another via In, Out, and Thru MIDI ports.
5-pin DIN cables allow us to connect our MIDI devices together with In, Out, and Thru ports.
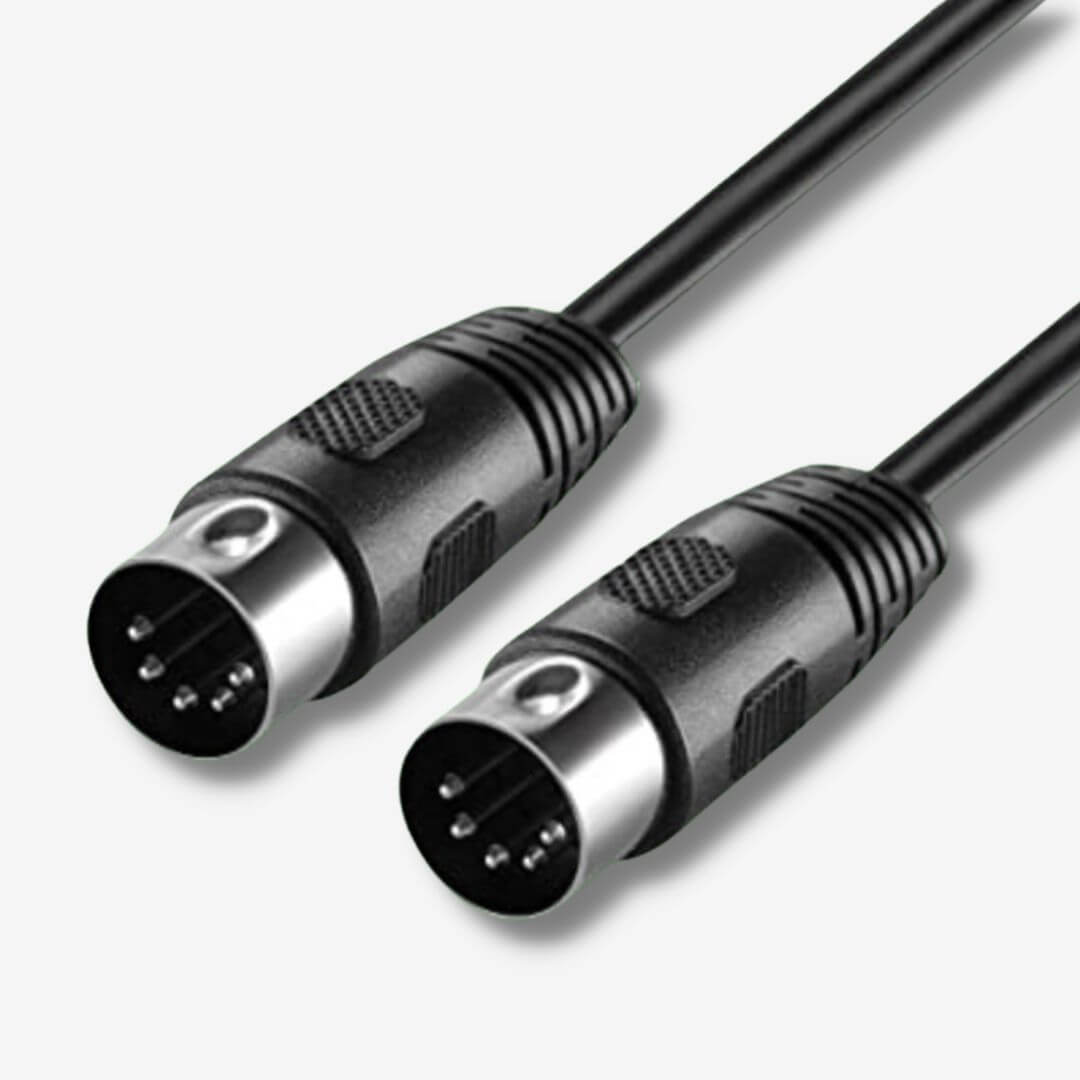
These cables transport MIDI messages between devices that instruct each device how to behave.
However, to connect our MIDI signal chain to our computer we need a MIDI interface that can act as the middle man.
MIDI interfaces
Finally, we need an audio interface with DIN MIDI ports to connect our MIDI signal chain to our computer.
These allow us to send MIDI information in and back out out of our computer via our interface’s USB connection.
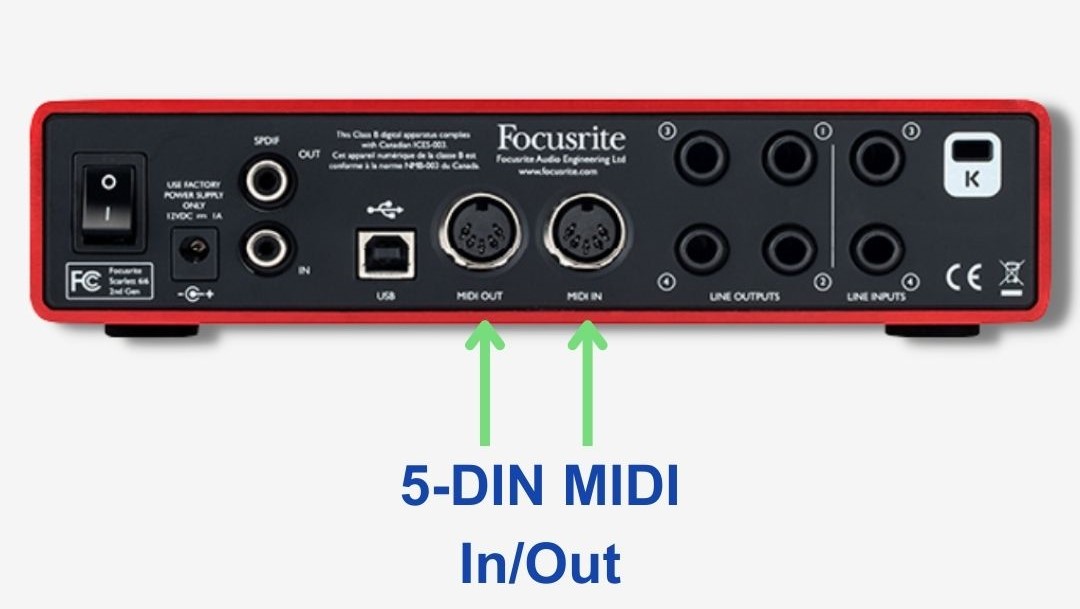
As a result, a MIDI interface is a perfect companion when working with external MIDI hardware.
Whether we’re connecting a synth, a sequencer, a drum machine, or all of the above, a MIDI interface becomes the central communication hub between all of our MIDI devices.
MIDI 2.0 vs MIDI 1.0
Back in 2020, MIDI got a huge upgrade.
Though everything we have discussed is still relevant to today’s MIDI controllers, the MIDI 2.0 spec was released after 40 years of MIDI 1.0 allowing musicians like you & I to bring our ideas to life.
The fact that MIDI 1.0 was unaltered for so long speaks volumes about the creative power it offers musicians.
However, some clever computer people from companies like Apple, Google, Native Instruments, and Ableton upgraded MIDI into more of a powerhouse!
MIDI 2.0 reduces setup time
With MIDI 1.0 devices, communication goes one way – from the controller to the computer.
This means that we have to “activate” the controllers by manually setting the MIDI channel that the controller communicates with the computer through.
But MIDI 2.0 has bidirectional communication that allows our computer and controller to communicate in a two-way conversation (if you will) and it’s an automated process.
Therefore, the first major upgrade that MIDI 2.0 brings is auto communication between devices.
This all works via a MIDI 2.0 communication process called MIDI CI (capability inquiry).
Check out the diagram below to see the automatic communication processes in MIDI 2.0.
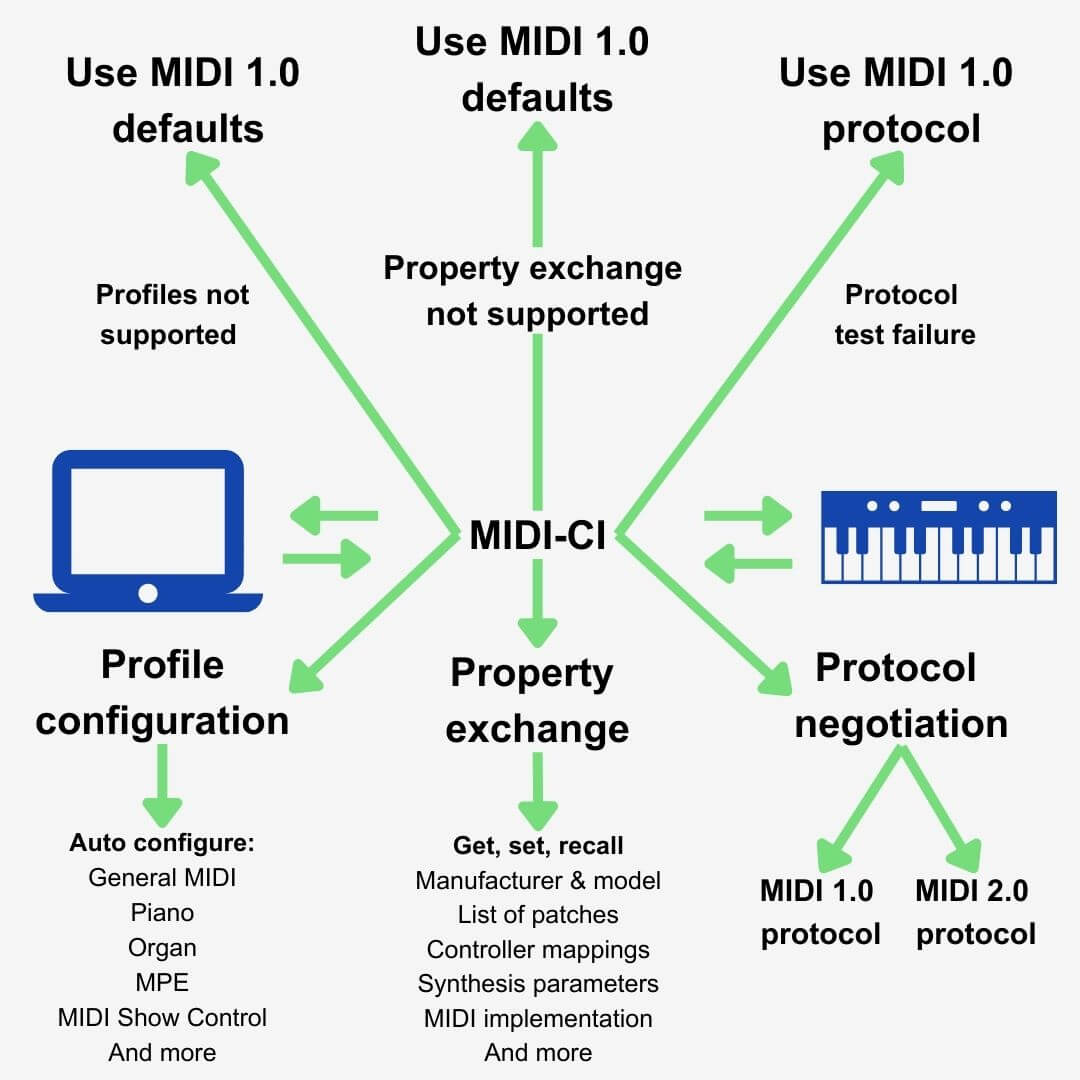
Another of these communication processes is Protocol Negotiation.
Protocol Negotiation is actually the first protocol that a MIDI 2.0 device carries out, determining whether a connected device has is a MIDI 1.0 or 2.0 device.
And if the connected device only has MIDI 1.0 capabilities, our 2.0 device will communicate as a 1.0 device.
In addition to Protocol Negotiation, MIDI 2.0 devices undergo Profile Configuration.
To combat the time taken to set up our controller in our DAW, assign its features to corresponding knobs and faders in our software, and the rest… MIDI 2.0 does all of this automatically!
If we’re using a mixer control surface, 2.0 will automatically configure our hardware towards our DAW mixer and you can jump straight in and start making music!
Finally, this means our control surface is automatically configured to any plugins that you can use its faders, knobs, and buttons with too.
MIDI has more MIDI channels
As discussed earlier, MIDI 1.0 has 16 MIDI channels.
But MIDI 2.0 has a whopping 256 MIDI channels!
Compared to MIDI 1.0’s 7-bit, MIDI 2.0’s 32-bit resolution also makes complicated communication much more efficient.
In fact, the parameter limits of MIDI 2.0 are in the 1000’s.
As we discussed earlier, MIDI 1.0 has a parameter limit between 0 – 127. Therefore, we can make much more expressive adjustments to instruments with knobs and faders on on our MIDI controller.
Universal data transfers with MIDI 2.0
Up until now, musicians on Apple systems have needed adapters to utilize MIDI controllers in their creative process.
Now, finally, MIDI packets are now universally transportable across USB, Apple’s Lightning Bolt, ethernet, and any other means of digital transport!
As a result, we can utilize ‘plug and play‘ functionality with our MIDI controllers at any time, anywhere!
What can you do with a MIDI controller? FAQs
Rather than using our mouse and keyboard to search for instruments and effects or enter musical notes and DAW commands, MIDI controllers provide a physical interface to do all of this.
In other words, MIDI controllers allow you to control software instruments and DAW parameters with physical buttons, faders, and knobs.
Are MIDI controllers necessary for making music?
No, MIDI controllers aren’t necessary for music production.
But a MIDI controller will simplify our workflow, making music production all the more enjoyable for you.
As a result of a streamlined workflow, our home studios have more of a professional edge too!
Why use a MIDI controller?
MIDI controllers are so popular for a multitude of reasons.
Firstly, MIDI file sizes are much smaller than audio files like WAV files. Therefore computers can process them faster with very low latency.
Secondly, MIDI files allow you to interact with the music we’re making. With a controller, you can physically play those melodies and chords in our head and record them in our DAW.
Finally, a MIDI controller allows you to navigate through our DAW seamlessly. No longer would you need to use our computer mouse and keyboard for almost anything!
For example, MIDI controllers allow you to control the volume of channels, channel panning, effect parameters like wet/dry, resonance, attack and release times, and many more.
You can find the full list of mappable parameters at the end of the article!
A time before MIDI controllers
Before MIDI, musicians played multiple instruments and then had to go through endless recordings until they got it just right.
This sounds like it could take days, right? It did!
MIDI was created to allow musicians to control more than one electronic instrument with a singular keyboard.
This allowed them to manipulate and control sounds from various instruments in one place. MIDI is an innovative tool that has saved a lot of people a lot of time!
Due to these revelations, people could create music at home – rather than pay an arm and a leg to hire a recording studio.
Though music production was and is fairly expensive to get into, it’s now much more accessible because of MIDI and digital audio in general.
Final thoughts: the future of MIDI
Before MIDI came to be, music production could often be a little more tedious. With MIDI, we can control more than one electronic instrument with just one controller!
Digital audio and thus MIDI 1.0 allowed people from all over to make music anywhere at any time.
And MIDI 2.0 has been a welcome upgrade to what was an already awesome music composition and production tool.
But room has been left for developers to design new MIDI messages in the future. And these can be implemented easily into the MIDI language!
This means that applications for devices that we couldn’t dream of today can be easily used tomorrow inside the MIDI language that we’re comfortable with now.
What are the most common MIDI CC messages?
You can assign certain parameters where a CC message is ‘undefined’ in our software instrument.
- CC#1 = Modulation wheel
- CC#2 = Breath Control
- CC#7 = Volume
- CC#10 = Pan
- CC#11 = Expression
- CC#64 = Sustain Pedal (on/off)
- CC#65 = Portamento (on/off)
- CC#71 = Resonance (filter)
- CC#74 = Frequency Cutoff (filter)
Full list of MIDI CC messages
- CC#0 = Bank Select (MSB)
- CC#1 = Modulation Wheel
- CC#2 = Breath controller
- CC#3 = Undefined
- CC#4 = Foot Pedal (MSB/most significant byte)
- CC#5 = Portamento Time (MSB/most significant byte)
- CC#6 = Data Entry (MSB/most significant byte)
- CC#7 = Volume (MSB/most significant byte)
- CC#8 = Balance (MSB/most significant byte)
- CC#9 = Undefined
- CC#10 = Pan position (MSB/most significant byte)
- CC#11 =Expression (MSB/most significant byte)
- CC#12 = Effect Control 1 (MSB/most significant byte)
- CC#13 = Effect Control 2 (MSB/most significant byte)
- CC#14 = Undefined
- CC#15 = Undefined
- CC#16-19 = General Purpose
- CC#20-31 = Undefined
- CC#32-63 = Controller 0-31
- CC#64 = Hold Pedal (on/off)
- CC#65 = Portamento (on/off)
- CC#66 = Sostenuto Pedal (on/off)
- CC#67 = Soft Pedal (on/off)
- CC#68 = Legato Pedal (on/off)
- CC#69 = Hold 2 Pedal (on/off)
- CC#70 = Sound Variation
- CC#71 = Resonance
- CC#72 = Sound Release Time
- CC#73 = Sound Attack Time
- CC#74 = Frequency Cutoff
- CC#75 = Sound Control 6
- CC#76 = Sound Control 7
- CC#77 = Sound Control 8
- CC#78 = Sound Control 9
- CC#79 = Sound Control 10
- CC#80 = Decay
- CC#81 = Hi Pass Filter Frequency
- CC#82 = General Purpose Button 3 (on/off) Roland Tone level 3
- CC#83 = General Purpose Button 4 (on/off) Roland Tone level 4
- CC#84 = Portamento Amount
- CC#85-90 = Undefined
- CC#91 = Reverb Level
- CC#92 = Tremolo Level
- CC#93 = Chorus Level
- CC#94 = Detune Level
- CC#95 = Phaser Level
- CC#96 = Data Button increment
- CC#97 = Data Button decrement
- CC#98 = Non-registered Parameter (LSB)
- CC#99 = Non-registered Parameter (MSB)
- CC#100 = Registered Parameter (LSB)
- CC#101 = Registered Parameter (MSB)
- CC#102-119 = Undefined
- CC#120 = All Sound Off
- CC#121 = All Controllers Off
- CC#122 = Local Keyboard (on/off)
- CC#123 = All Notes Off
- CC#124 = Omni Mode Off
- CC#125 = Omni Mode On
- CC#126 = Mono Operation
- CC#127 = Poly Mode